PeakSync Guide
Edit your script
Shape the script to your taste — adjust the timing, smooth what you want smoother, and set how strongly it plays.
Generation follows the video. Script Studio is where you make it yours — shape the motion to your taste, and set how strongly it plays.
Editing is free. No credits, no quota, no limit on how many times you save. For a script you will use more than once, twenty minutes here is worth more than generating it again.
1. Open or import a script
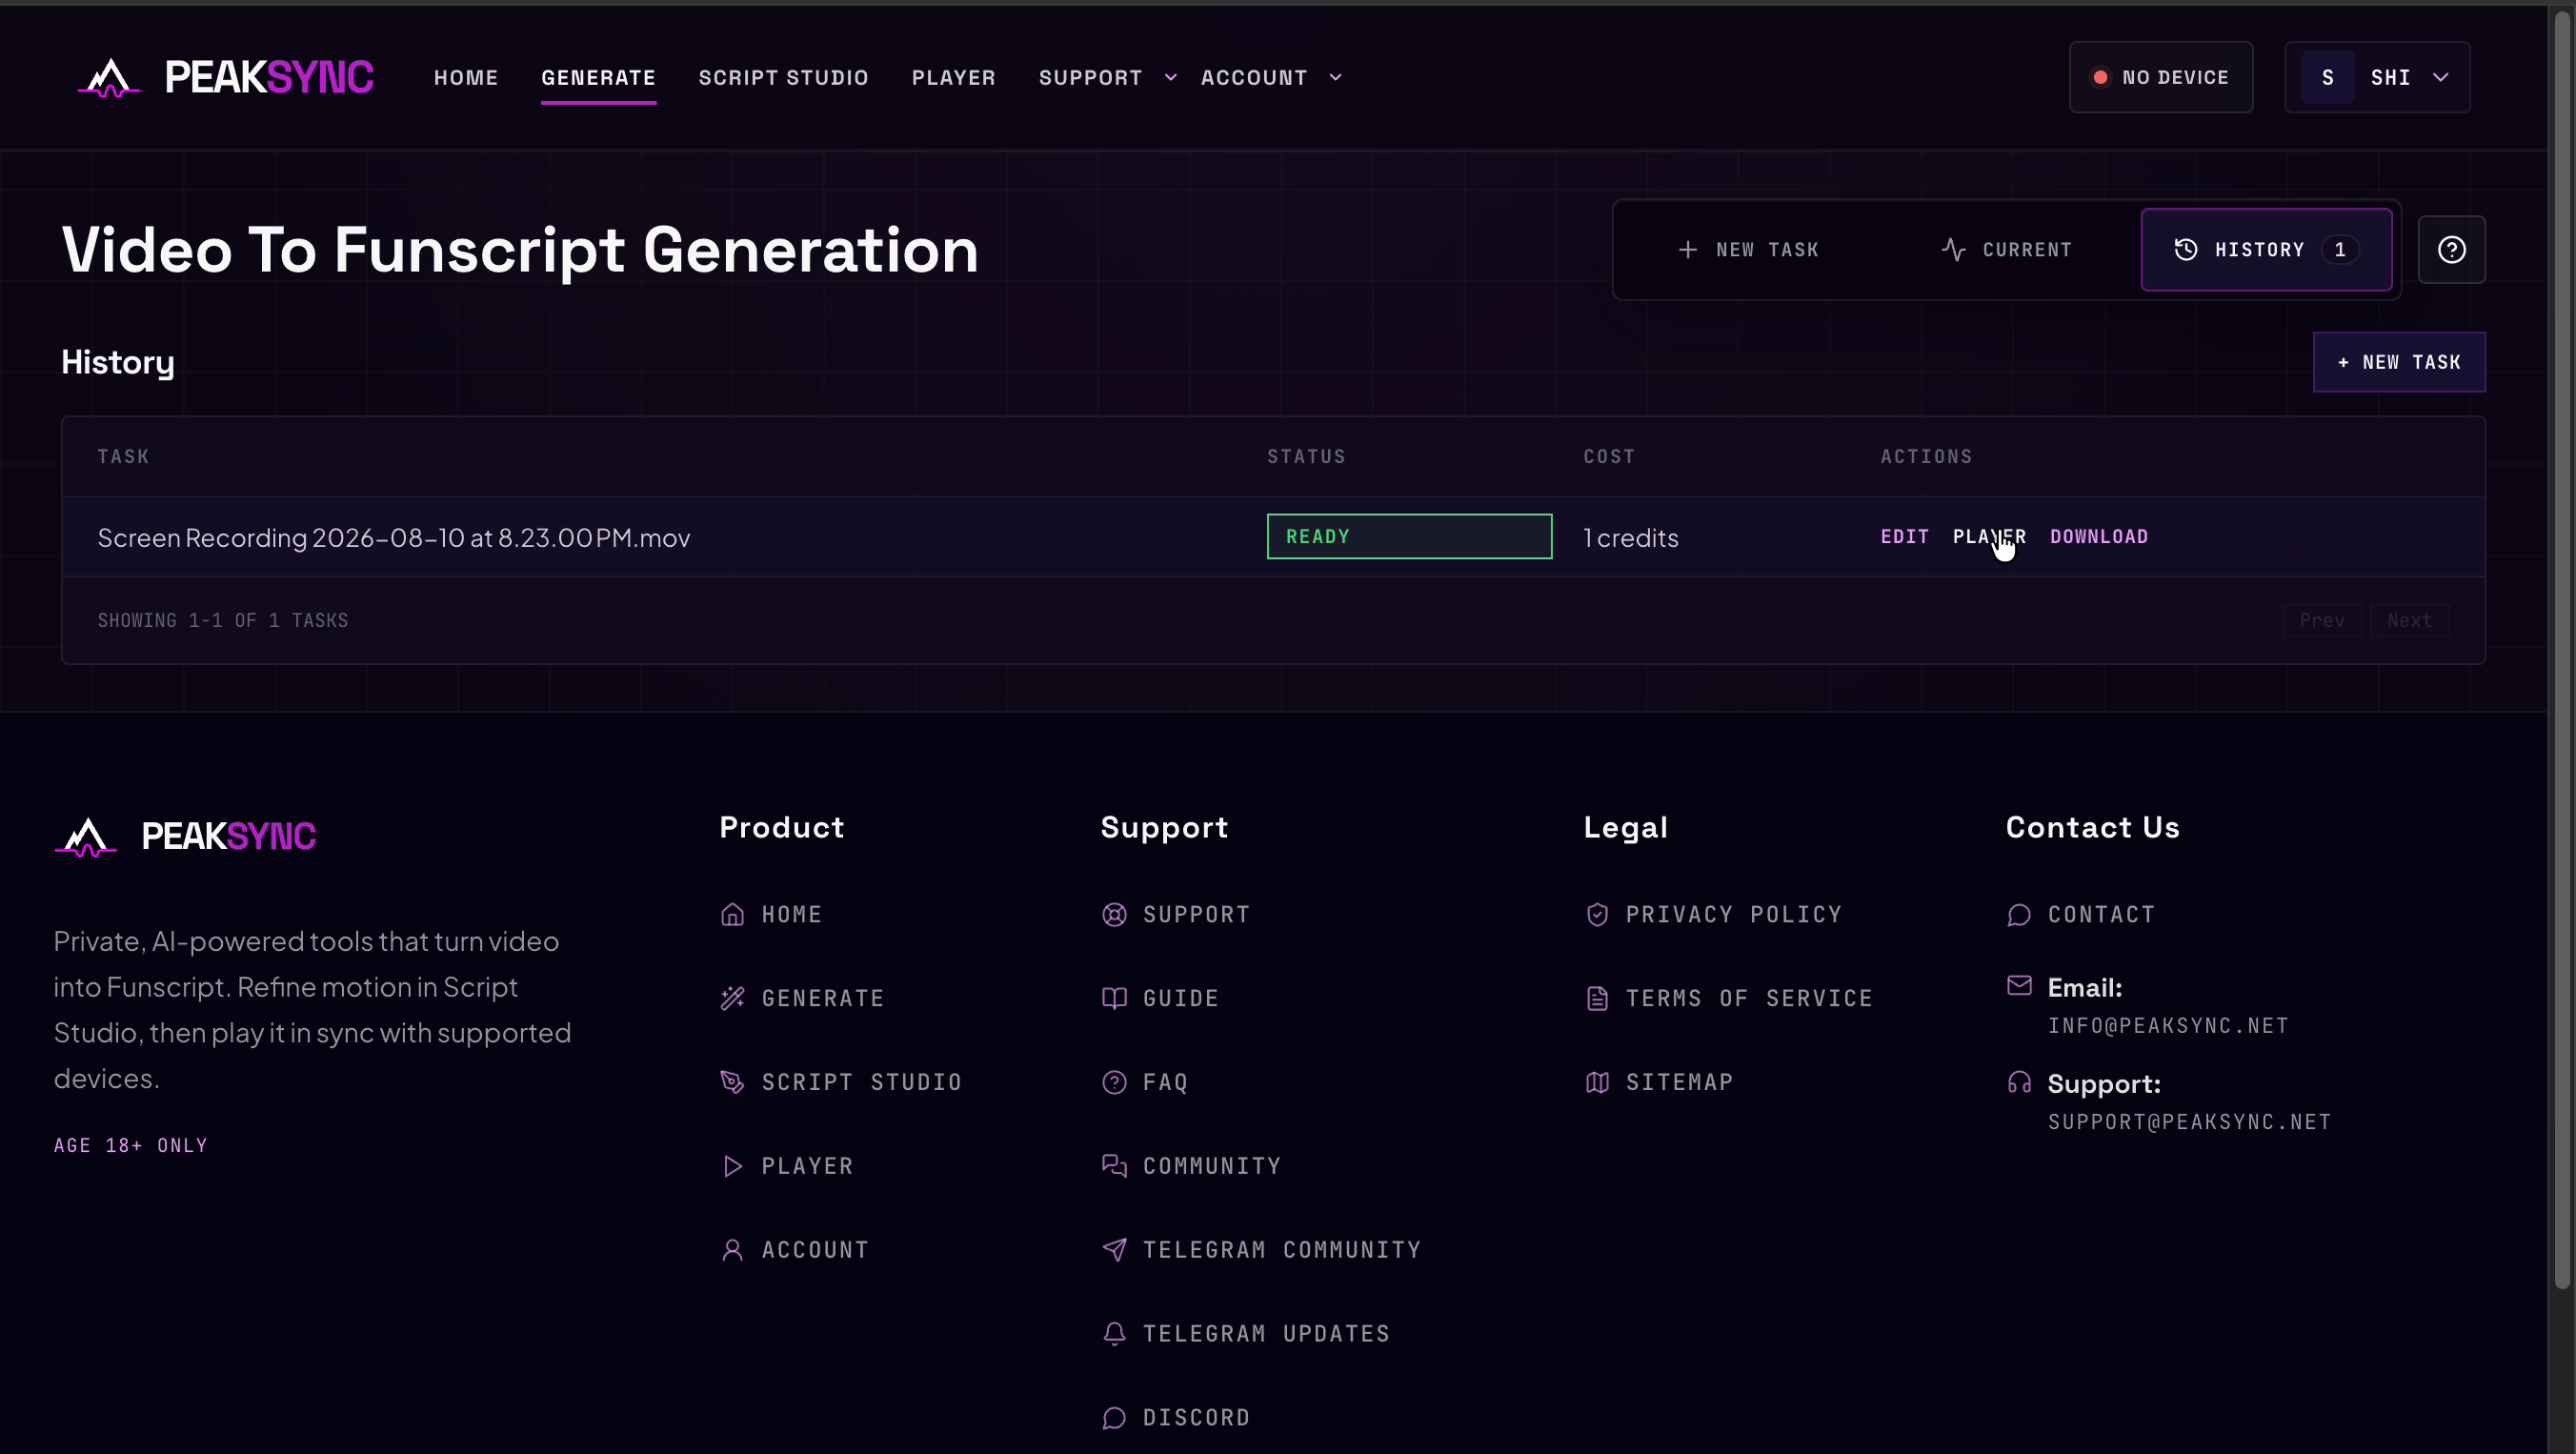
Three ways in:
| From | How |
|---|---|
| A finished task | EDIT in HISTORY |
| A saved script | the edit action in ACCOUNT → SCRIPTS |
| Nothing yet | SCRIPT STUDIO in the navigation, then create or import |

The header tells you what you're holding:
SCRIPT EDITOR · PERSISTED · REV 4—PERSISTEDmeans it's stored on PeakSync's side, andREV 4is which revision you're looking at.SAVED— nothing outstanding. It changes toUNSAVEDthe moment you touch anything.
Saving creates a new revision rather than overwriting the old one, so there's always a trail back.
2. Import video for synchronized editing
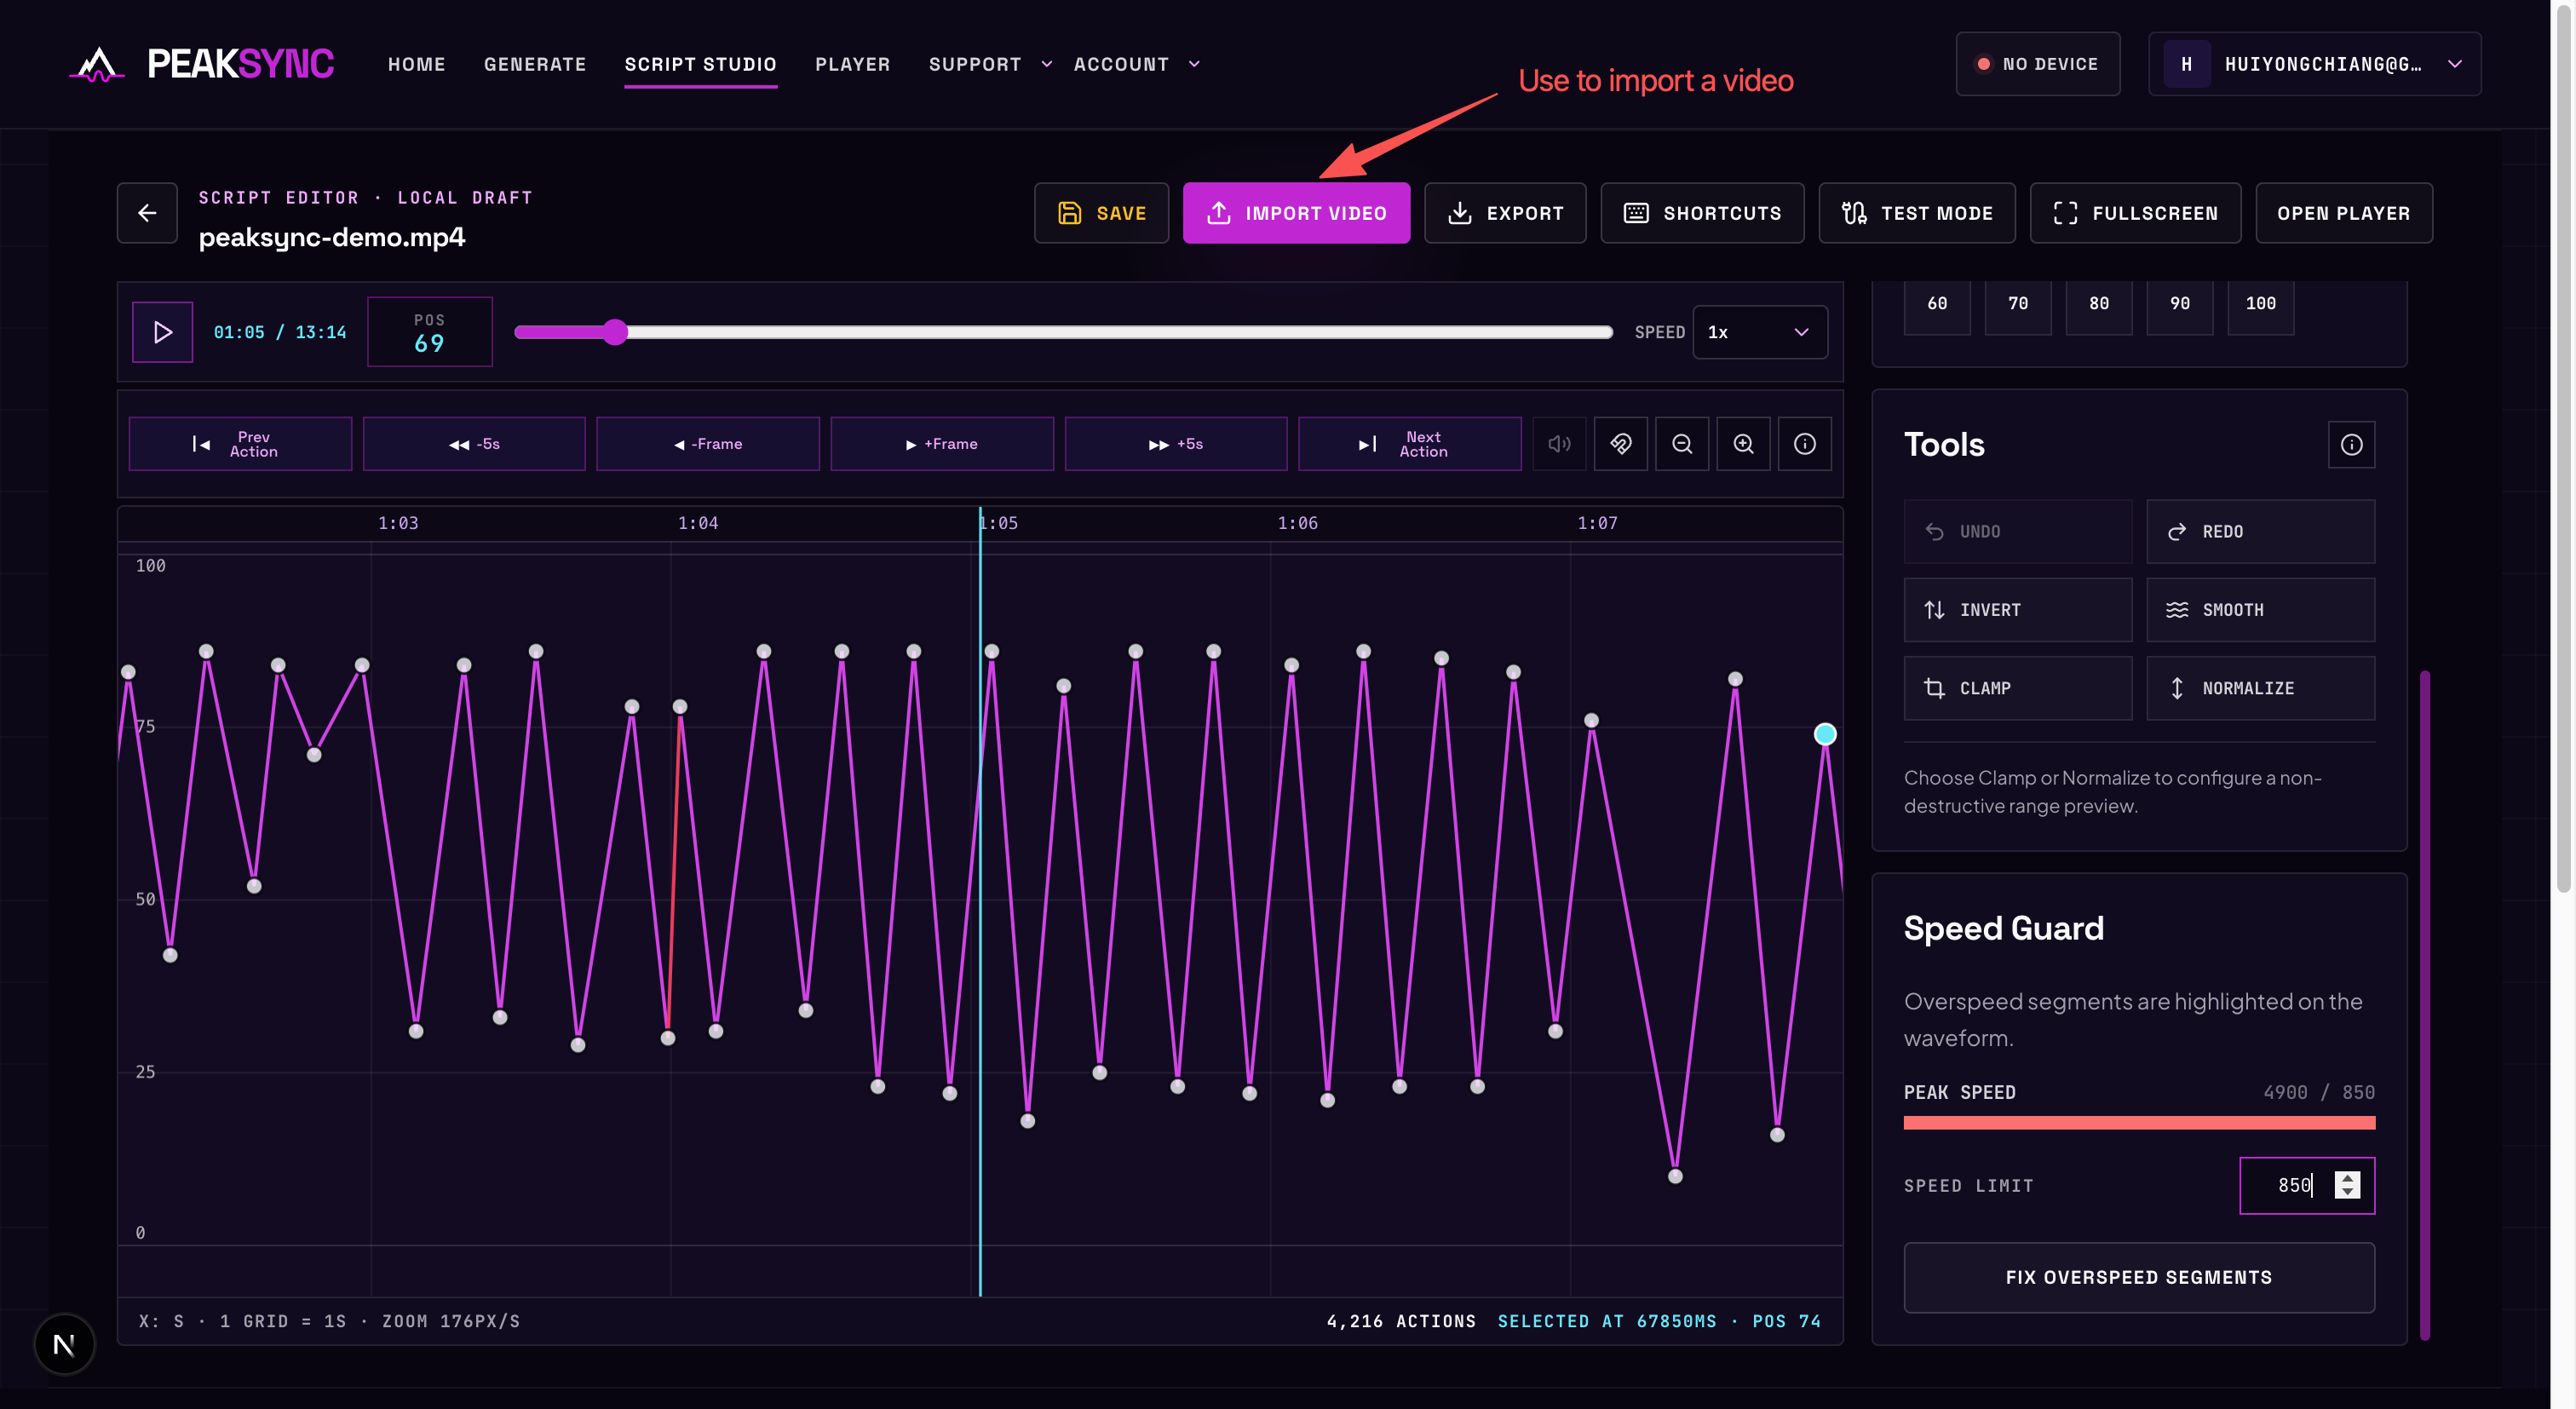
Import the exact video this funscript was made for. Script Studio keeps the video, playhead and script position on the same timeline, so you can compare every action with the frame it belongs to.
Press IMPORT VIDEO in the toolbar, then choose the matching MP4, MOV or WebM from your
computer. Use the same cut that the script follows — a different intro, missing scene or edited
version shifts every moment after the change, even when the rest of the video looks identical.
Once the video appears above the timeline:
- Play or drag the video progress bar to reach the passage you want to inspect. The timeline playhead and live script-position readout move with it.
- Use
PREV ACTION/NEXT ACTIONto land on script nodes, or-FRAME/+FRAMEto compare the motion one frame at a time. - Select a node and adjust it. Click Seek beside Time or press J to bring the video back to that node's exact millisecond so you can check the change against the picture.
If the video's length differs from the script timeline by at least a second, Studio tells you:
Video duration differs from the script timeline. The script duration was not changed.
That message does not block editing. It is a cue to check that you chose the same version; importing a video never stretches, trims or otherwise changes an existing script.
The video stays in this browser. It is not uploaded, added to the funscript or saved as part of a revision. Refreshing, moving to another browser or computer, or clearing this site's data may mean choosing it again. The saved script — its actions, timing and revisions — is unaffected.
3. Read actions and timing on the timeline
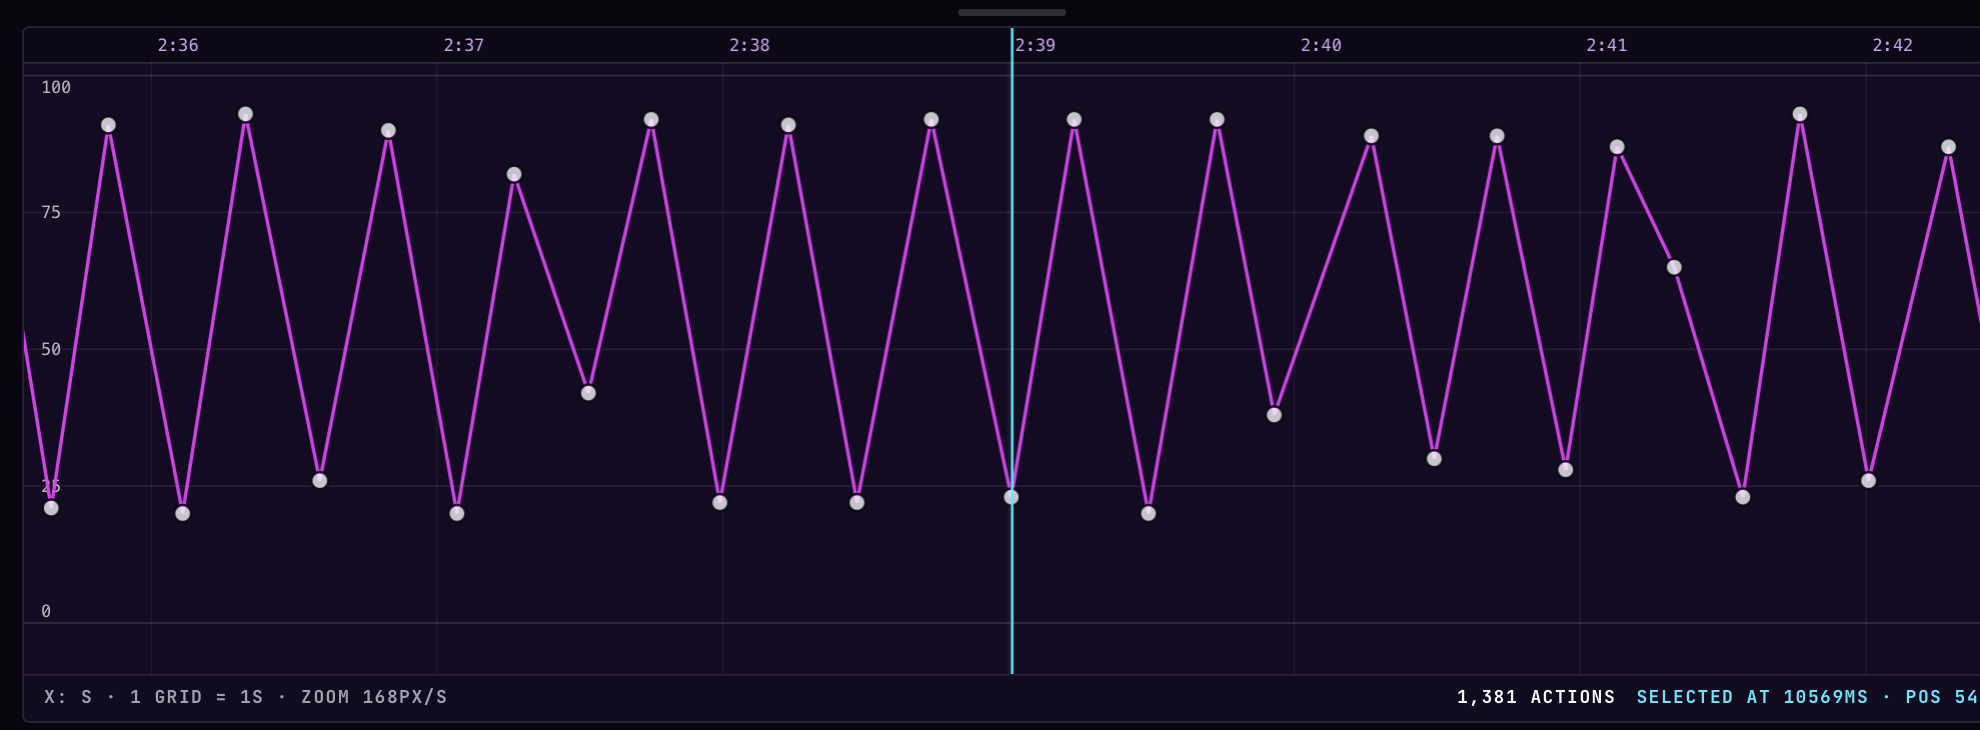
This is your funscript. Each dot is one action — a position from 0 to 100 at an exact millisecond. The line between the dots is the motion your device will follow.
The footer is the part people miss:
X: S · 1 GRID = 1S · ZOOM 168PX/S 1,381 ACTIONS · SELECTED AT 10569MS · POS 54
One grid square is one second, and this 5-minute script holds 1,381 actions.
That number is the whole reason you don't edit dot by dot. You work on passages.
Zoom in to edit individual actions
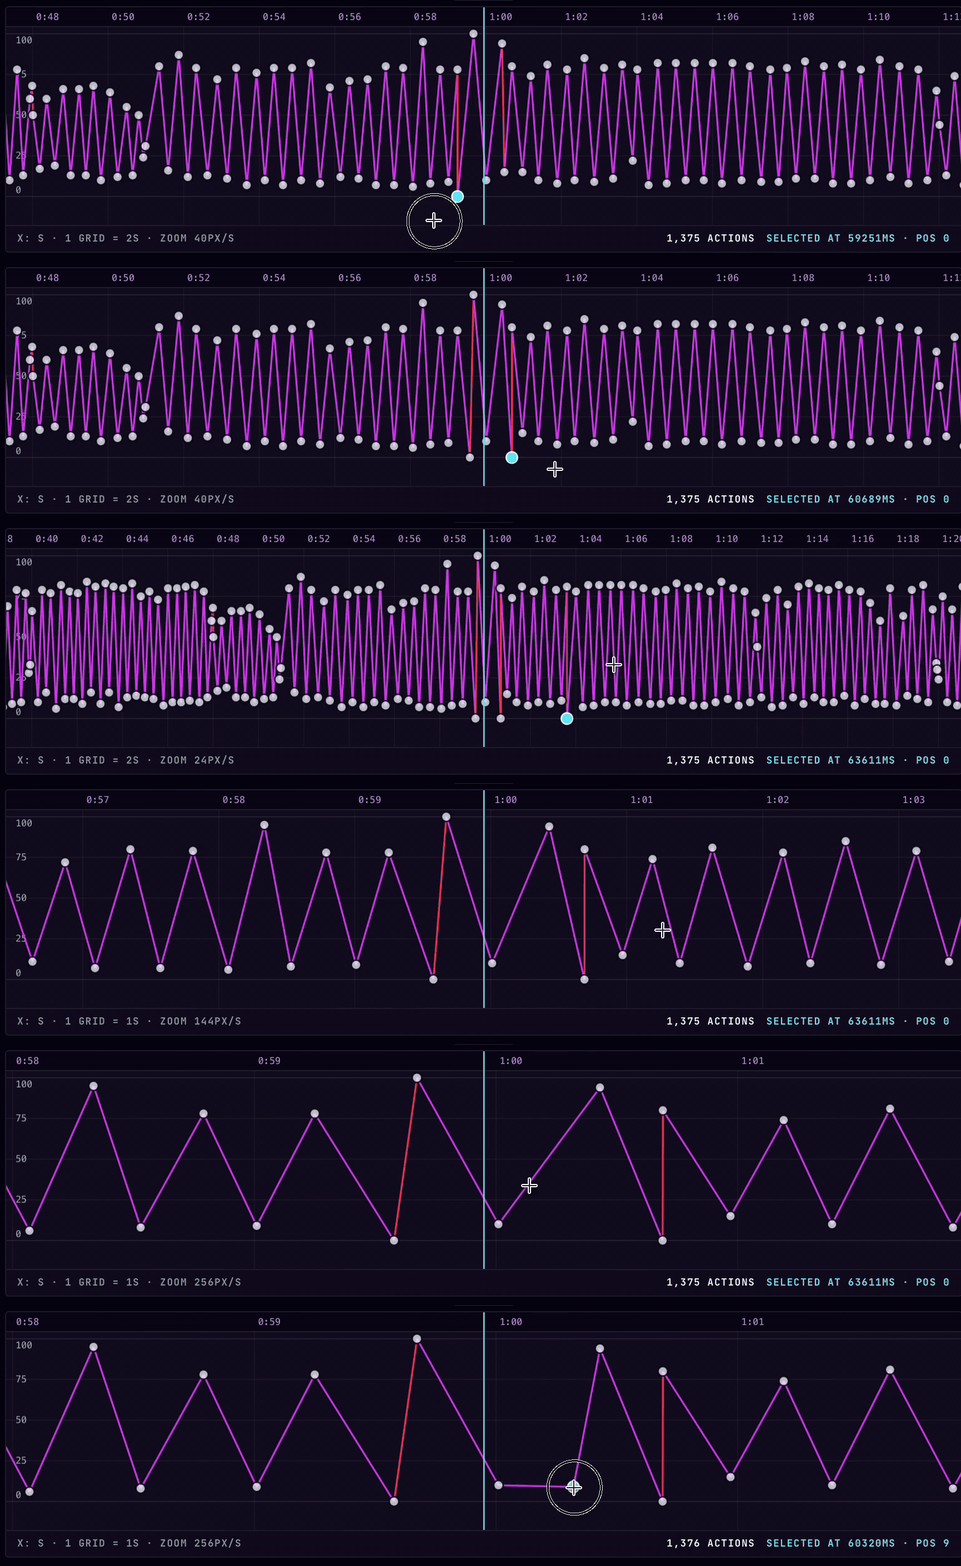
At 40 PX/S the script looks like a solid wall: you can see its shape, but not the individual
actions. Zoom in and the same passage spreads out until every action is a dot you can grab. Watch
ZOOM in the footer rise from 40PX/S to 256PX/S.
The red segments are Speed Guard marking motion above the limit you've set. Learn how to limit script speed with Speed Guard.
4. Navigate with keyboard shortcuts
Clicking through 1,381 actions one at a time is not realistic. Press SHORTCUTS.
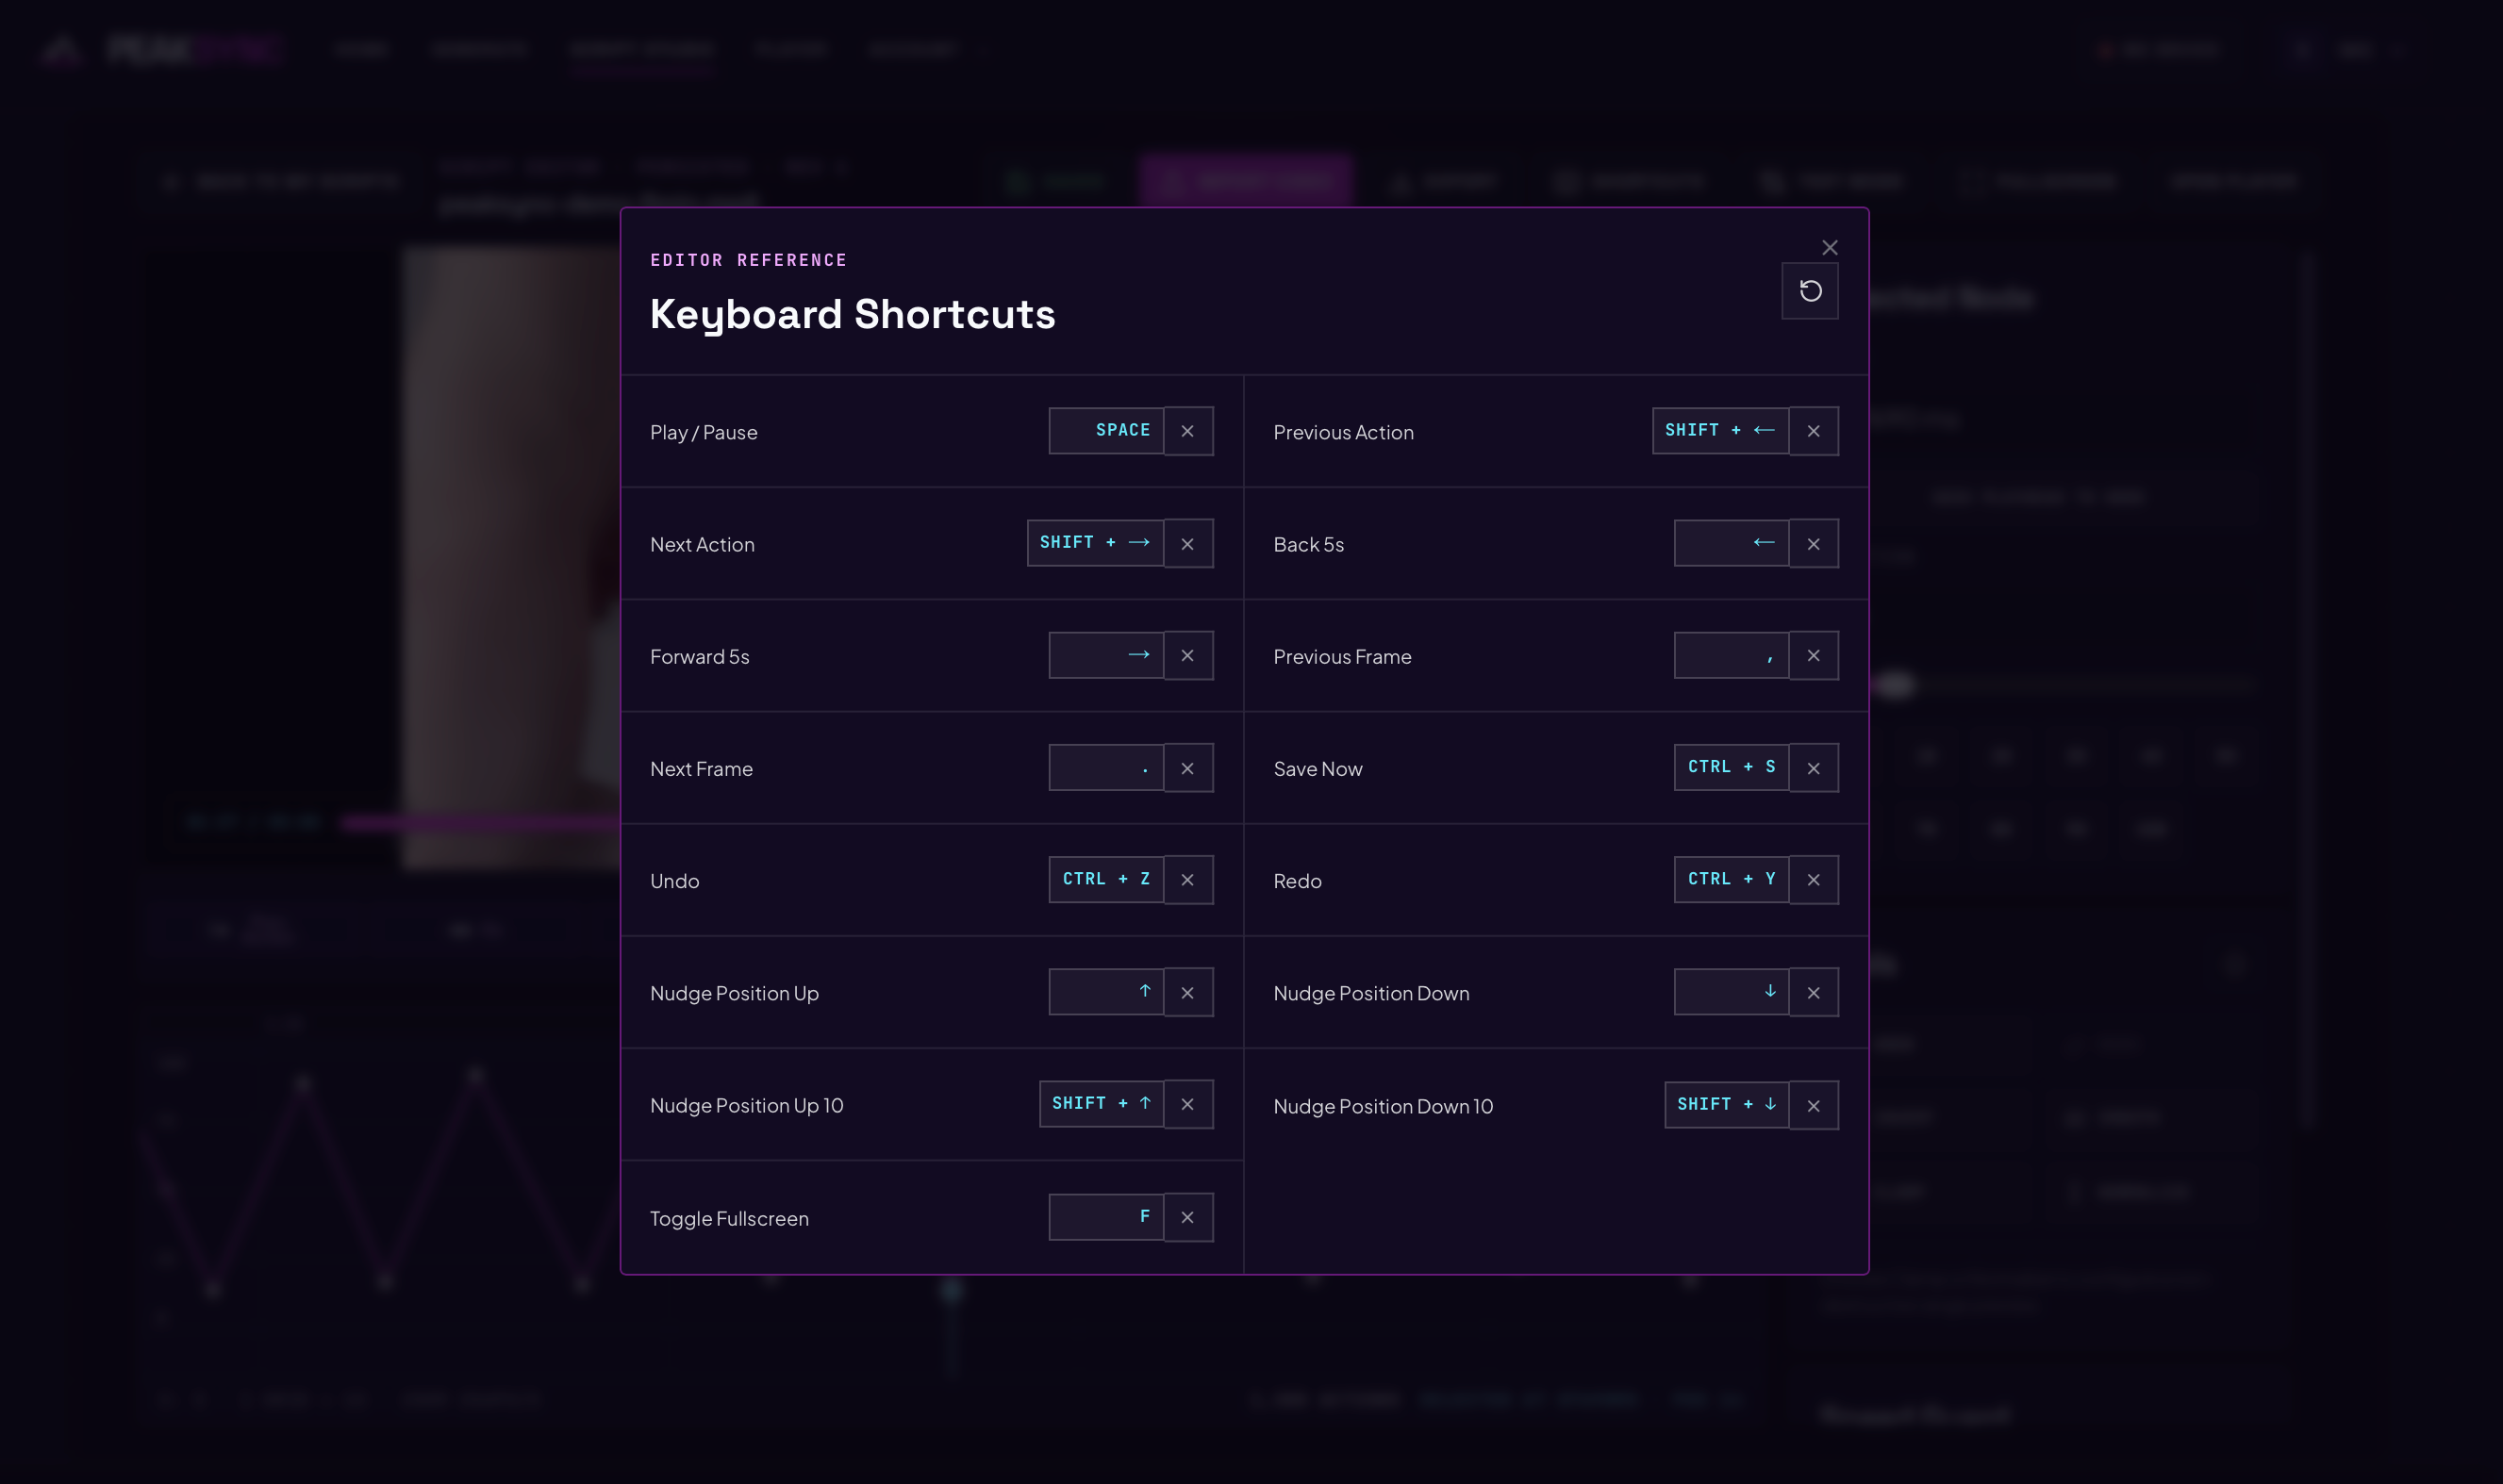
The handful that carry the work:
| Do this | Press |
|---|---|
| Jump to the next / previous action | SHIFT + → / SHIFT + ← |
| Seek the playhead to the single selected node | J (default; configurable) |
| Add or remove a node from the selection | SHIFT / CTRL/CMD + CLICK |
| Select a time range directly on the waveform | LEFT-DRAG empty waveform space |
| Add a time range to the current selection | CTRL/CMD / SHIFT + LEFT-DRAG |
| Insert one or more waveform nodes | Choose ADD NODE, then click empty space |
| Nudge the selected position up / down | ↑ / ↓ |
| Nudge by 10 | SHIFT + ↑ / SHIFT + ↓ |
| Step one frame | , / . |
| Play / pause | SPACE |
| Undo / redo | CTRL/CMD + Z / CTRL/CMD + Y |
| Save | CTRL/CMD + S |
| Deselect without deleting nodes | D (default; configurable) |
Open Repeat fragment (REPEAT) for the selection | R (default; configurable) |
Open Phase Shift (SHIFT) for the selection | P (default; configurable) |
| Apply the active transform preview | CTRL/CMD + ENTER |
| Cancel preview / exit Add node mode | ESC |
Use Ctrl on Windows/Linux or Cmd on Mac.
Jump, judge, nudge — that loop is most of the work. Configurable shortcuts can be reassigned or disabled; the dialog also has a reset button. Esc is a fixed reference, not a reassignable action. In Scale, Esc restores all nodes to before entering the mode, including released drags. During a range drag, it cancels the pending band; while Add node is idle, it returns to Select mode. In Clamp, Normalize, Smooth, Repeat fragment or Phase Shift, it discards the preview. Selection is kept and applied edits are not undone. While recording a shortcut, Esc cancels recording. D performs the Deselect button action and does not fire while typing or in dialogs. During Scale, Clamp, Normalize, Repeat fragment or Phase Shift, D is blocked: apply or cancel the preview first. J runs Seek Playhead to Node when exactly one node is selected, including with the inspector collapsed or in Waveform Focus. It leaves the selection and node positions unchanged and does nothing with no selection or multiple selected nodes. It does not fire while typing, composing text or using dialogs or menus. Reassign or disable it in Shortcuts; the Seek button tooltip follows your current binding. If an older custom shortcut already uses J, it keeps J and the new action starts disabled. In Clamp and Normalize, Undo/Redo changes preview parameters, not saved nodes. A drag or a held arrow key is one local step. Focus a waveform handle and use ↑/↓ for 1, Shift for 10, or Home/End for the legal limits. Ctrl/Cmd + Enter applies the preview as one global Undo step.
R opens Repeat fragment only when a continuous passage of at least two nodes is selected; P opens Phase Shift for one or more continuous selected nodes. Continuous means there are no unselected nodes between the first and last selected nodes. Both shortcuts are configurable in Shortcuts, and their button tooltips show your current binding. They do not open tools while you are typing, composing text or using a dialog or menu. Finish the active preview before opening another. If an existing custom binding already uses R or P, it keeps that key; assign a different key to the new tool in Shortcuts.
The Shortcuts dialog contains the current bindings and searchable function descriptions.
5. Edit a selected node
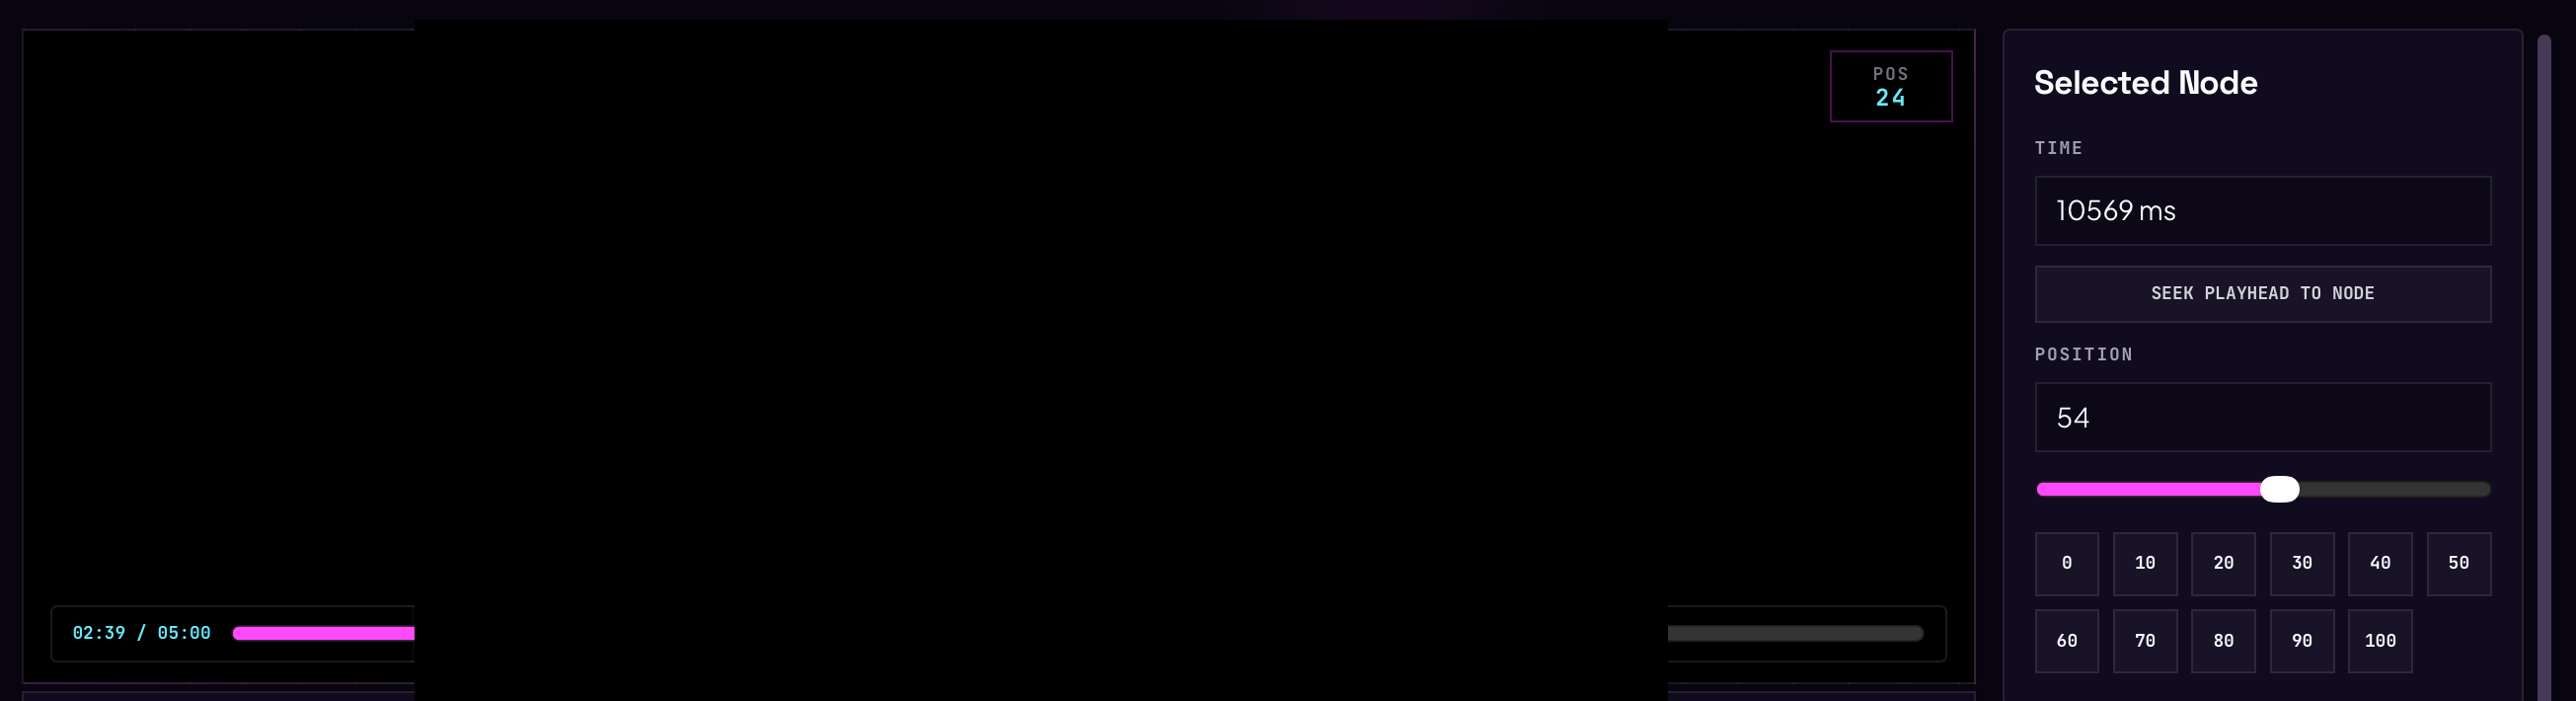
Click a dot and the right-hand panel shows exactly what it is: TIME 10569 ms, POSITION 54.
- The slider and the 0–100 buttons set the position in steps of ten.
- Seek beside Time, or J, moves the playhead and loaded video to that exact moment, so you can compare the stroke with what is happening on screen. That comparison is the only way to judge whether it is right.
- The Seek button uses an arrow pointing to a vertical line. Waveform Focus keeps its four-corner icon and Shift + F shortcut; it changes the workspace layout rather than the playhead time.
(The video pane is blacked out in this guide. On your screen it shows your video.)
5.1 Select a passage directly
The waveform starts in Select mode with the normal arrow cursor. A plain click on any node selects only that node and deselects all others, including when the clicked node was already selected. Dragging a selected node still moves the whole selection; Shift/Ctrl/Cmd-click continues to add or remove individual nodes.
Selection determines which nodes your next edit affects; it does not change positions, timing or Undo history.
- Start on empty plot space and left-drag across a time interval in either direction. On release, Studio replaces the selection with every node between the inclusive time bounds. Starting on a node keeps node selection and movement behavior instead of starting a range.
- For precise boundaries, enter From (ms) and To (ms) in the right inspector, then click Select nodes. Both endpoints are included.
- Choose Add to selection in the inspector to make ordinary drags and numeric submission append to the existing selection. Choose Replace to return to replacement behavior. Overlapping ranges do not duplicate nodes, and gaps between separate ranges are not selected.
| Gesture on the waveform | Result |
|---|---|
| Left-drag empty space | Use the inspector's Replace / Add setting for this time range |
| Ctrl/Cmd or Shift + left-drag empty space | Temporarily add this time range to the selection |
| Shift / Ctrl/Cmd + click a node | Add or remove that individual node |
| Esc during a range drag | Cancel the drag and keep the previous selection |
Release the mouse to finish the selection. Finish or cancel an active Scale, Smooth, Clamp, Normalize, Repeat fragment or Phase Shift preview first. Use Ctrl on Windows/Linux or Cmd on Mac. These mouse gestures are fixed references in Shortcuts, not reassignable single-key bindings.
Add nodes deliberately
Find Add node in the Selection group of the Waveform Edit Bar. Click it to enter a persistent crosshair mode, then click empty waveform space to insert a node at that time and position. You can add several nodes without reopening the tool. Existing-node clicks and drags still select or move nodes. Click Add node again or press Esc while idle to return to the default arrow-cursor Select mode. For a blank draft, activate Add node before clicking the waveform to create the first action.
5.2 Deselect without deleting nodes
Click the bordered Deselect button or press D (the configurable default) to deselect all nodes. Deselect does not delete nodes or change their stored positions or timing. During Scale, selection controls are hidden and the Deselect shortcut is blocked. Choose Apply Scale to keep the result or Cancel Scale to restore the session baseline, then deselect. The Deselect tooltip shows your current shortcut; it does not fire while typing or in dialogs.
With no nodes selected, transforms such as Normalize operate on the entire script. Select another passage before applying a local edit. To delete nodes, use the separate Delete command instead.
There is one Waveform editing help button at the far right of the Transforms group. It opens a single reference containing both Selection & editing gestures and Tools & transforms guidance, including Repeat fragment, Phase Shift and your current shortcuts. The Selection group has no second help button.
6. Use the Waveform Edit Bar
The Waveform Edit Bar sits directly above the waveform and stays available when the right inspector is shown, collapsed or hidden by Waveform Focus. Its groups follow the editing workflow:
| Group | What it contains |
|---|---|
| History | Undo and Redo, always visible |
| Selection | Selected-node status, Add node and Deselect |
| Transforms | Scale, Shift, Repeat, Normalize, Clamp, Invert, Smooth and one combined help entry |
Read the bar from left to right as History → Selection → Transforms. On a wide desktop, transform buttons appear in this order: Scale → Shift → Repeat → Normalize → Clamp → Invert → Smooth → Waveform editing help. As the bar narrows, commands move into More transforms; Scale stays visible at smaller widths than Shift and Repeat. At narrow widths, Transforms contains all seven commands in the same order. Undo and Redo never move into either menu.
| Transform | What it does |
|---|---|
SCALE | Stretches or compresses selected positions directly on the waveform |
SHIFT (Phase Shift) | Moves selected nodes earlier or later and replaces nodes in the destination range |
REPEAT (Repeat fragment) | Adds copies after a selected passage and replaces later nodes in the copied range |
NORMALIZE | Rescales positions to use a target range fully |
CLAMP | Confines positions to a range |
INVERT | Flips every position — 0 becomes 100 |
SMOOTH | Previews continuously adjustable, time-aware smoothing without changing timing |
With no selected nodes, Normalize, Clamp, Invert and Smooth act on the entire script. Scale, Shift
and Repeat require a selection. Select two or more nodes to limit
NORMALIZE, CLAMP or INVERT to them. With one selected node, Scale, Normalize and Clamp are disabled;
use Position or drag the node directly. The sidebar explains: Select at least 2 nodes to use Scale, Normalize, or Clamp.
Whole-script Normalize and Clamp also require at least two nodes. SMOOTH needs at least three selected nodes because the
first and last nodes anchor the selected range.
SMOOTH, CLAMP and NORMALIZE offer a non-destructive preview — configure the result, compare
the original dashed curve with the cyan preview, then Apply or Cancel. Node timing never changes, so
the script stays synchronized with the video.
While a transform preview is open, the Transforms group changes to its Apply and Cancel controls. Smooth opens a compact Context Strip immediately below the edit bar for scope, Smoothness, result and Apply/Cancel. Smooth, Scale, Shift, Repeat, Normalize and Clamp all show the primary Apply action first, followed by the bordered Cancel action. Normalize and Clamp keep their draggable waveform handles; their exact numeric fields remain in the inspector. Finish or cancel a preview before switching transforms, selecting nodes, editing positions or entering Test Mode.
6.1 Smooth abrupt movements without changing timing
SMOOTH reduces rapid changes in motion direction while keeping every node at its original timestamp.
It uses the real time between nodes, so a fast reversal is softened more than the same shape spread over
a longer interval. It does not add, remove or retime actions, so use it when a passage feels too sharp
but is already aligned with the video.
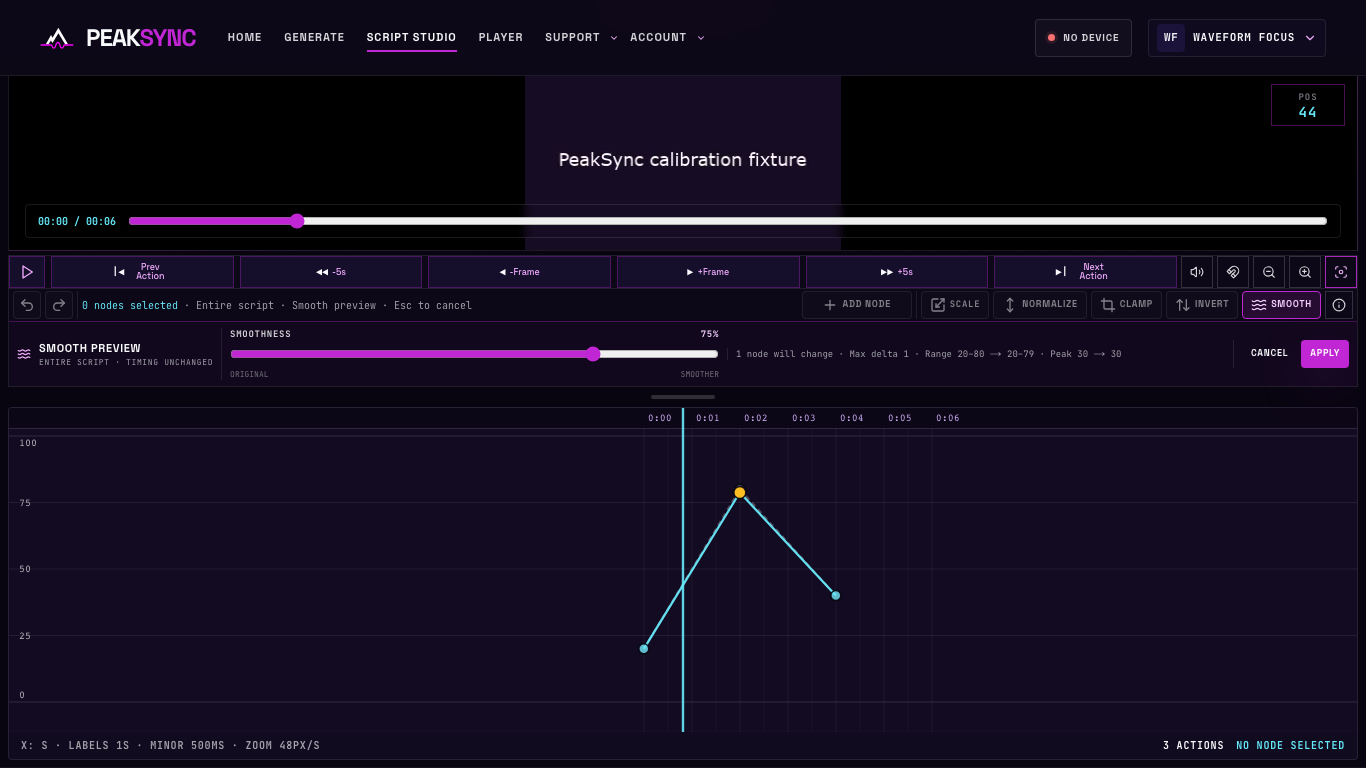
- Choose the scope. Clear the selection to smooth the entire script, or select at least three
adjacent nodes with
SHIFT / CTRL/CMD + CLICKto work on one passage. - Click
SMOOTHin the Transforms group or its responsive menu. The Context Strip opens directly below the edit bar. The original shape remains as a dashed line while the cyan curve previews the result; nothing has changed in the script yet. - Adjust Smoothness from
0to100. A fresh editor starts at50;0is the original curve, and higher values progressively reduce faster direction changes. The value and preview update as you move the slider. Arrow keys change by1, Page Up/Down by10, and Home/End jump to0/100. - Check the number of nodes that will change, maximum position change, position range and Peak Speed. Compare the cyan curve with the video before committing.
- Click
APPLYto save one smoothing pass as a single Undo step, orCANCELto leave the script untouched.CTRL/CMD + ENTERapplies the preview;ESCcancels it.
The first and last node in each continuous selected group stay fixed as anchors. If the selection has gaps, Smooth treats each group independently and never bridges the unselected nodes; groups with fewer than three nodes remain unchanged.
If Smoothness is 0, or the preview says that no node positions change at the current value,
APPLY stays disabled. Increase Smoothness or select a continuous range with an editable interior.
Changing the slider always recalculates from the curve captured when the preview opened, so moving it
back to an earlier value restores that value's exact preview rather than stacking multiple passes.
6.2 Keep positions inside a range with Clamp
CLAMP sets a floor and ceiling for position values. Actions below the Minimum move up to that
boundary, actions above the Maximum move down to it, and everything already inside the allowed range
stays exactly where it is. Timestamps and the number of actions do not change.
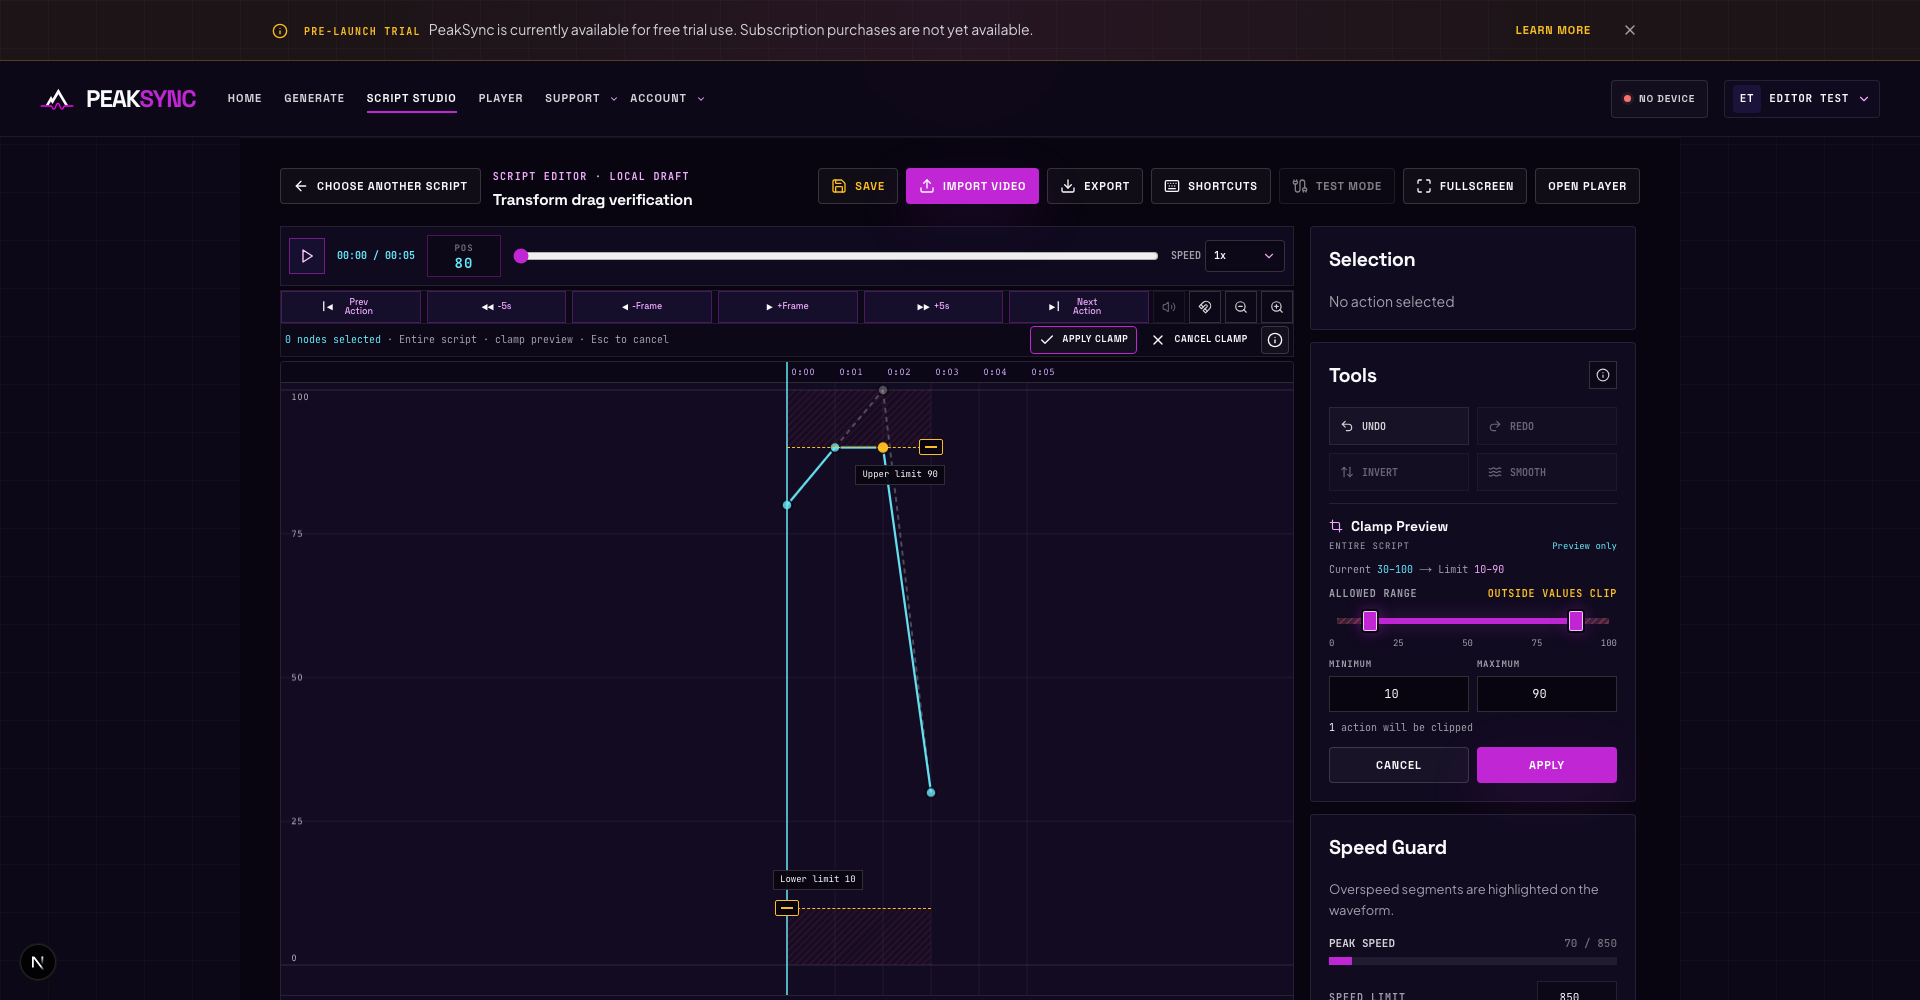
- Choose the scope. Deselect to clamp the entire script (at least two nodes), or select two or more nodes
with
SHIFT / CTRL/CMD + CLICKto limit the change to those exact nodes. - Click
CLAMP. Every preview starts with limits equal to Current, the lowest and highest positions in the current scope. Opening alone changes nothing. After adjusting the limits, a line such asCurrent 72–96 → Limit 10–90compares the original positions with the requested limits. Canceling discards trial values; reopening recalculates Current instead of remembering earlier limits. - Drag the two handles or enter integer Minimum and Maximum values from 0 to 100. Minimum must be at or below Maximum (a flat multi-node scope starts with equal bounds). The fuchsia rail is the allowed range; the striped outer zones are the values that will be clipped.
- Compare the original dashed curve with the cyan preview. Changed actions appear in amber, and the panel reports how many actions will be clipped. You can also drag the amber limit handles directly on the waveform. The sidebar stays in sync. Bringing a limit back restores original values, because every preview uses the same frozen source. Stripes mark clipped zones only over selected runs, not gaps in a sparse selection.
- Click
APPLYto commit the preview as one Undo step, orCANCELto leave the script untouched.CTRL/CMD + ENTERapplies the preview;ESCcancels it.
For example, with a 10–90 range:
| Original position | Result |
|---|---|
5 | 10 |
55 | 55 |
96 | 90 |
If Minimum and Maximum are equal or reversed, Studio shows an error and disables APPLY. If all
positions in the scope are already inside the requested range, it shows No actions require clamping and also leaves APPLY disabled, so no empty Undo step or unsaved revision is created.
Clamp is different from NORMALIZE: Clamp preserves every value already inside the range, while
Normalize proportionally remaps the whole selected position range to new boundaries. Use Clamp when
you want hard safety limits without reshaping the motion between them.
6.3 Stretch a visible selection directly
Use SCALE when you want to make a selected passage taller or shorter directly on the waveform.
Select at least two nodes with different positions, then click SCALE in the timeline utility
controls. Use direct range selection to choose the passage first.
Studio draws an envelope around the selected time and position range. Scale stays disabled for an
empty selection, one node, or nodes that all have the same position; it never falls back to the entire script.
- Drag the Upper handle to change the maximum while keeping the current minimum fixed.
- Drag the Lower handle to change the minimum while keeping the current maximum fixed.
- Focus a boundary handle and use
ARROW UP / ARROW DOWNfor one-unit adjustments, addSHIFTfor ten units, or useHOME / ENDto reach the valid boundary. - Release a handle to update the preview. Apply Scale applies the whole session as one Undo step.
CTRL/CMD + ENTERapplies the same action. Cancel Scale orESCrestores all nodes to before entering Scale, even after releasing multiple drags. - Apply Scale stays disabled until the preview differs from the curve shown when Scale opened. If
Undo restores that original curve, Apply becomes disabled again and
CTRL/CMD + ENTERdoes nothing.
For example, moving the upper boundary of [20, 30, 50, 70] from 70 to 100 produces
[20, 36, 68, 100]. The lower boundary remains 20, timestamps do not change, and actions outside
the selection remain untouched. Move the lower boundary to 0 in a second gesture to fill the entire
0–100 range; while Scale is active, the two boundary changes can be undone independently.
Scale and Normalize share proportional range math but serve different workflows: Scale is a fast, visual manipulation relative to the current selection boundary; Normalize always maps from the source frozen when its preview opened, with presets and exact target values. Both support waveform dragging and an explicit Apply step.
The Waveform Edit Bar keeps Undo/Redo and selection status visible. During Scale, its Transforms group
shows Apply Scale, Cancel Scale and the single Waveform editing help button. Both actions keep
the selection. Narrow layouts collect inactive transforms into one menu in the standard order.
The status reads N nodes selected · Pos A–B · Scale preview · Esc to cancel.
Use the History group Undo/Redo or their configured shortcuts: while scaling they restore preview gestures;
after Apply Scale, Undo restores the whole session. There is no duplicate Undo beside Scale.
Confirm with Apply Scale before saving or exporting changes.
With multiple nodes selected, the right inspector shows their time and position ranges; select one
node to access its precise position fields.
6.4 Remap motion to a target range with Normalize
For a local edit, select a passage before opening Normalize. Deselect deliberately returns its scope to the entire script.
The compact Normalize Preview panel shows a one-line mapping, such as Current 80–100 → Limit 0–100 · ×5.
The multiplier means a fivefold expansion; hover it to see the amplitude before and after.
Current range · Initial appears beside Target range when it matches Current, and Preview only sits beside the scope.
The waveform retains Preview only — Apply to commit. Source bounds appear only after Current
in the mapping summary. With no change to apply, Apply is disabled. Flat sources cannot be normalized.
NORMALIZE proportionally maps the lowest and highest positions in a scope to new target boundaries.
Every position between them moves by the same proportion, widening motion that uses too little of the
available range or compressing motion that feels too broad. Timestamps and action count stay fixed.
Drag the purple target handles directly on the waveform, or use the sidebar slider, numbers and presets. Every opening starts at Current: a source of 80–100 starts with handles at 80 and 100. Choosing Full explicitly moves the lower target to 0. The compact sidebar keeps one Target range rail; it does not add a Source rail. All parameter changes use the frozen original positions, so repeated adjustments do not accumulate rounding drift. Cancel / Esc discards the whole session; pointer cancellation discards only the current gesture. Panning or resizing during a drag also cancels that gesture. Offscreen selections can still be configured precisely from the sidebar; the waveform does not show misleading offscreen handles.
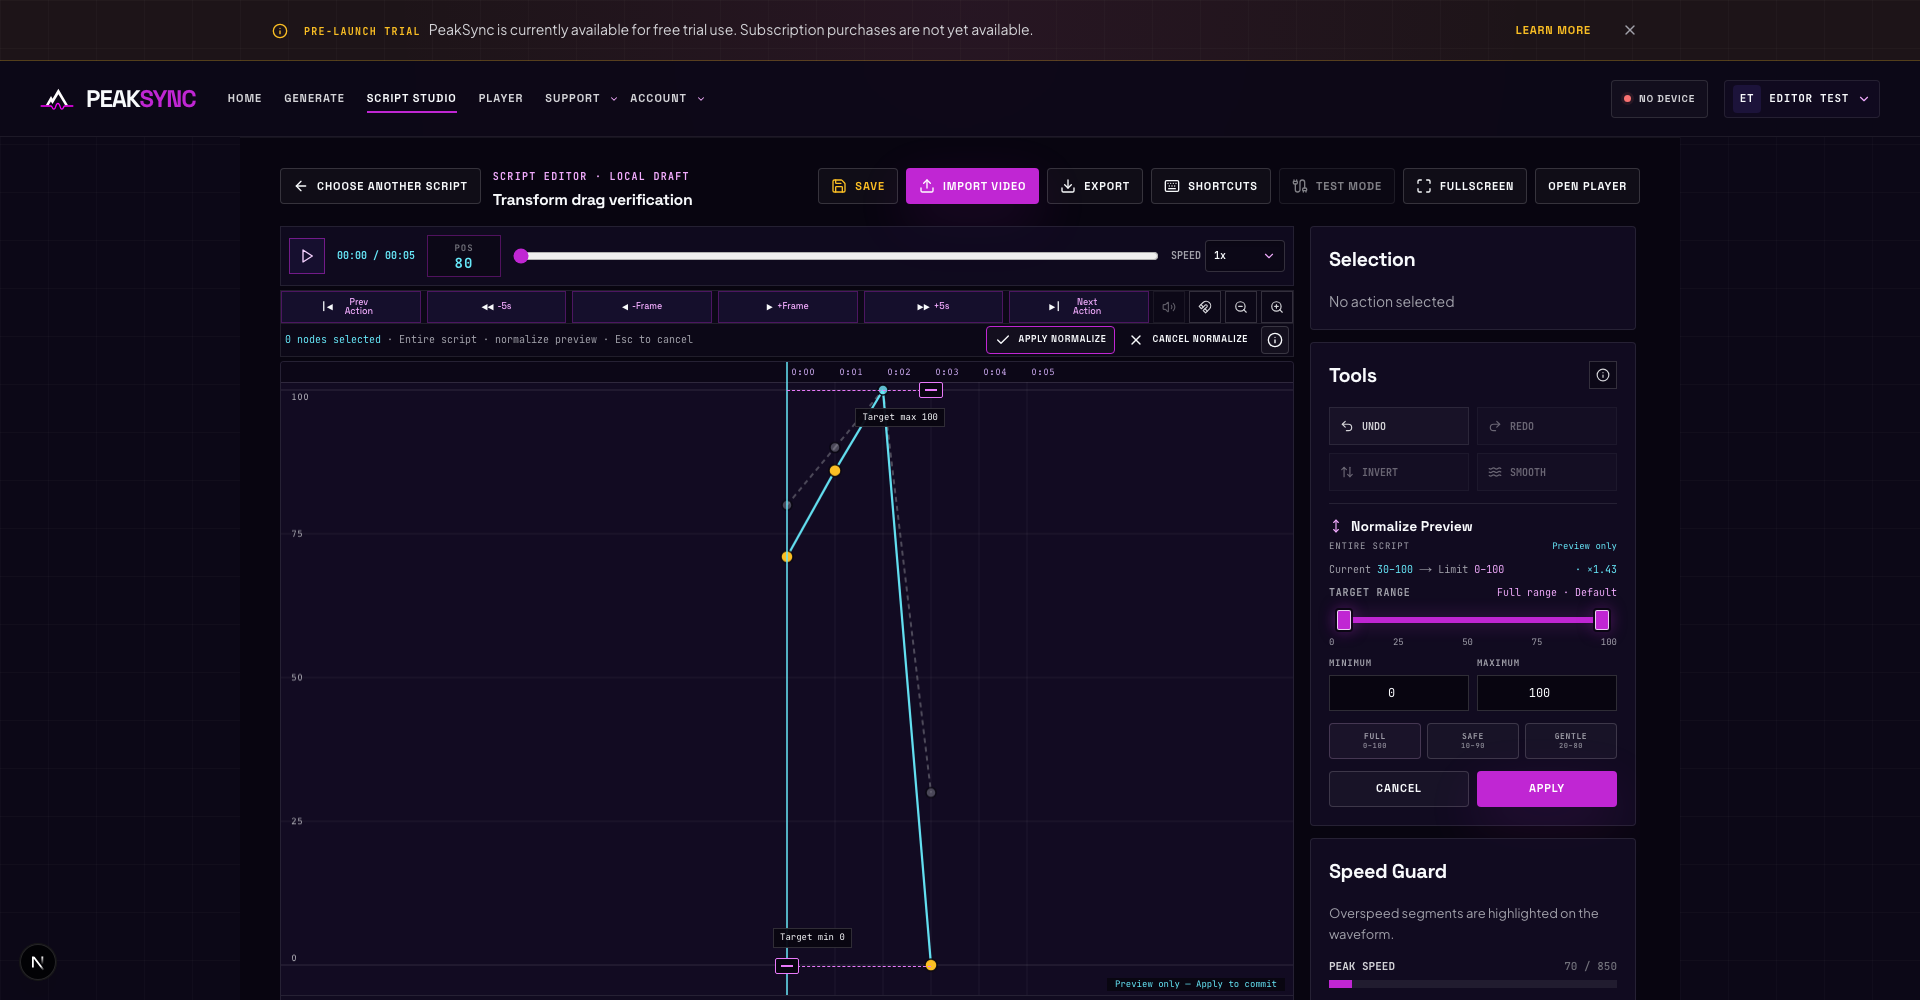
- Choose the scope. Use Deselect to normalize the entire script, or select at least two
nodes with
SHIFT / CTRL/CMD + CLICKto remap only those actions. Selected nodes do not need to be adjacent. With exactly one selected node, Normalize stays disabled and showsSelect at least 2 nodes to use Scale, Normalize, or Clamp.It never silently falls back to the entire script. - Click
NORMALIZE. Studio calculates the Source Range from the lowest and highest positions in the scope, then opens Normalize Preview without changing the script. - Compare Current source bounds with Limit target bounds in the mapping summary, then set the target with the two handles or the integer Minimum and Maximum inputs. Every opening starts at Current, including after applying, canceling or undoing an earlier edit; no previous target is reused. Canceling or pressing Escape discards uncommitted target changes; finish the preview before switching transforms. Minimum must be lower than Maximum.
- Use Full
0–100, Safe10–90or Gentle20–80for a quick target. You can fine-tune either boundary after choosing a preset. - Compare the original dashed curve with the cyan preview. Changed actions appear in amber, and the panel shows the amplitude multiplier. Its tooltip gives the amplitude before and after — amplitude is the distance from the lowest position to the highest.
- Click
APPLYto commit the preview as one Undo step, orCANCELto leave the script untouched.CTRL/CMD + ENTERapplies the preview;ESCcancels it.
For example, normalizing a Source Range of 20–80 to a Target Range of 0–100 produces:
| Original position | Result |
|---|---|
20 | 0 |
50 | 50 |
80 | 100 |
Positions between the endpoints are mapped proportionally and rounded to whole values. Unlike
CLAMP, Normalize moves values that were already inside the target range; that proportional remap is
what preserves the relative shape while changing its total depth.
If every scoped action has the same position, Studio shows Selected actions have no amplitude range. If the source already matches the target, it shows Already normalized. Equal or reversed
target boundaries show a validation error. In all three cases APPLY stays disabled, so the
preview creates no empty Undo step or unsaved revision.
6.5 Extend a pattern with Repeat fragment
Use Repeat fragment to continue a passage whose motion you want to reuse. Its toolbar button is
REPEAT, with a loop-arrow icon; the default shortcut is R. This creates new nodes, not a
playback loop.
- Select a continuous passage containing at least two nodes at different
times, then click
REPEATor press R. On narrow screens, find Repeat fragment in Transforms or More transforms. - Set Additional copies. The original is not counted:
2adds two copies after it, giving three occurrences in total. Type a whole number or use − / + to change it by one. - If the first and last positions differ, Join duration sets the time in seconds to move from the end of one copy to the start of the next. It must be positive. A longer join makes that connecting movement slower and uses more timeline space. Matching endpoint positions join directly; this field is not needed.
- Check Target and Overwrites above the waveform. The original passage stays in place; nodes in the following copied range are replaced. Nodes after that range stay at their original times. Copies must fit inside the script timeline; reduce the count or cancel and extend Timeline length if more room is needed.
- Click Apply Repeat or press Ctrl/Cmd + Enter to keep the result. Click Cancel Repeat or press Esc to keep the original script.
For example, repeating a one-second passage with matching endpoint positions and Additional copies = 2 adds two seconds of the same pattern immediately after the original. Existing nodes in those two seconds are overwritten; later content is not pushed back.
6.6 Align a passage with Phase Shift
Use Phase Shift when the shape is right but its timing is early or late. Its toolbar button is
SHIFT, with a horizontal double-arrow icon; the default shortcut is P, not the keyboard Shift key.
- Select one node or a continuous group, then click
SHIFTor press P. The responsive menu uses the full name Phase Shift. - Enter the Time shift in seconds. Positive delays; negative advances. For example,
+0.250moves the selection 0.250 seconds later, and−0.250moves it 0.250 seconds earlier. The −0.050 s and +0.050 s buttons adjust by exactly 50 milliseconds each time; there is no separate direction selector. - You can also drag the Phase Shift bar horizontally on the waveform. With that bar focused, Left / Right moves by 0.050 seconds and Home / End moves to the earliest/latest allowed position. Grid snapping affects dragging, not the fixed 50ms buttons or exact numeric input.
- Check Target and Overwrites. Node positions and the spacing within the selection stay the same, but the original selected nodes move away from their old times. Existing nodes in the destination range are replaced; nodes only passed over on the way stay unchanged. The result must remain between time zero and the script's end.
- Click Apply Phase Shift or press Ctrl/Cmd + Enter to keep the result. Click Cancel Phase Shift or press Esc to discard the preview. A zero offset has no change to apply.
Preview controls for both tools: parameters replace the usual editing buttons in the same bar. Apply comes before Cancel; narrow layouts may shorten their labels. The expand icon fits the full preview into view without seeking the video, and ? explains the current limits. Undo/Redo changes preview parameters while the tool is open. After Apply, one Undo restores the whole operation. While dragging the Phase Shift bar, Esc cancels that gesture first; press it again to cancel the session. Close an open help popup first if it has focus. Finish the preview before changing tools, playing, saving or exporting; Apply updates the script in the editor, while Save persists it.
7. Limit script speed with Speed Guard
Speed Guard is where you say how fast you want it. Set SPEED LIMIT to the pace you like, and the
panel shows you the script's peak against it. Anything above your limit is highlighted in red on the
waveform — you saw those segments in the zoom above.
How fast is right is entirely personal, and it changes with the device, the video and the mood. There is no correct number here, only yours.
To hold a script to your limit:
- Open it in Script Studio.
- Set
SPEED LIMITto the pace you want. - Press
FIX OVERSPEED SEGMENTS. Timing stays exactly where it is — only the depth of the fastest movements is eased, so the script stays in sync with the video. - Save.
That settles it once, in the stored script, for every future play. The Player's own SPEED LIMIT does
the same thing per session, without touching the saved script — handy when you want one playthrough
gentler than usual.
8. Find parts of the script to adjust
The script traces what the video does. These are the places people most often want something other than a faithful trace — knowing where to look is most of the skill:
- Pace. As above. The most common thing to adjust, and the easiest.
- Cuts. A hard cut is a large visual change, so the trace steps across it. If you'd rather not feel the edit points, smooth them.
- Quiet passages. Where little happens, the trace picks up fine detail.
SMOOTHit if you want those stretches calmer. - Range. A script may live between 70 and 100 and never use the bottom of its range.
NORMALIZEopens it out, if you want the full stroke. - Camera movement. Where the camera moves rather than the subject, the trace follows the camera. Whether you want that is a judgement call — this one is yours.
9. Make room with Waveform Focus, Fullscreen and playback speed
Waveform Focus
At desktop widths, choose Waveform Focus in the timeline utility controls or press Shift + F. Waveform Focus keeps the video, navigation, Waveform Edit Bar and waveform visible, while hiding the Editor title/action bar and the complete right inspector. The extra width goes to node editing, and the height freed above the video goes to the waveform. The imported video remains mounted, synchronized and interactive.
An active Scale, Normalize, Clamp, Smooth, Repeat fragment or Phase Shift preview stays open when you enter or leave Focus. Use the same Apply/Cancel controls in the edit bar or Context Strip. The first press of Esc cancels an active gesture, preview, menu or dialog; when none remains, Esc exits Waveform Focus. You can also use Shift + F again or click the same control, whose tooltip changes to Exit Waveform Focus.
Node numeric fields, exact transform values, Delete and Speed Guard repair remain inspector-only. Leave Focus to use them; your selection, playhead, playback and uncommitted preview stay intact.
Fullscreen

FULLSCREEN — or press F — hides the browser's toolbars and gives the timeline the whole
screen. For detailed work, that extra space makes a real difference. EXIT FULLSCREEN, or F again,
brings the toolbars back.
Fullscreen and Waveform Focus are independent: Fullscreen changes the browser window, while Focus changes the Editor layout. You can use either one or both; leaving one does not leave the other.
Playback speed
The editor has a speed selector; the Player deliberately does not. Slowing down keeps the imported video and script playhead together while giving you more time to judge a passage. During real playback, changing speed would pull the script and the video apart.
10. Test changes on connected hardware
TEST MODE borrows the device runtime so you can feel a fix without leaving the editor.
It plays a bounded window of what's on screen, capped at 30 seconds. You're testing a correction, not auditioning the script.
The button says Stop Test, not pause. A stopped test cannot be resumed; you start a new one.
SAFETY STOP is here too, and works exactly as it does in the Player.
11. Save, export or open in Player

| Do this | Result |
|---|---|
CTRL + S or SAVE | Creates a new revision |
EXPORT | Downloads the current script as a .funscript file |
OPEN PLAYER | Hands the current script straight to the Player |
Export anything you care about. It's plain text, it's yours, it opens in other funscript software, and it's the only copy that doesn't depend on this account.
Where next: Your first funscript