PeakSync Guide
Your first funscript
Generate a script from a video, watch it play in sync, then connect a device and feel it move.
Start to finish: a video goes in, a funscript comes out, and you play it back — optionally with a device attached.
A funscript is a plain text file listing positions and timings. It contains no video and no audio, only motion, and it is what a connected device follows.
You need: an account, a video, and a few credits. No device required until chapter 4.
1. Open GENERATE, SCRIPT STUDIO or PLAYER from Home

This is the home page. Three buttons, and between them they are the whole product:
| Button | What it does |
|---|---|
GENERATE FUNSCRIPT | Turns a video into a funscript |
EDIT FUNSCRIPT | Opens a script in Script Studio so you can change it |
OPEN PLAYER | Plays a script, with or without a device |
The same three sit in the top navigation as GENERATE, SCRIPT STUDIO and PLAYER, so you can
move between them at any point.
Two things in the top right, worth knowing before you start:
NO DEVICE— nothing is attached to this browser tab. It will say that until you connect hardware, which happens later, in the Player.- Your account chip — credits, scripts, tasks and saved devices all live under
ACCOUNT.
This guide follows that order: generate a script, play it, connect a device, then edit it.
2. Create a funscript from a video in GENERATE
The main event: you give PeakSync a video, it gives you back a funscript. Everything below is one continuous run — a single short clip going all the way through.
2.1 Open GENERATE from Home

Click GENERATE FUNSCRIPT, or GENERATE in the top navigation. Either one lands you on the
Video To Funscript Generation.
2.2 Choose a video source

The page is one screen with two parts: CHOOSE HOW TO LOAD A VIDEO at the top, and
CONFIGURE & SUBMIT underneath. Top right, + NEW TASK, CURRENT and HISTORY switch between
starting a task and watching the ones you already have.
Read the SOURCE NOTICE before you pick anything:
Selecting or dropping this video confirms you're authorized to use it and anyone in explicit content is an adult and has consented to its use.
There is no checkbox. Choosing the file is the confirmation, every time.
On the right, Preflight lists what it checks — format, duration and file size — with the limits
spelled out. The last line reads Load a source to run preflight until you give it a video, and then
fills in with your file's real values. Below it are your CREDITS balance and the two quota meters.
Until a source is accepted, the submit button reads SELECT A VIDEO TO CONTINUE and does nothing.
There are three ways to add a video, on three cards.
2.3 Upload a local video with Upload file
Drop a file on the dashed area, or click it to open your file picker.
MP4 · MOV · WEBM · up to 40 min · maximum 1 GB · deleted after generation
This is the more reliable option, and the one the rest of this chapter follows.
If the file is a VR recording, PeakSync notices and asks before going any further:
VR video detected — “This looks like a VR recording. It will be converted on this device — only the
converted flat video is uploaded.” A still from the conversion comes with it, so you can check the
framing is right before you agree. The conversion happens in your browser; the original never leaves
your machine.
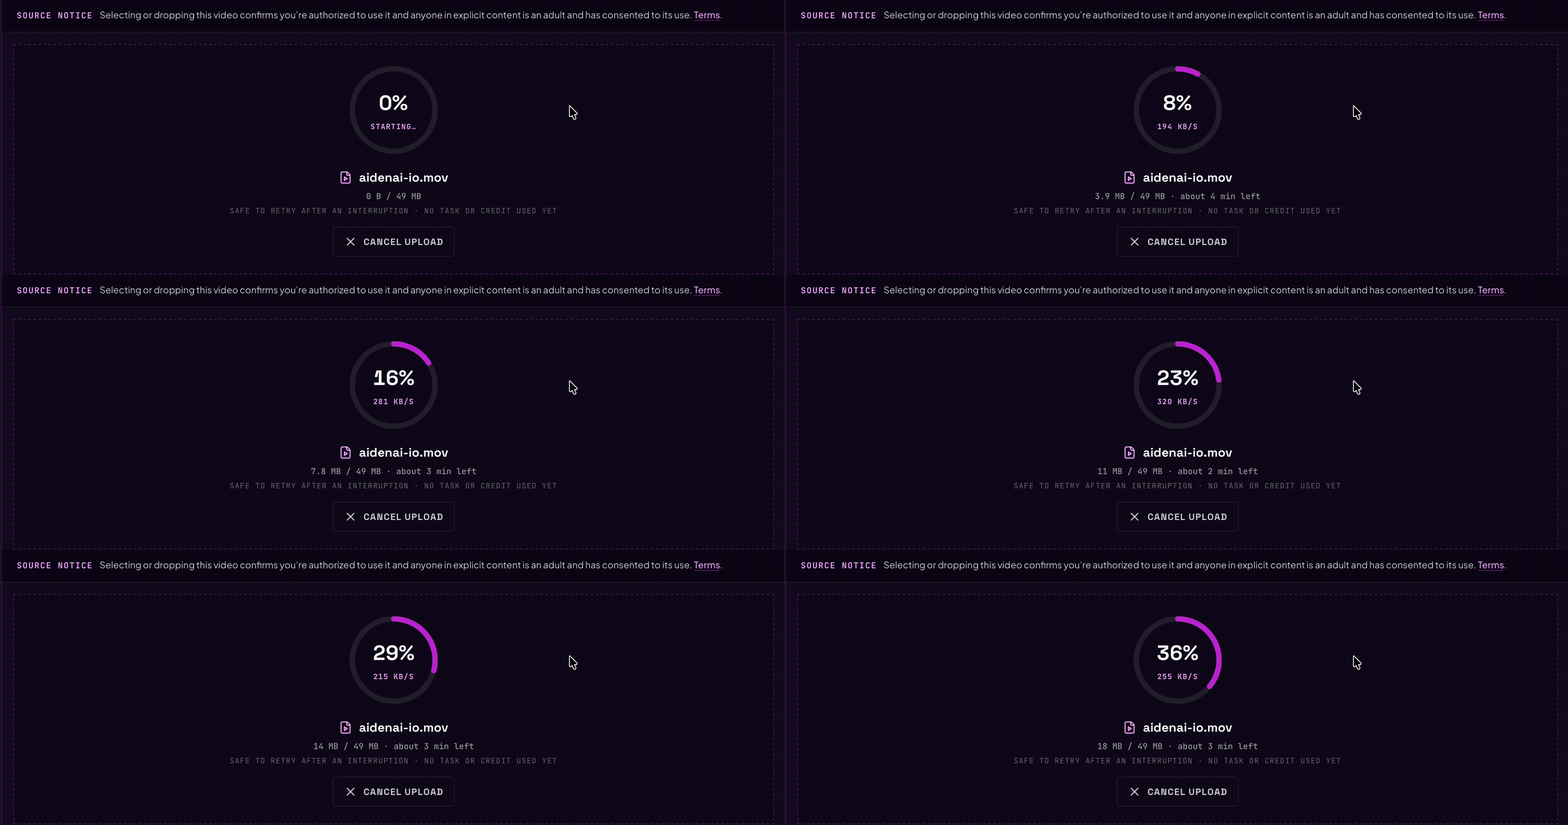
As soon as the file is accepted, the dropzone turns into a live progress ring. It starts at
0% · STARTING…, then shows real numbers: percentage, transfer speed, bytes sent, and an estimate of
the time left. Those numbers describe your own internet connection, not PeakSync's queue.
Underneath, in small type:
SAFE TO RETRY AFTER AN INTERRUPTION · NO TASK OR CREDIT USED YET
Nothing has been charged. A failed upload costs you nothing, and CANCEL UPLOAD stops it cleanly.
Keep this page open while it uploads. This is the only step that needs it.
2.4 Load a direct video link with Video URL
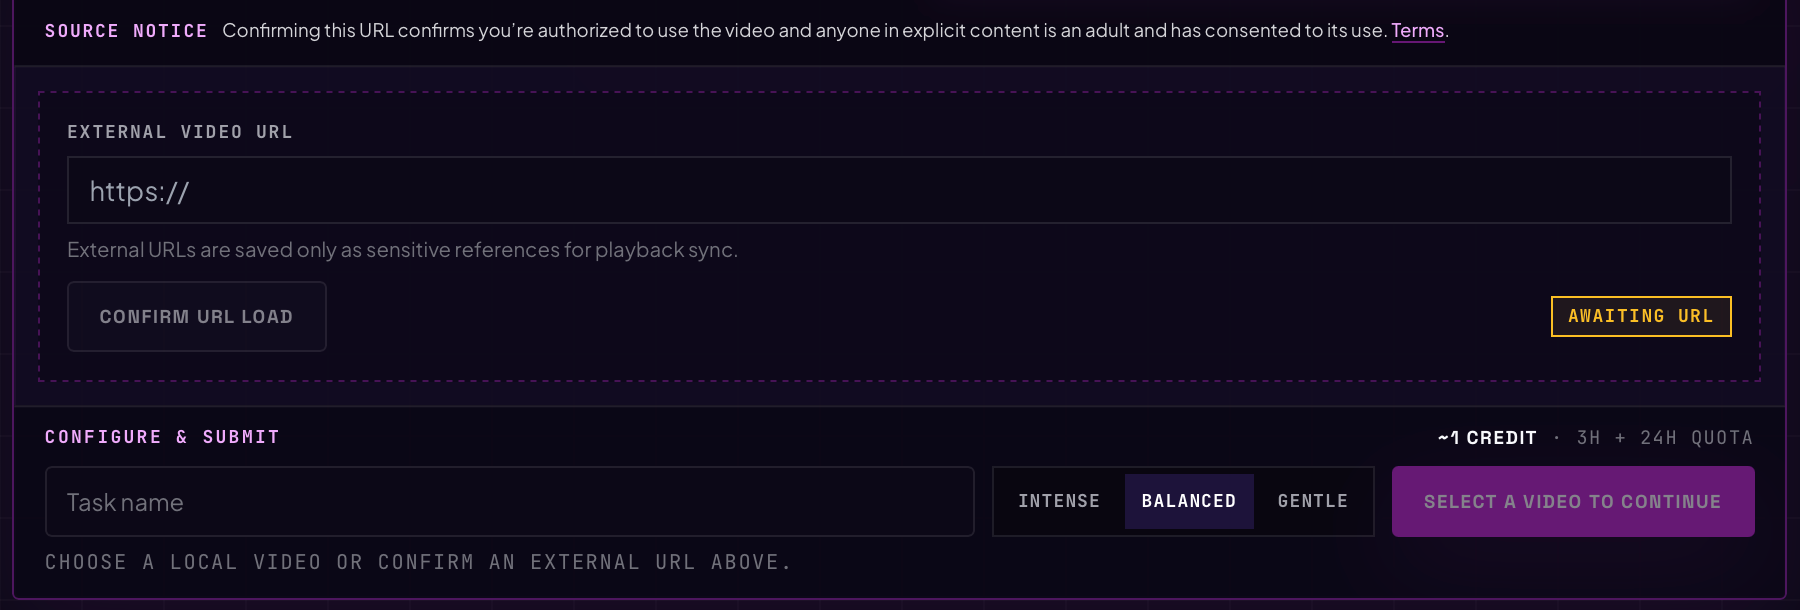
Paste an address into EXTERNAL VIDEO URL, then press CONFIRM URL LOAD. Pasting alone does
nothing — the field holds the text, the button fetches it. Until then the status reads
AWAITING URL.
The notice is worded differently on this tab, but it means the same thing. Here, pressing
CONFIRM URL LOAD is your confirmation.
One difference worth knowing:
External URLs are saved only as sensitive references for playback sync.
An uploaded file is deleted from the server after generation. A URL is kept — as a reference, so the Player can find the video again later.
The address must point straight at the video file, so PeakSync can download it. A web page that plays a video is usually not such an address, which is why most public video pages fail this check. If a URL won't load, record it instead — which is the third tab.
2.5 Capture a website video with the PeakSync extension
Most video pages hand out no file to download and no address to paste. This card is for those. It
needs the PeakSync browser extension — the card is marked EXTENSION for that reason — and this
is where you set it up: install it, then connect it to your account. Both are one-time, and both
happen here.
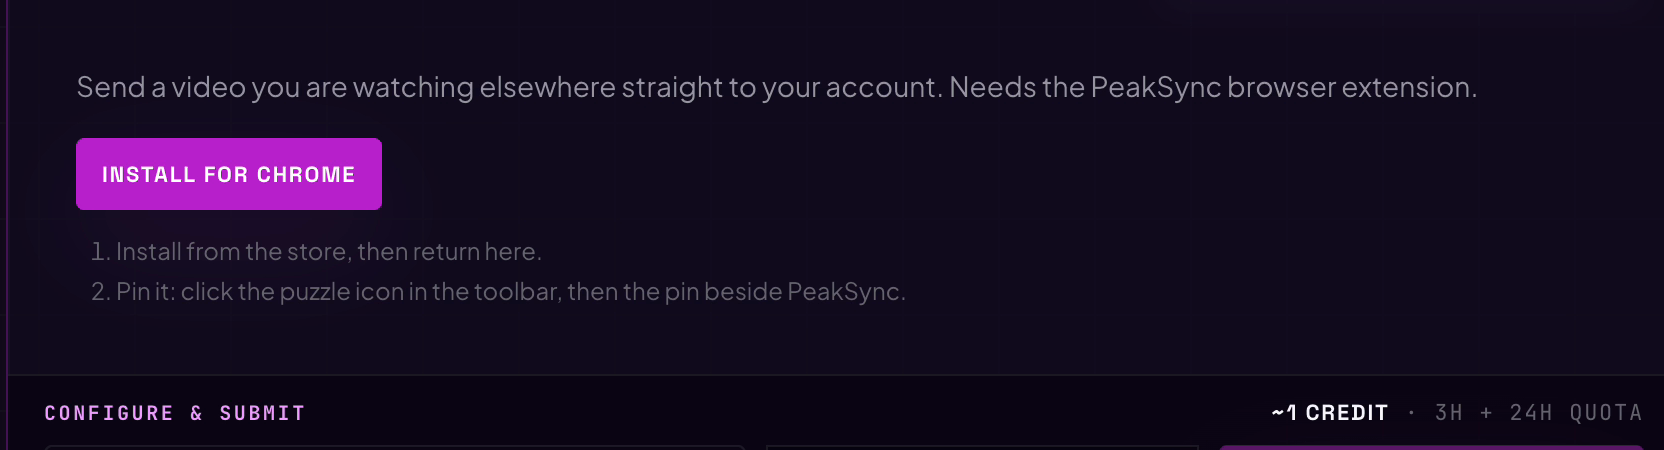
Install it. With no extension, the card offers INSTALL FOR CHROME, then two notes:
- Install from the store, then return here.
- Pin it: click the puzzle icon in the toolbar, then the pin beside PeakSync.
Pinning is worth doing. The whole flow starts by clicking that icon, and an unpinned extension hides behind the puzzle menu.
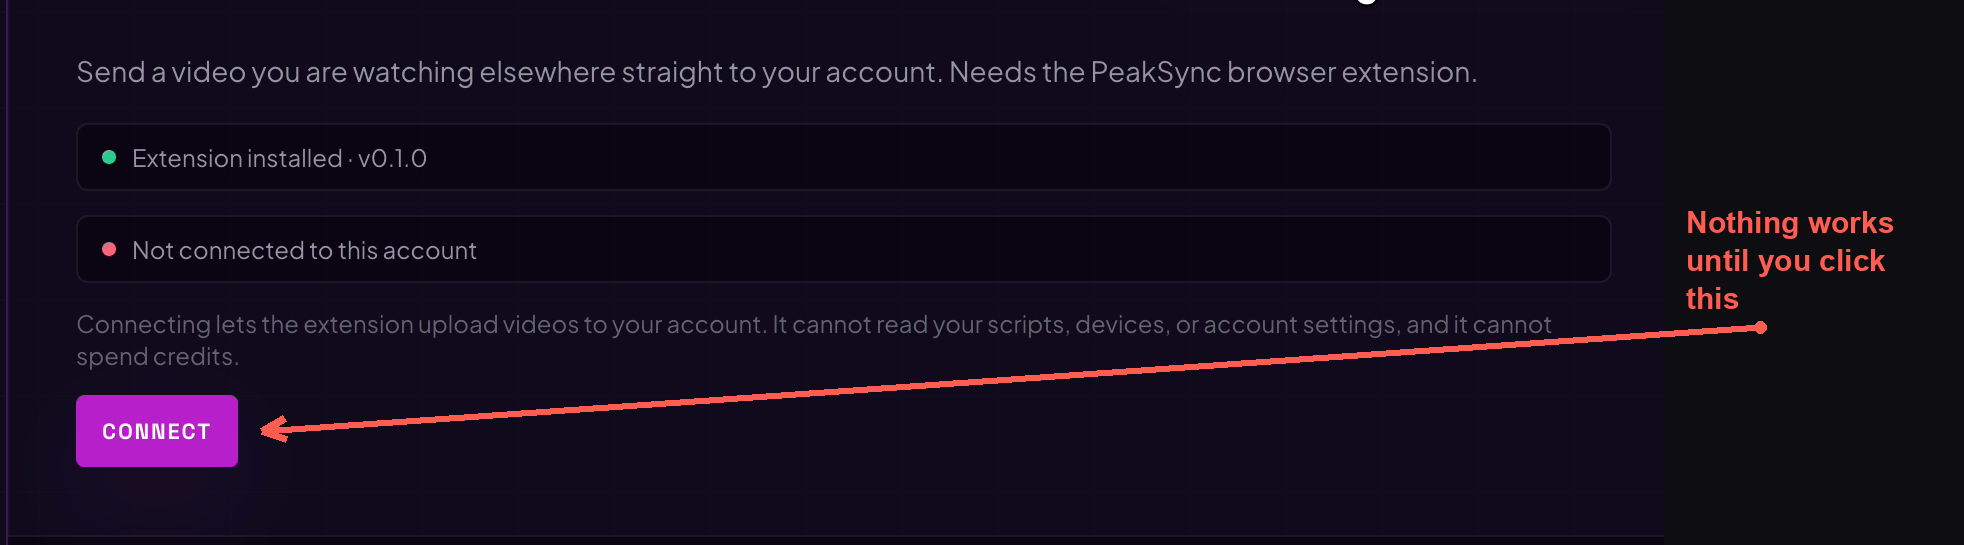
Connect it. Come back to this card after installing. It now reads Extension installed, with
the version, and below it:
Not connected to this account
An installed extension cannot do anything until you connect it. It has no idea who you are, so
its popup will say Signed out and offer only Open peaksync.net — which brings you back here.
Click CONNECT. What that grants is worth reading, because it is narrower than it sounds:
Connecting lets the extension upload videos to your account. It cannot read your scripts, devices, or account settings, and it cannot spend credits.
Only this page can connect the extension. The extension cannot authorize itself — your signed-in
click is what authorizes it. Once done, the line changes to Connected and tells you where to go
next:
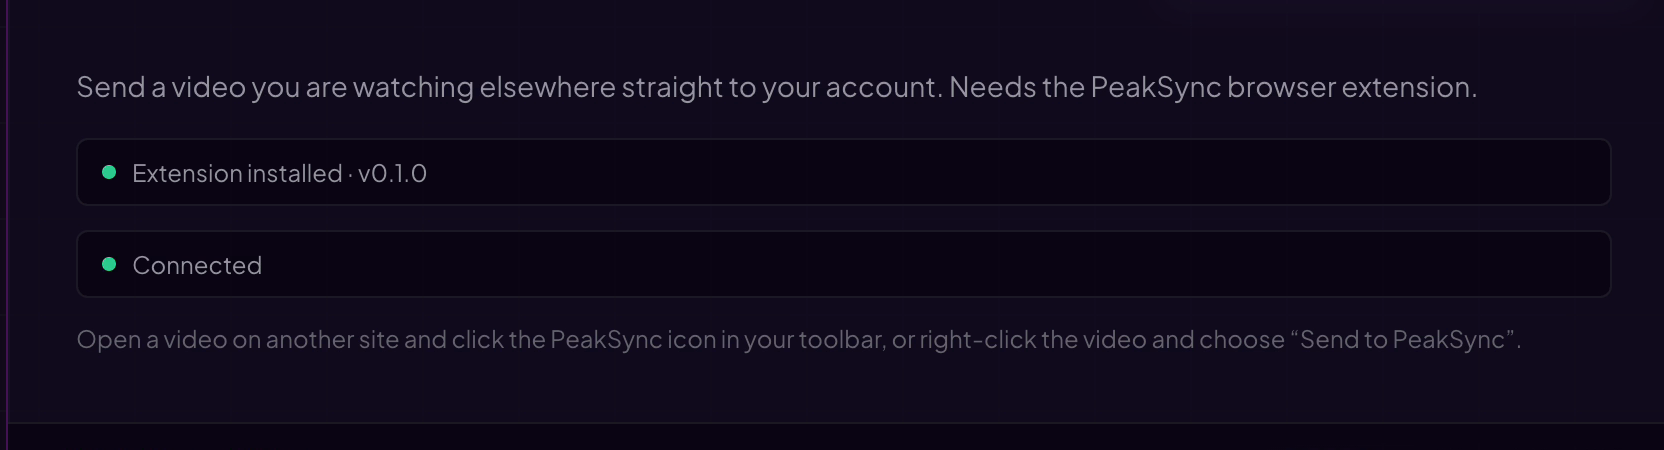
Open a video on another site and click the PeakSync icon in your toolbar, or right-click the video and choose "Send to PeakSync".
Capture. Open the video on the other site and start it playing. Two ways in, and they lead to the same place:
- Click the PeakSync icon in your toolbar.
- Right-click the video and choose
Send to PeakSync.
What the popup offers depends on what the site exposes:
| Badge | Button | What it does |
|---|---|---|
Ready | Send to PeakSync | The site exposes the video file. PeakSync fetches it directly. |
Ready to record | Start recording | The site exposes no file, so PeakSync records the tab as it plays. |
The popup says which one you are getting, and why:
This site does not expose a downloadable file, so PeakSync records the tab as it plays. Recording takes as long as the video does, and you need to keep this tab playing.
Above that it lists what it is about to do: Video resolution, Records up to, Estimated size,
and Playback Script only. Records up to is a ceiling, not a plan — the recording runs until
you stop it.
There is no checkbox here either. As with choosing a file, starting the recording is the confirmation:
Recording confirms you are 18 or older, that you have the right to use this source, and that it is lawful. The video is analysed, then deleted.
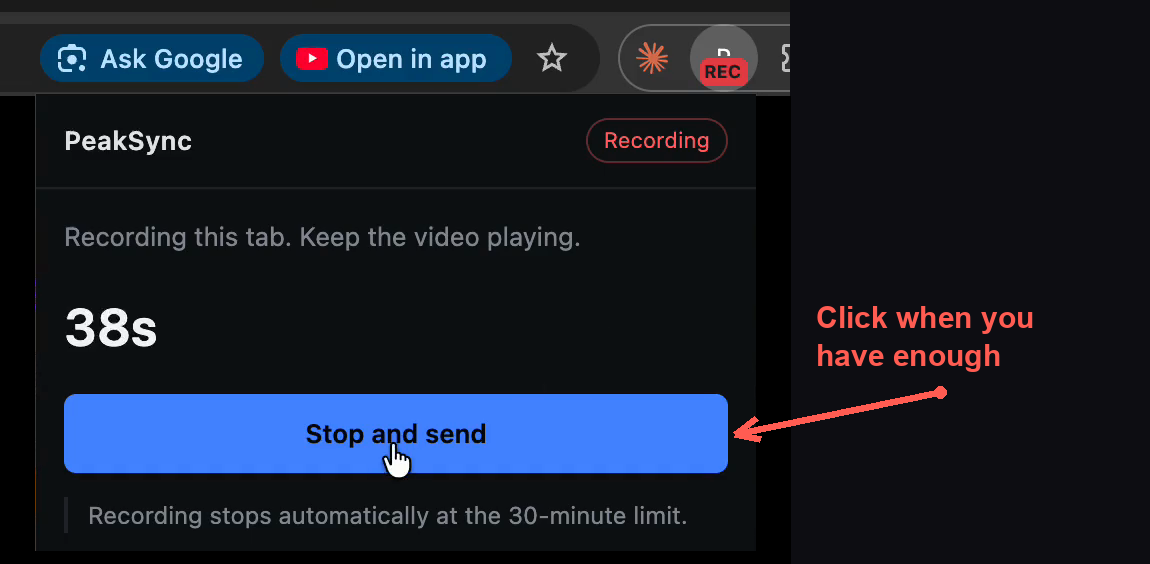
Once it starts, the toolbar icon carries a red REC badge and the popup counts up. Three things are
true while it runs:
- Recording is real time. A ten-minute video takes ten minutes. There is no way to speed it up.
- Keep the tab playing. It records the tab, not the video element — pause the video and you record a still frame.
- It records what is on screen. Page furniture, controls and captions all land in the recording. Put the player in fullscreen or theater mode first if you want a clean capture.
You can close the popup; the recording keeps going, and clicking the icon again returns you to this same view. Recording stops on its own at the 30-minute limit.
Click Stop and send when you have enough.
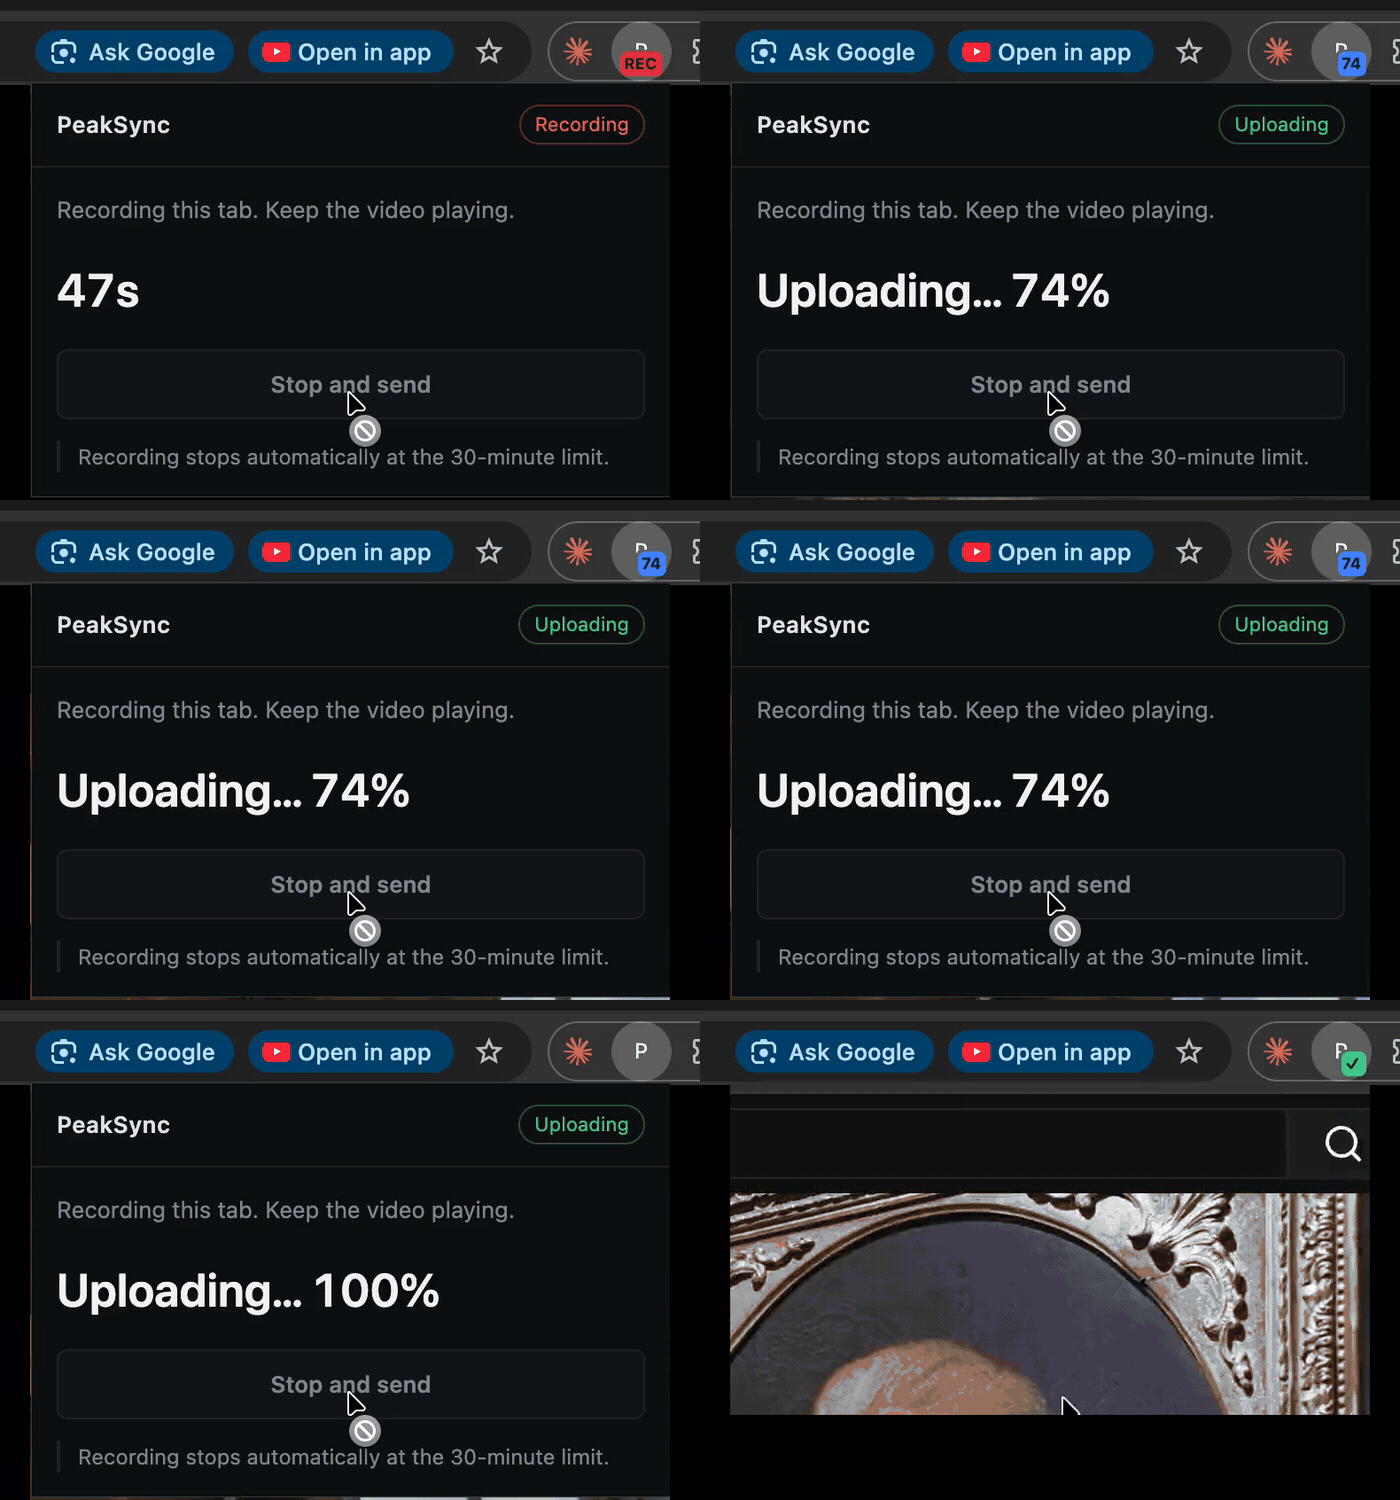
The badge changes to Uploading and the toolbar icon shows the percentage. When it lands, the popup
reads Uploaded:
Video uploaded and checked. Open PeakSync to review the cost and start generation.
and, in small type, No credits have been used yet. Nothing has been charged — the extension only
delivers the video. Click Open in PeakSync.
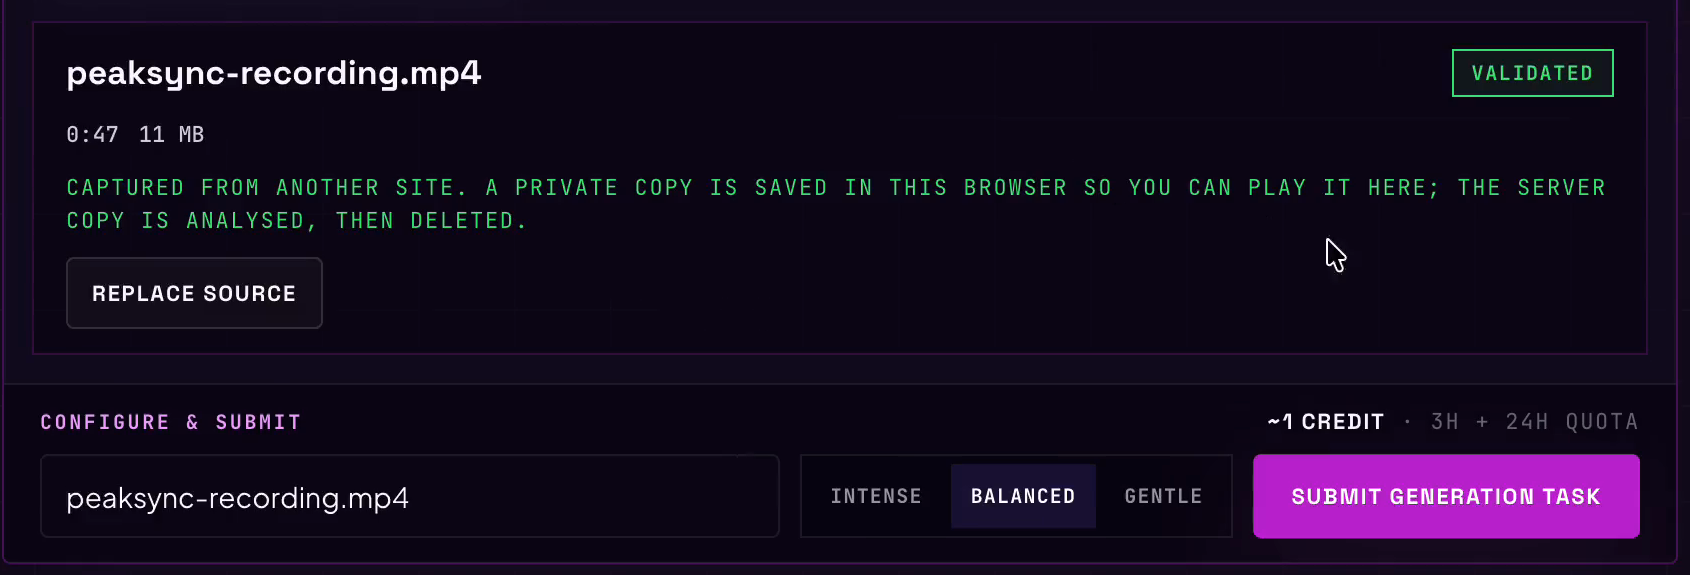
You arrive back at the workbench with the source already loaded and VALIDATED — no upload step,
because the extension already did it. The notice on the card is the one difference worth reading:
CAPTURED FROM ANOTHER SITE. A PRIVATE COPY IS SAVED IN THIS BROWSER SO YOU CAN PLAY IT HERE; THE SERVER COPY IS ANALYSED, THEN DELETED.
That local copy is what lets the Player and Script Studio show the video later, and it is the reason a captured source appears twice in the Player — the script, and the recording it came from:
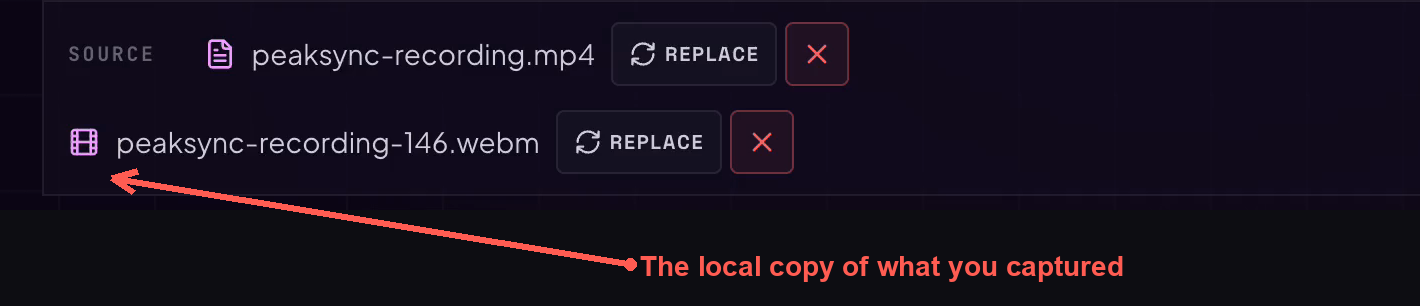
From here on, a captured source behaves exactly like an uploaded one.
2.6 Configure Task name and Generation style
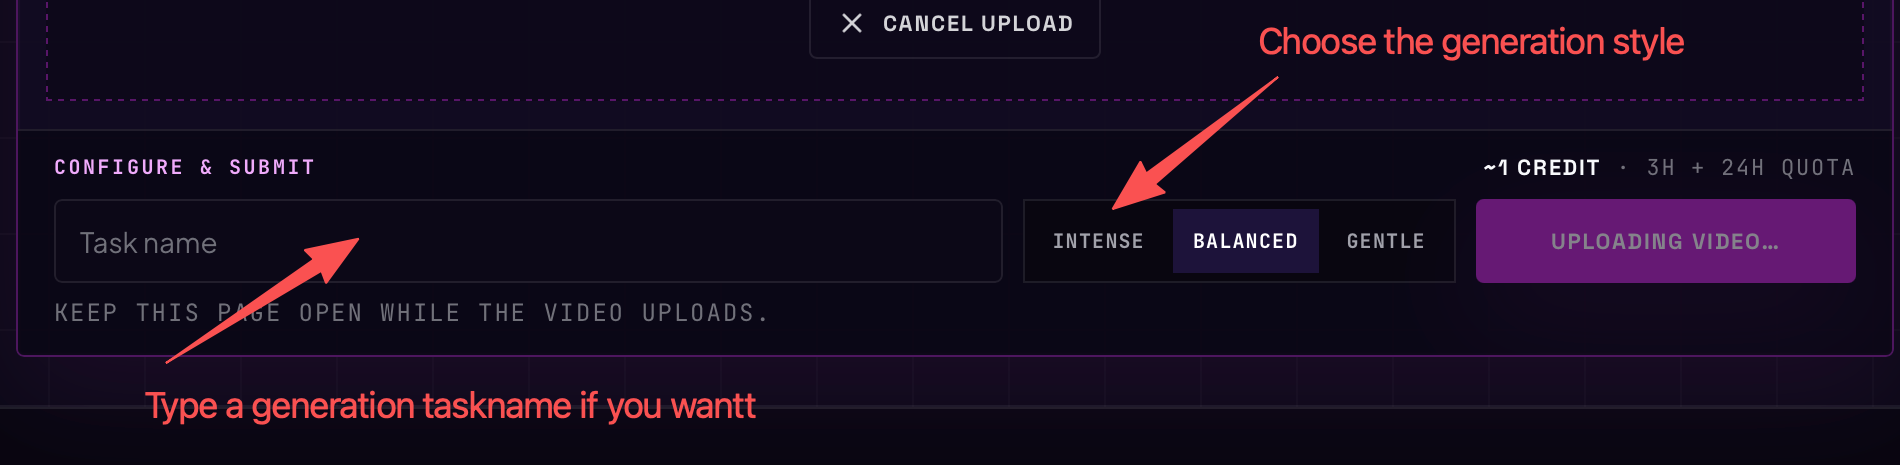
Two settings, and you can set both while the upload is still running.
- Task name — optional. This name labels the script everywhere afterwards. If your filename says more about the video than you want it to, change it here.
- Generation style —
INTENSE,BALANCEDorGENTLE.BALANCEDis the default. It shapes how eagerly the analyzer turns movement into strokes. It is not a device intensity setting, and it is fixed once you submit.
The cost on the right still reads ~1 CREDIT, because PeakSync cannot know how long your video is
until the upload finishes. The number corrects itself in the next step.
2.7 Review Preflight and submit the generation task
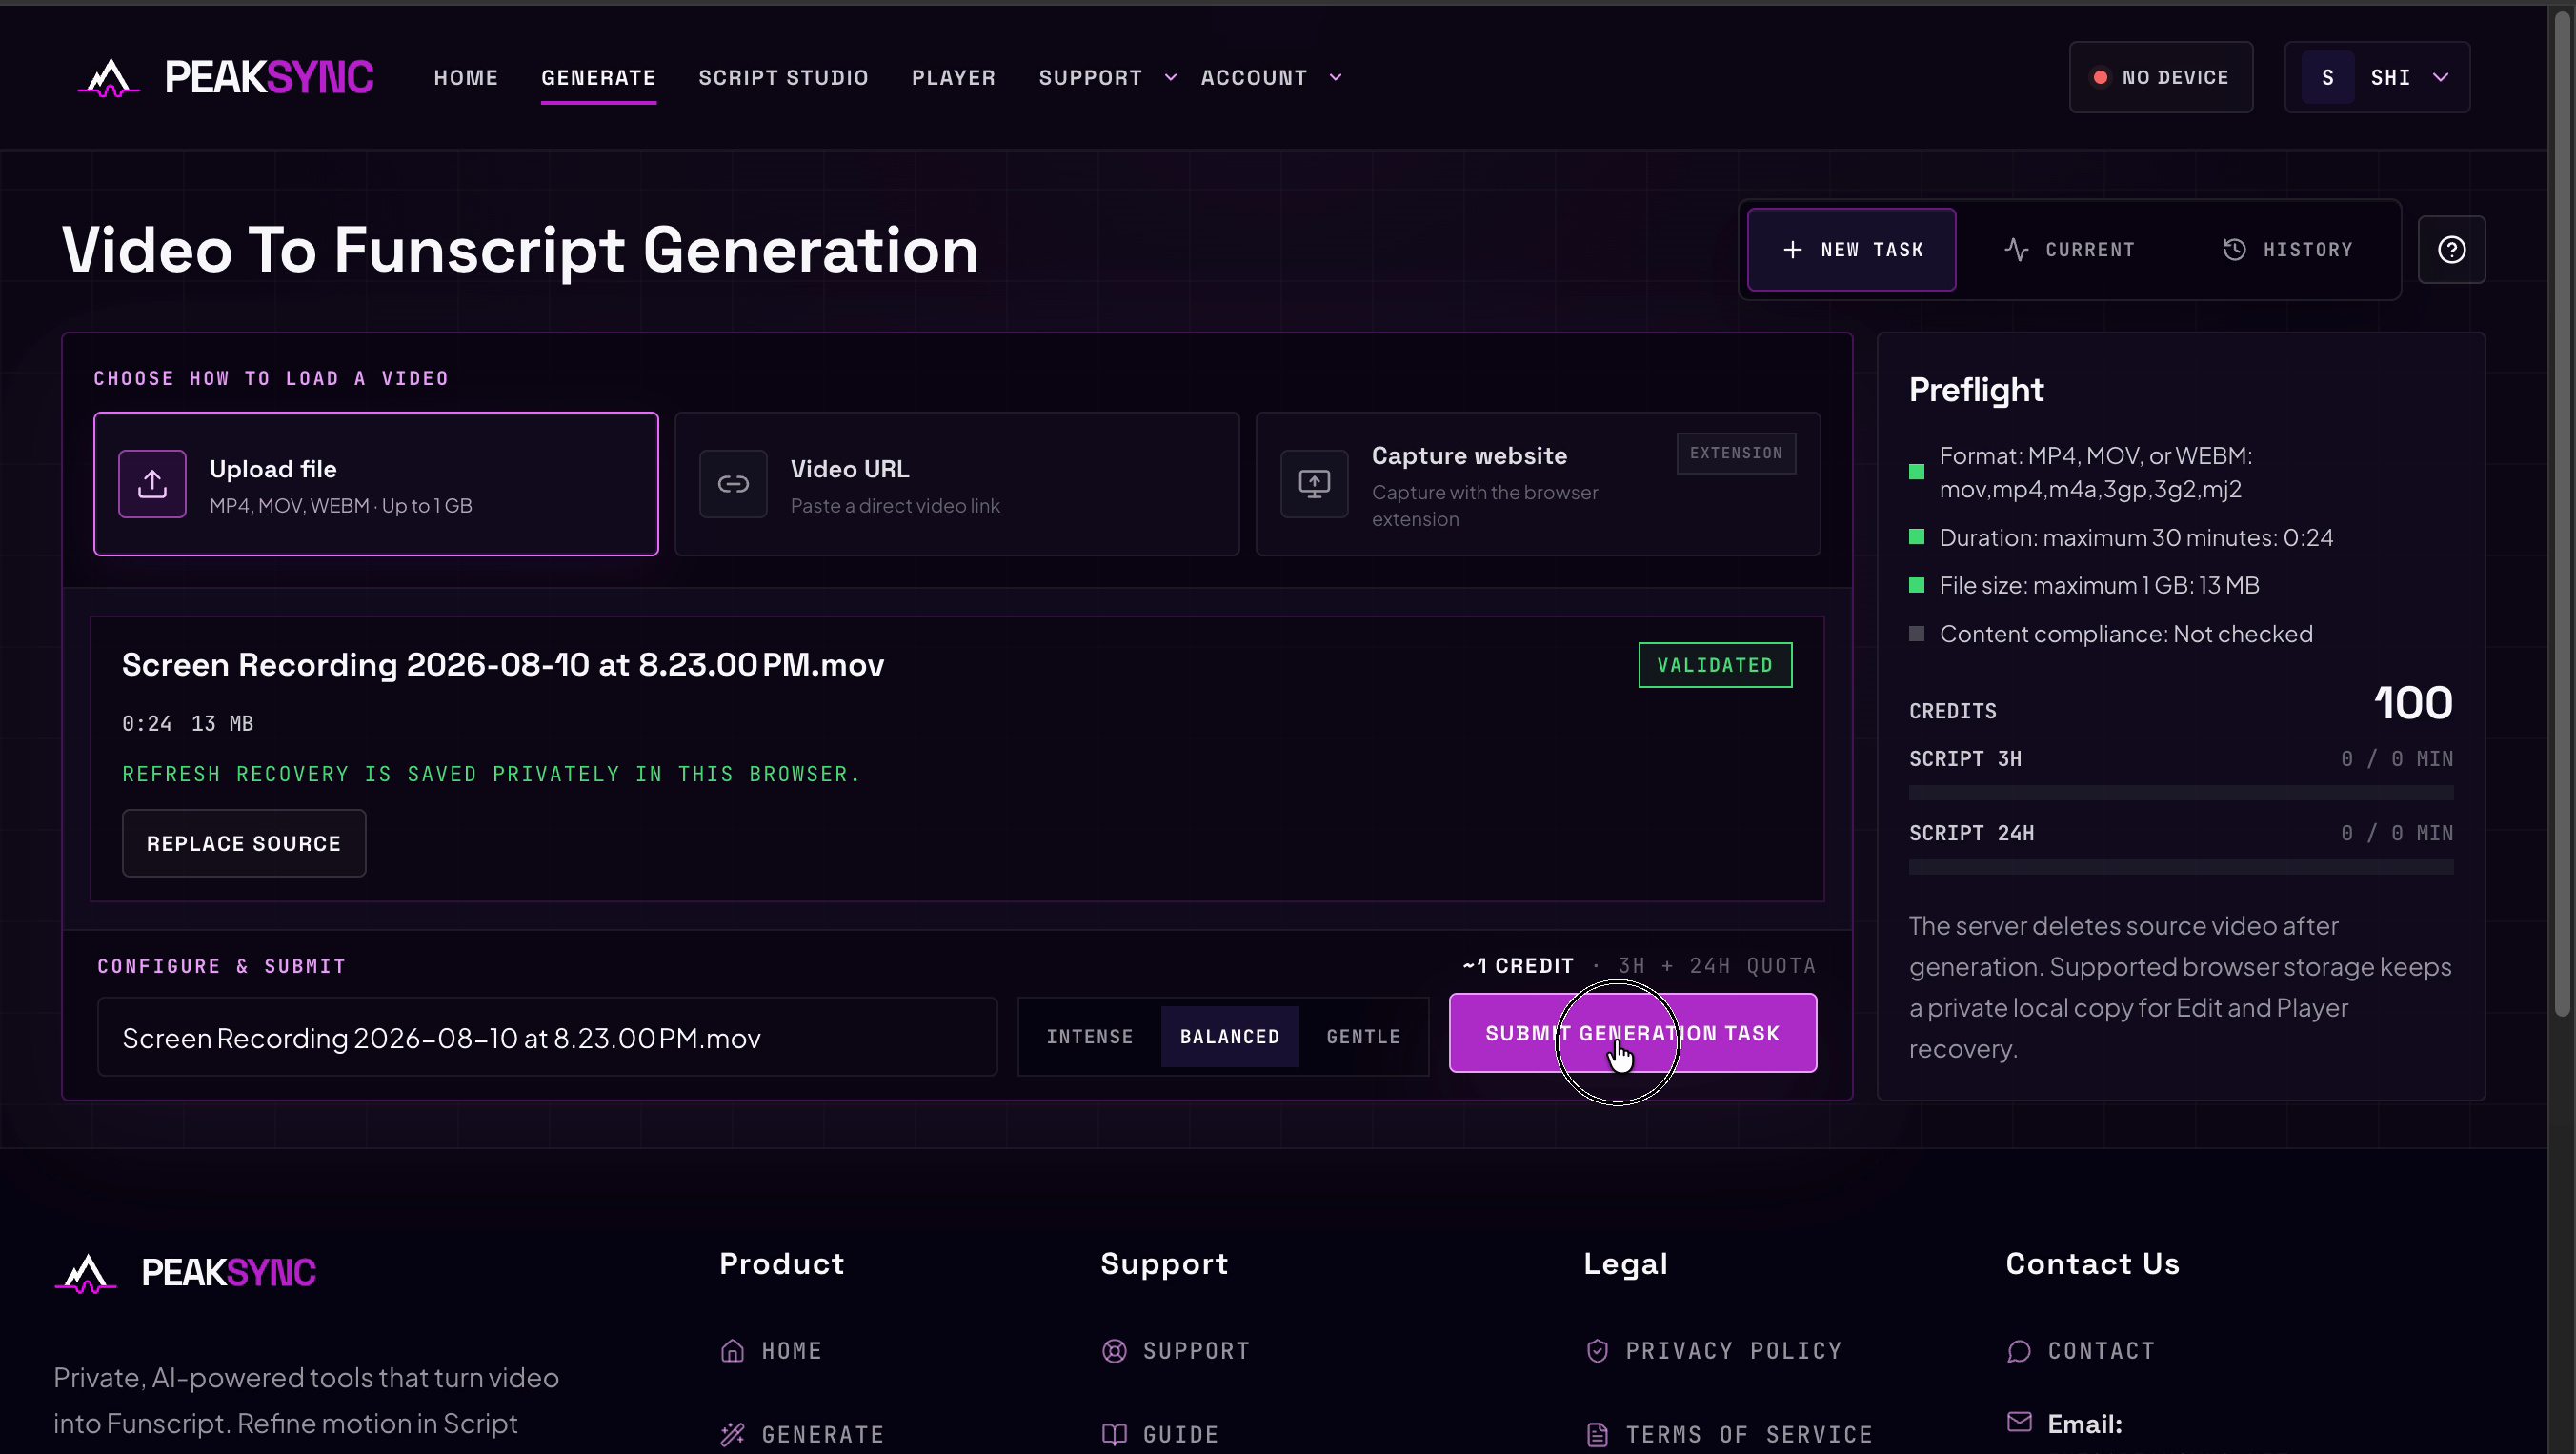
The source is now VALIDATED, and Preflight has filled in with your file's real values — format,
duration, file size.
Content compliance reads Not checked. It reads that for every file, always; that check runs
later, during processing. It is not a warning, and not something to wait for.
The cost is now exact. Roughly one credit per minute of video, rounded up, so this 24-second source costs 1 credit, drawn against both quota windows.
Click SUBMIT GENERATION TASK. This is the moment credits are spent.
2.8 Monitor task progress in CURRENT
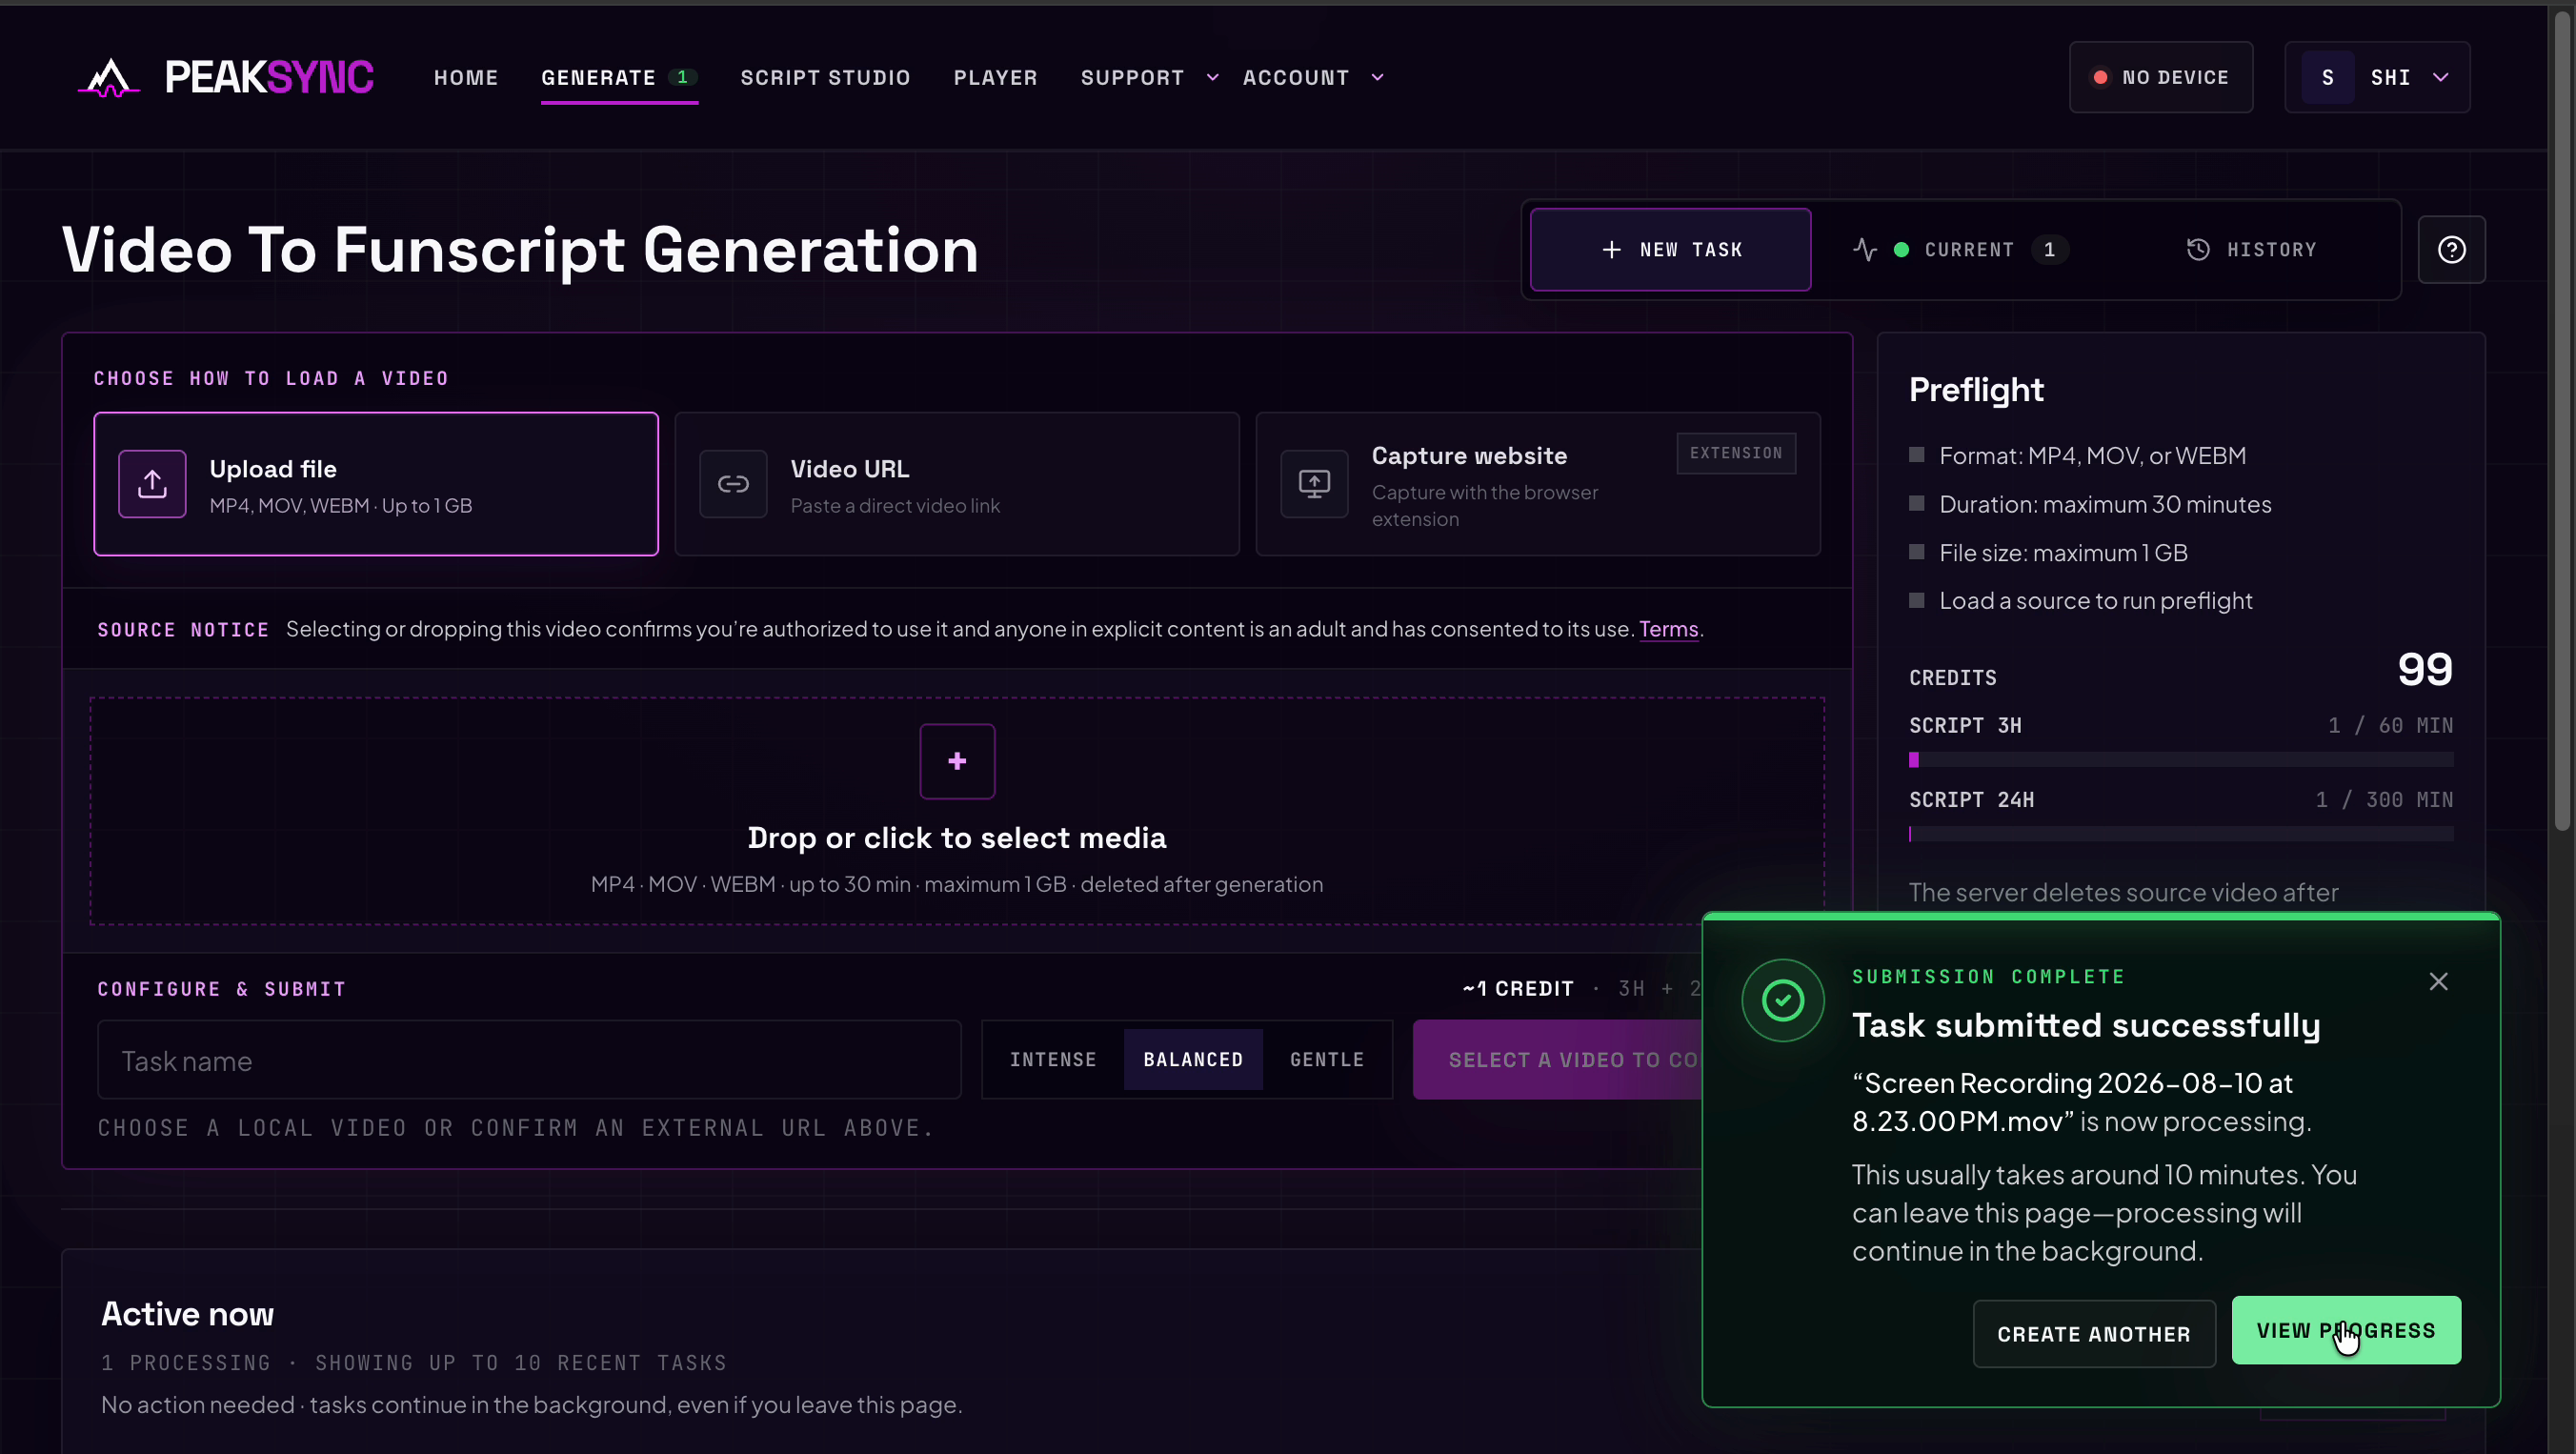
The task is accepted, and your balance drops — 100 before, 99 after. Both quota meters go up.
Click VIEW PROGRESS. A badge also appears on GENERATE in the navigation and stays visible as
you move around the site. The task is not tied to this tab either:
No action needed · tasks continue in the background, even if you leave this page.
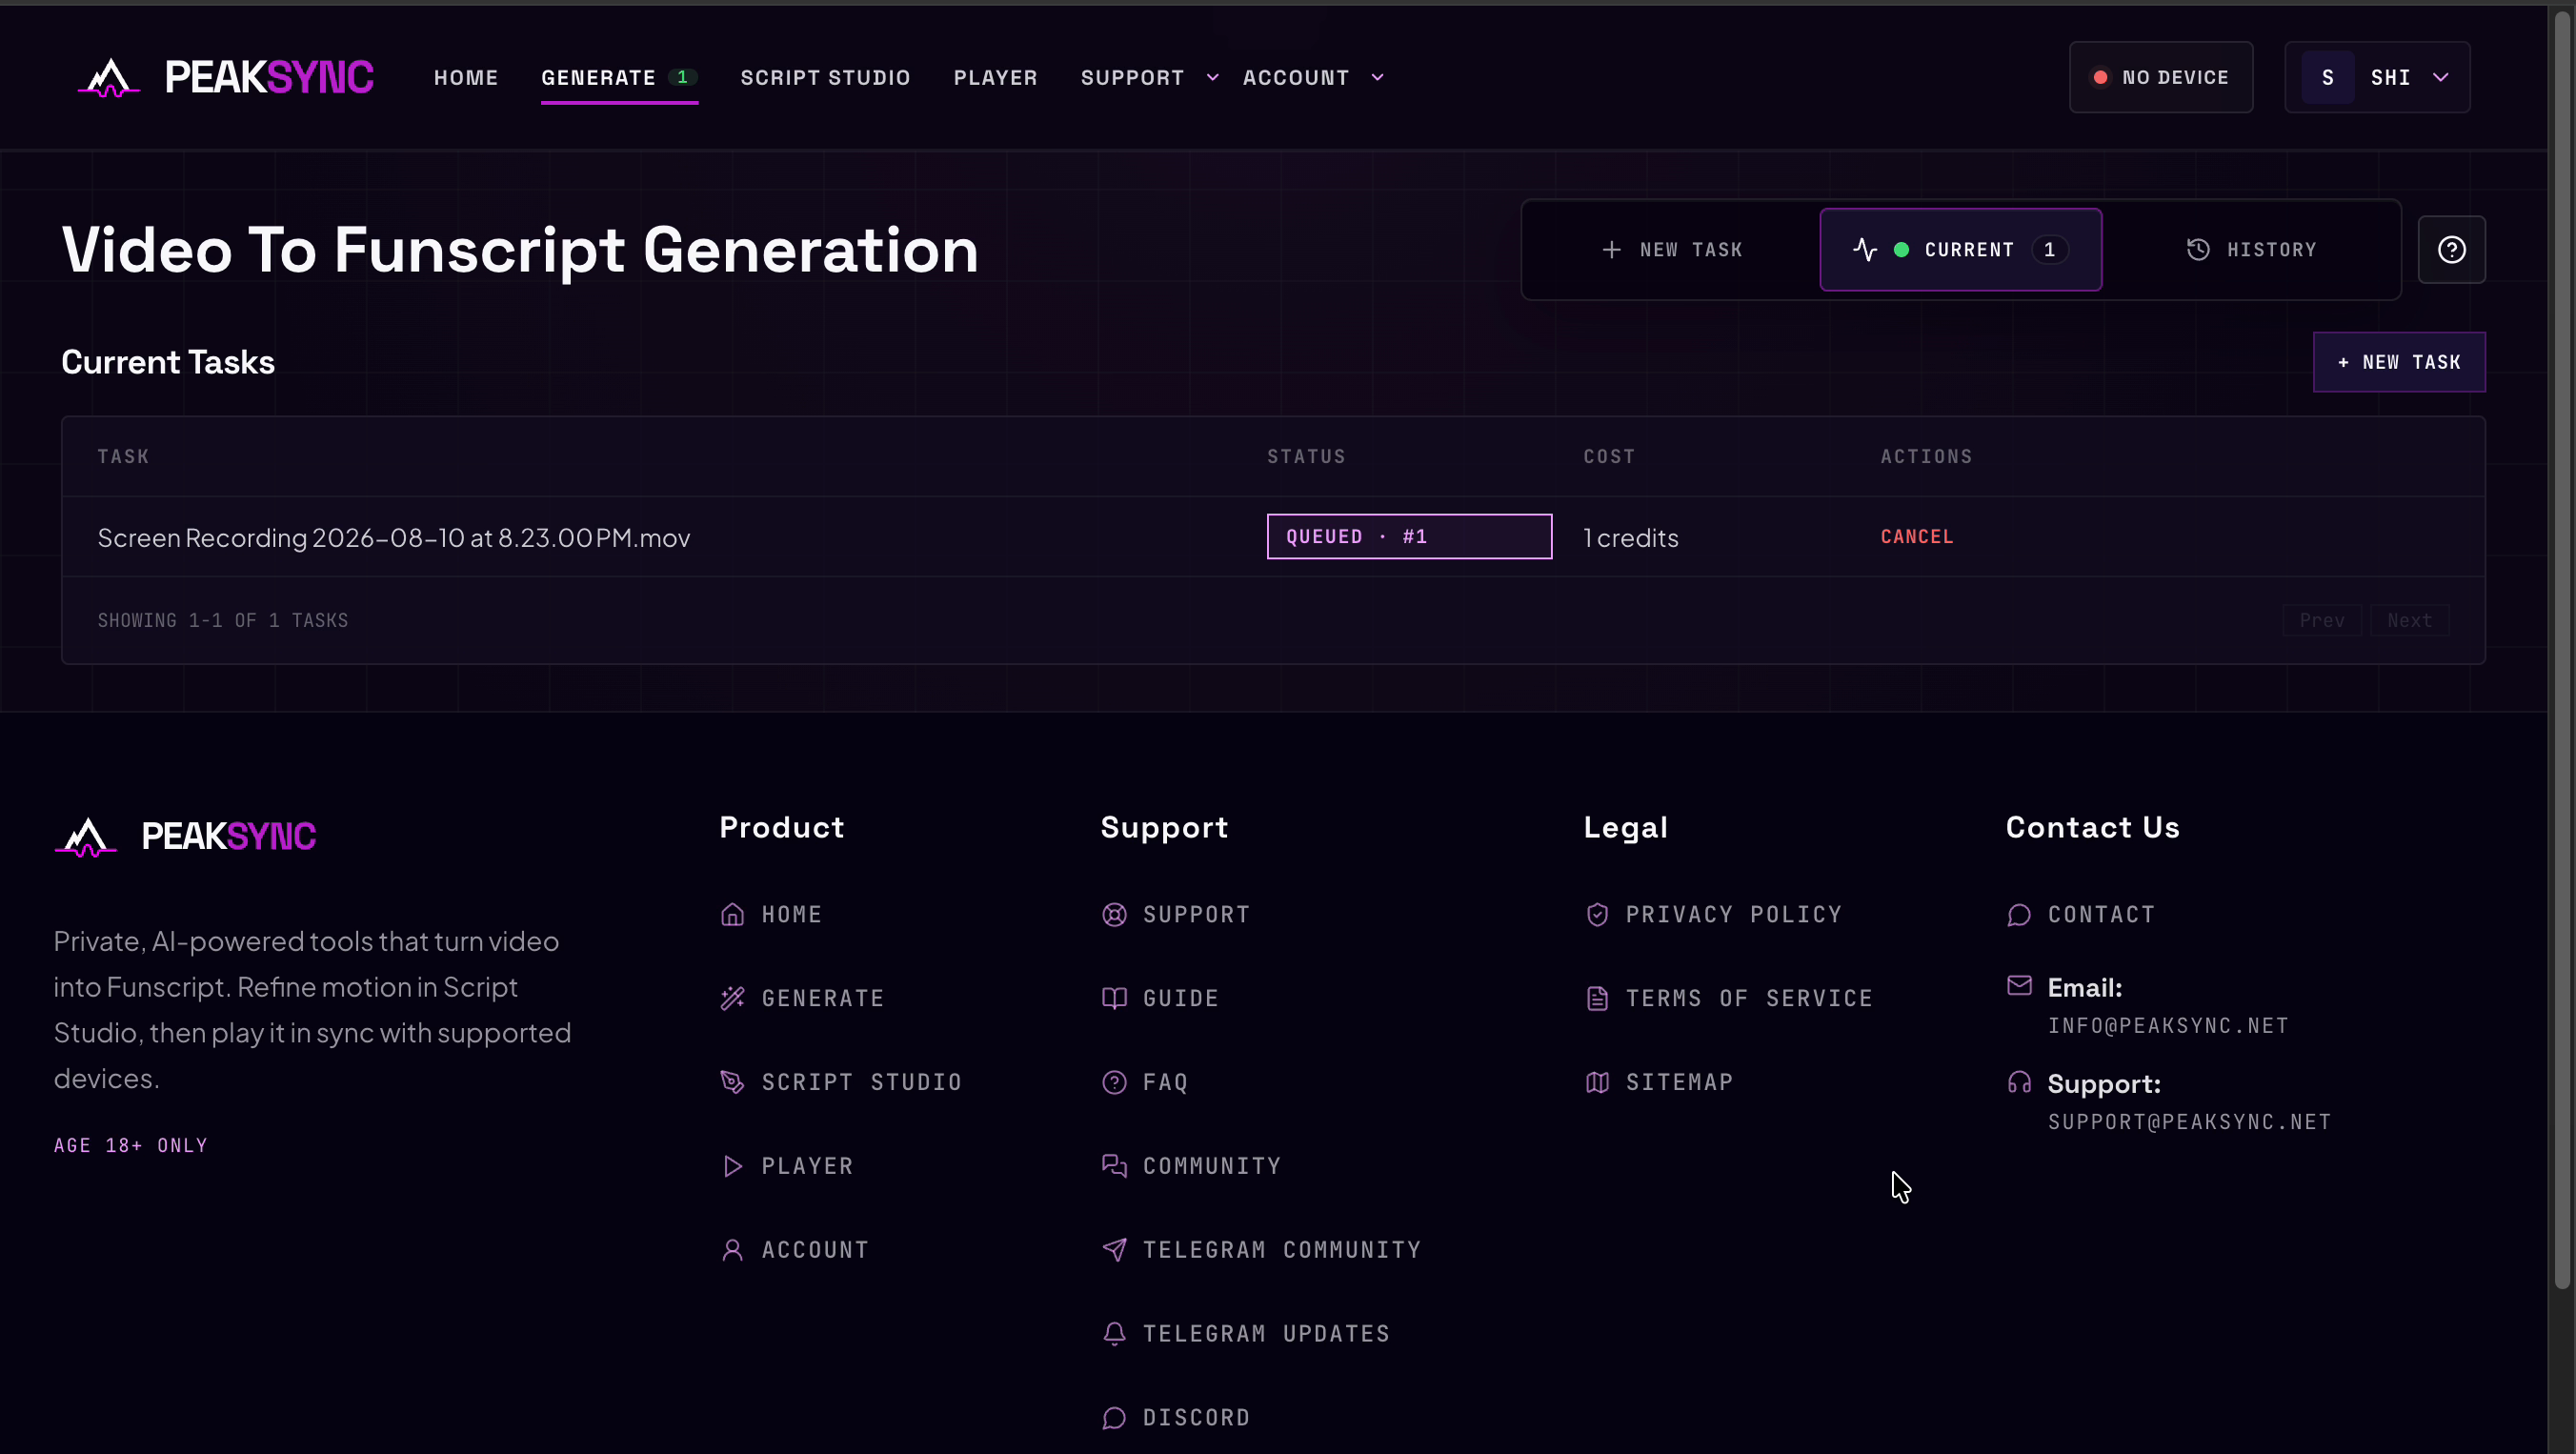
QUEUED · #1 — your position in the queue, and it counts down. While a task is queued, CANCEL is
offered and your credits come back.

GENERATING · 43% is real progress reported by the server, not an animation. Cancel is no longer
offered — the work is underway.
(That row is from an earlier run with a longer video, which is why the name and the cost differ from the ones above. Everything else on the screen is the same.)
2.9 Open, edit or download the completed script in HISTORY
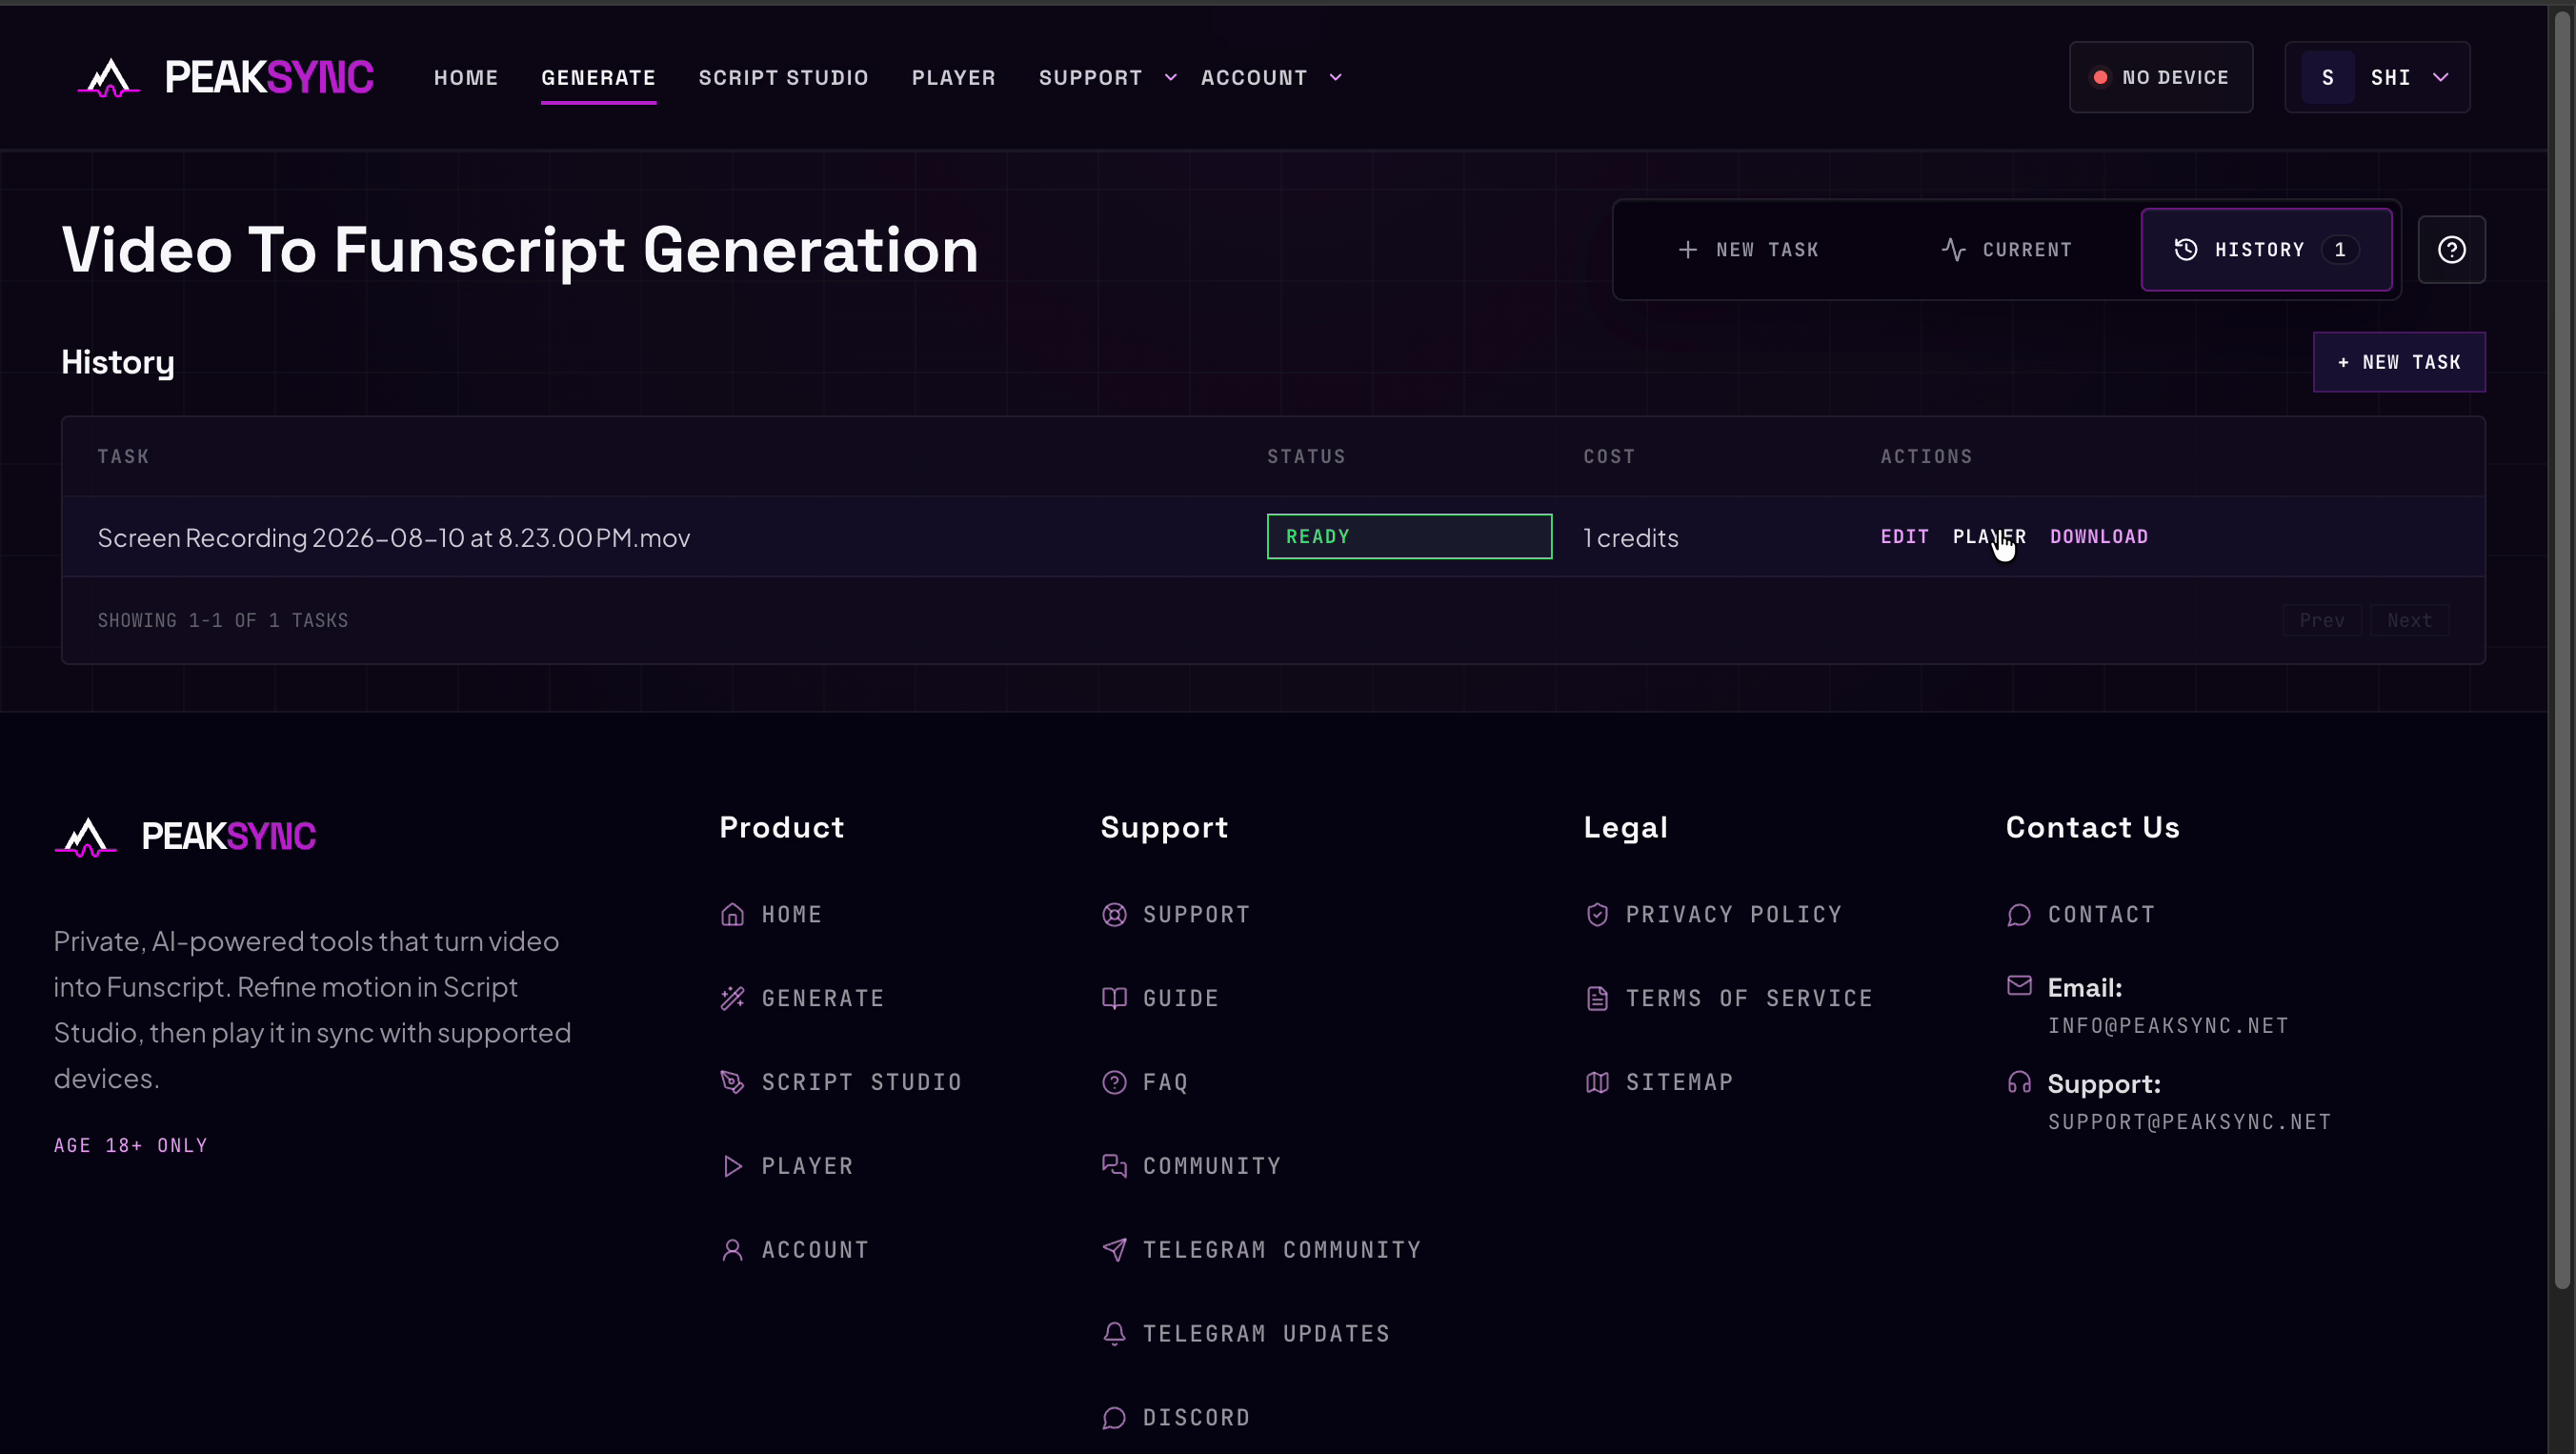
The task moves to HISTORY marked READY, with three actions:
| Action | What it does |
|---|---|
EDIT | Opens it in Script Studio |
PLAYER | Plays it |
DOWNLOAD | Saves the funscript JSON using the script name without adding a suffix |
Download is worth doing for anything you care about — it is plain text, it is yours, and it works in other funscript software.
Everything you generate stays here. HISTORY is the list you come back to.
3. Play the video and funscript together in PLAYER
Opened on its own, the Player asks for what to play: drop a .funscript and a video, or press
BROWSE MY SCRIPTS to pick one you've generated. Coming from PLAYER in HISTORY, the script is
already loaded.
Then it is the point of the whole product: your video at the top, and the Sync Scope tracing the script beneath it, locked to the same moment.
Scrubbing along the timeline keeps the video, Sync Scope and position readout at the same moment. During playback, they advance together.
Press SPACE, or the play button, and the video and the script advance together. The readout keeps
pace: Source N → Range N is the script position mapped to the output, and the timecode counts up
with the video.
Two traces:
- Source — the script exactly as generated.
- Projected Output — what will actually be sent, once your offset, invert and stroke range are applied.
With no settings changed they sit on top of each other. The moment you adjust something, they separate — which is how you see what a setting does instead of guessing.
Underneath, TIMING shows your current offset and LIVE OUTPUT shows the target position and device
state.
3.1 Sync the script to the connected device before playback
When a playback device is already connected, loading a funscript adds one setup step before hardware
motion can begin. The connection card shows Syncing script to device… while Player prepares the
current actions and supported output limits for that device.
Important: Your playback device must already be connected to Wi-Fi and online before Player can sync the script. A saved device profile, connection key or other credential only identifies the device — it does not make offline hardware available.
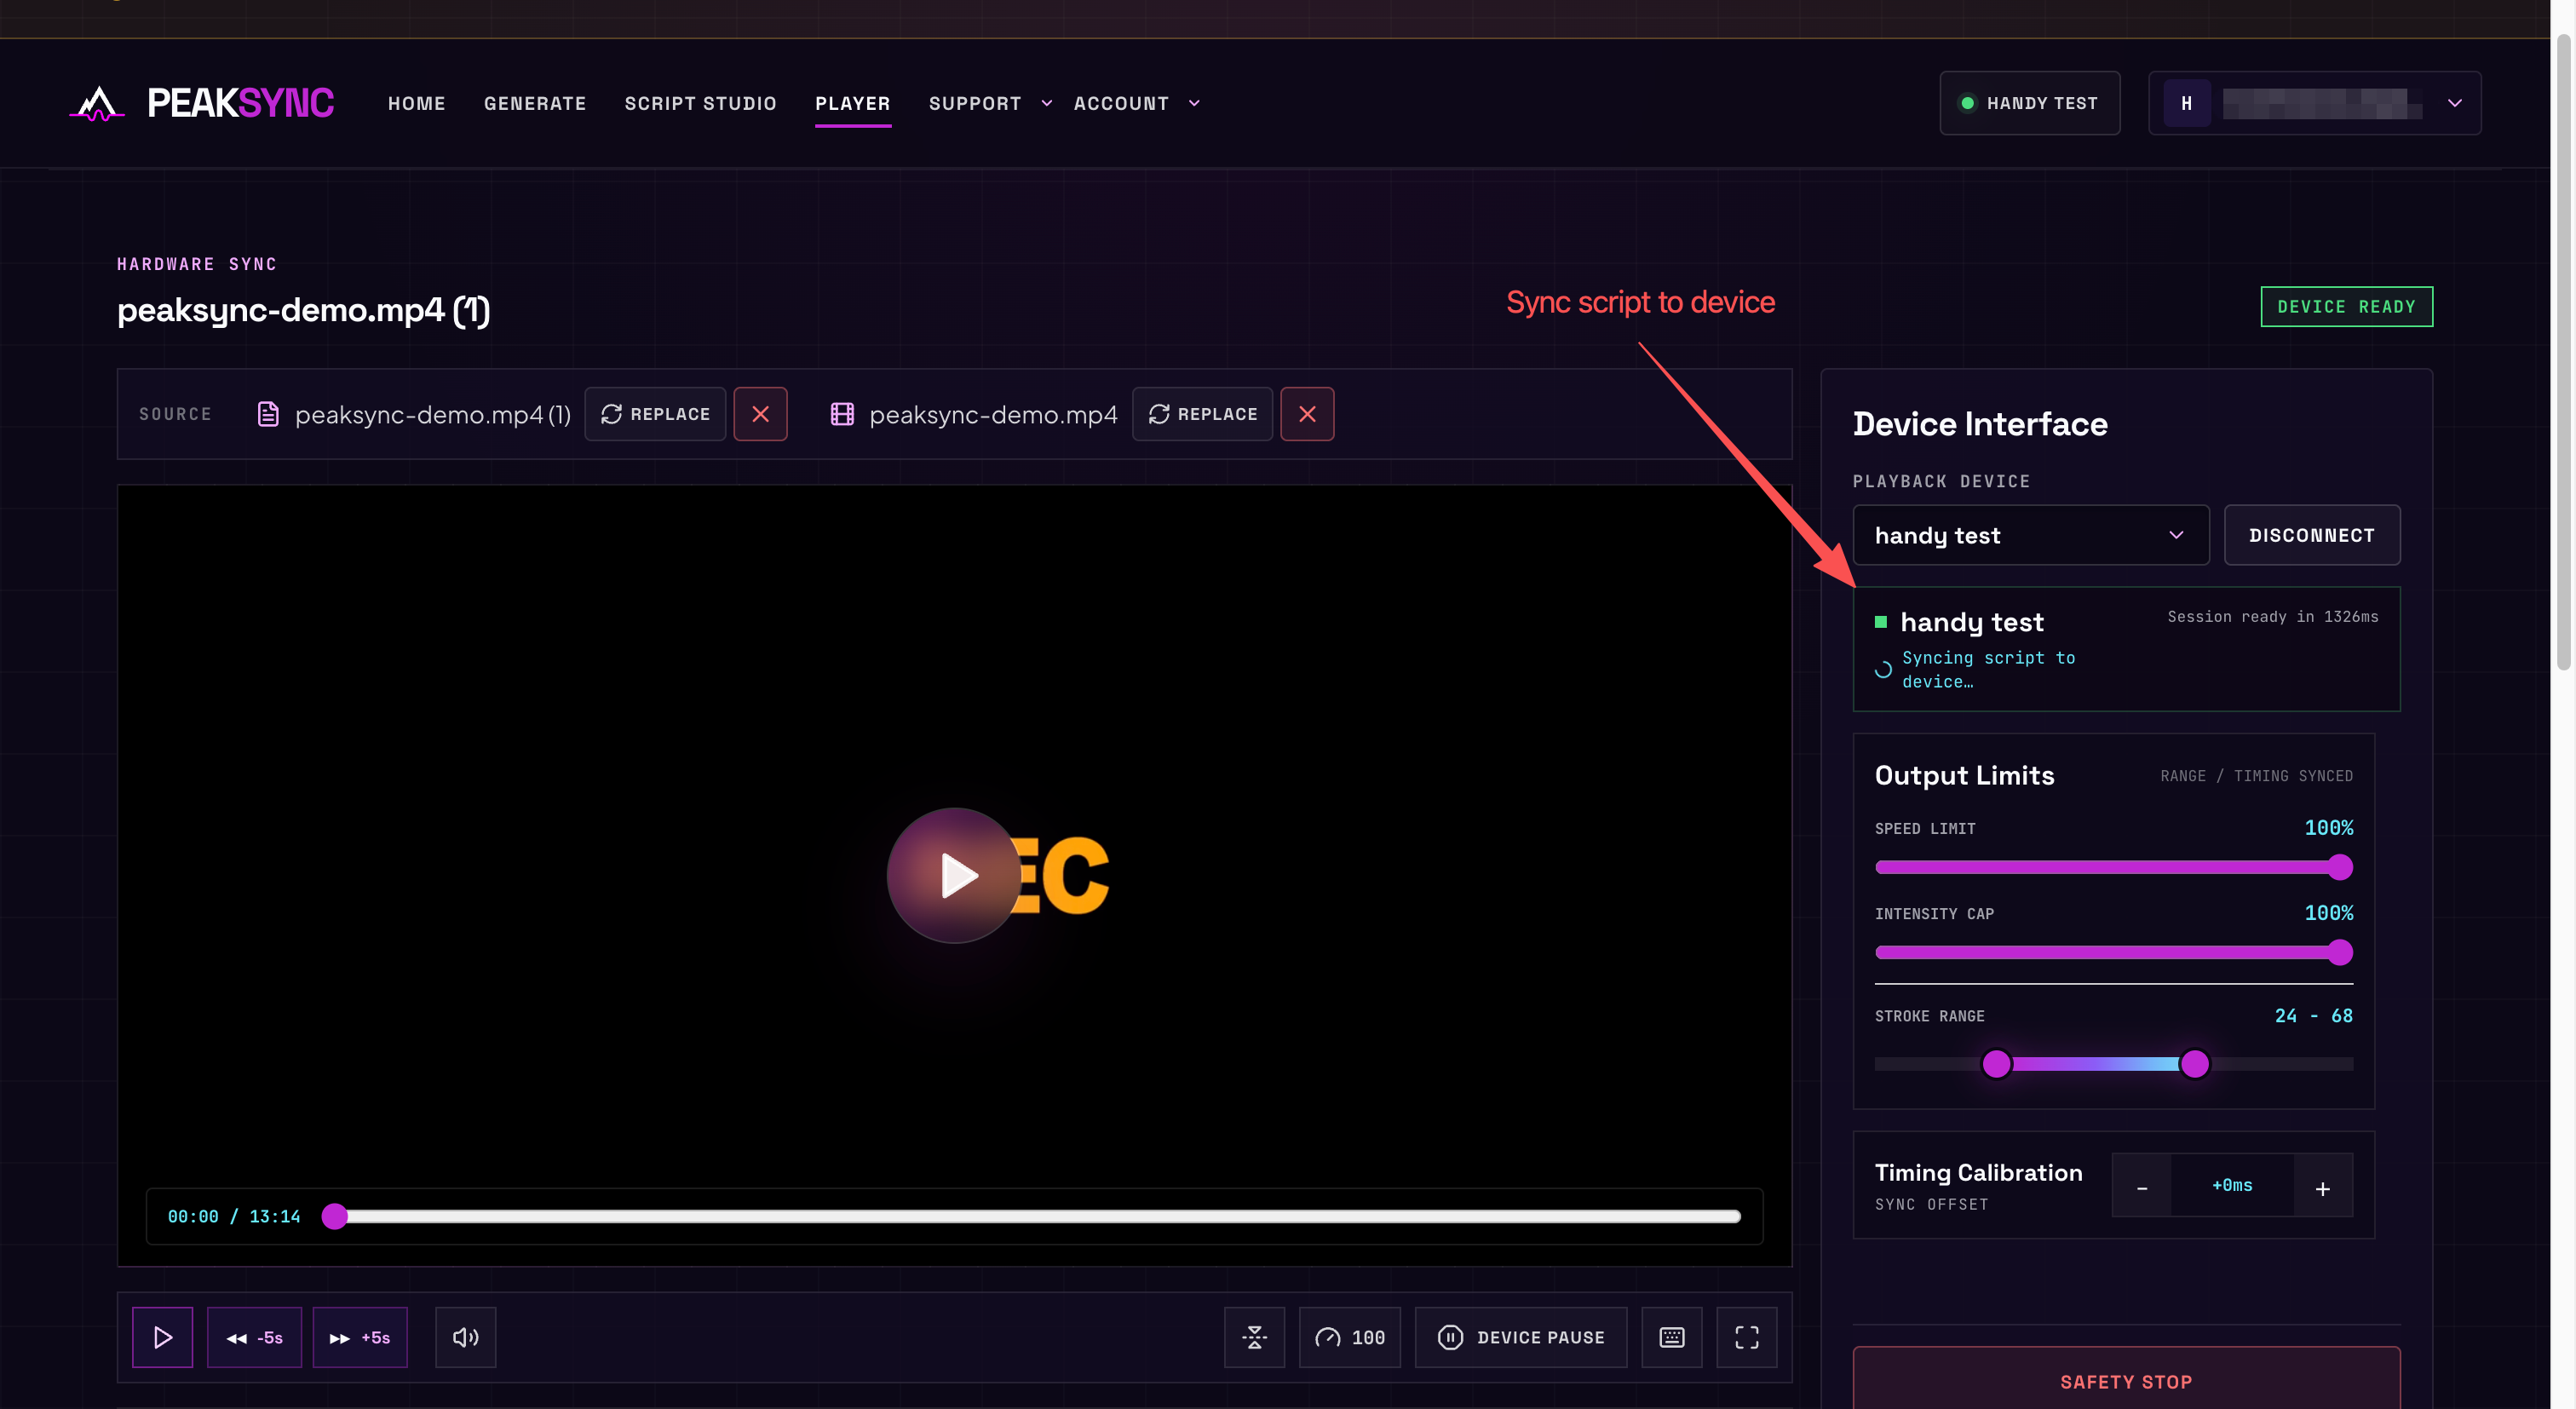
The device connection and the script sync are separate. A green device indicator means the connection
is live; wait for Script synced before expecting device output. The success message clears after a
moment, and the card returns to its normal connected status.
Player stops device output while a new sync is in progress. Replacing the funscript, reconnecting the device or changing an output setting that requires a new device-side script can start the sync again. Keep the page open and the device connected until it completes.
If Script sync failed appears, click Retry sync. Do not expect hardware motion until the sync
succeeds. If it keeps failing, reconnect the device and retry; chapter 4 covers the complete
connection and playback flow.
3.2 Read the device status after a successful sync
After the connection succeeds and the script is synced, press Play and check both device status areas before relying on the hardware output.
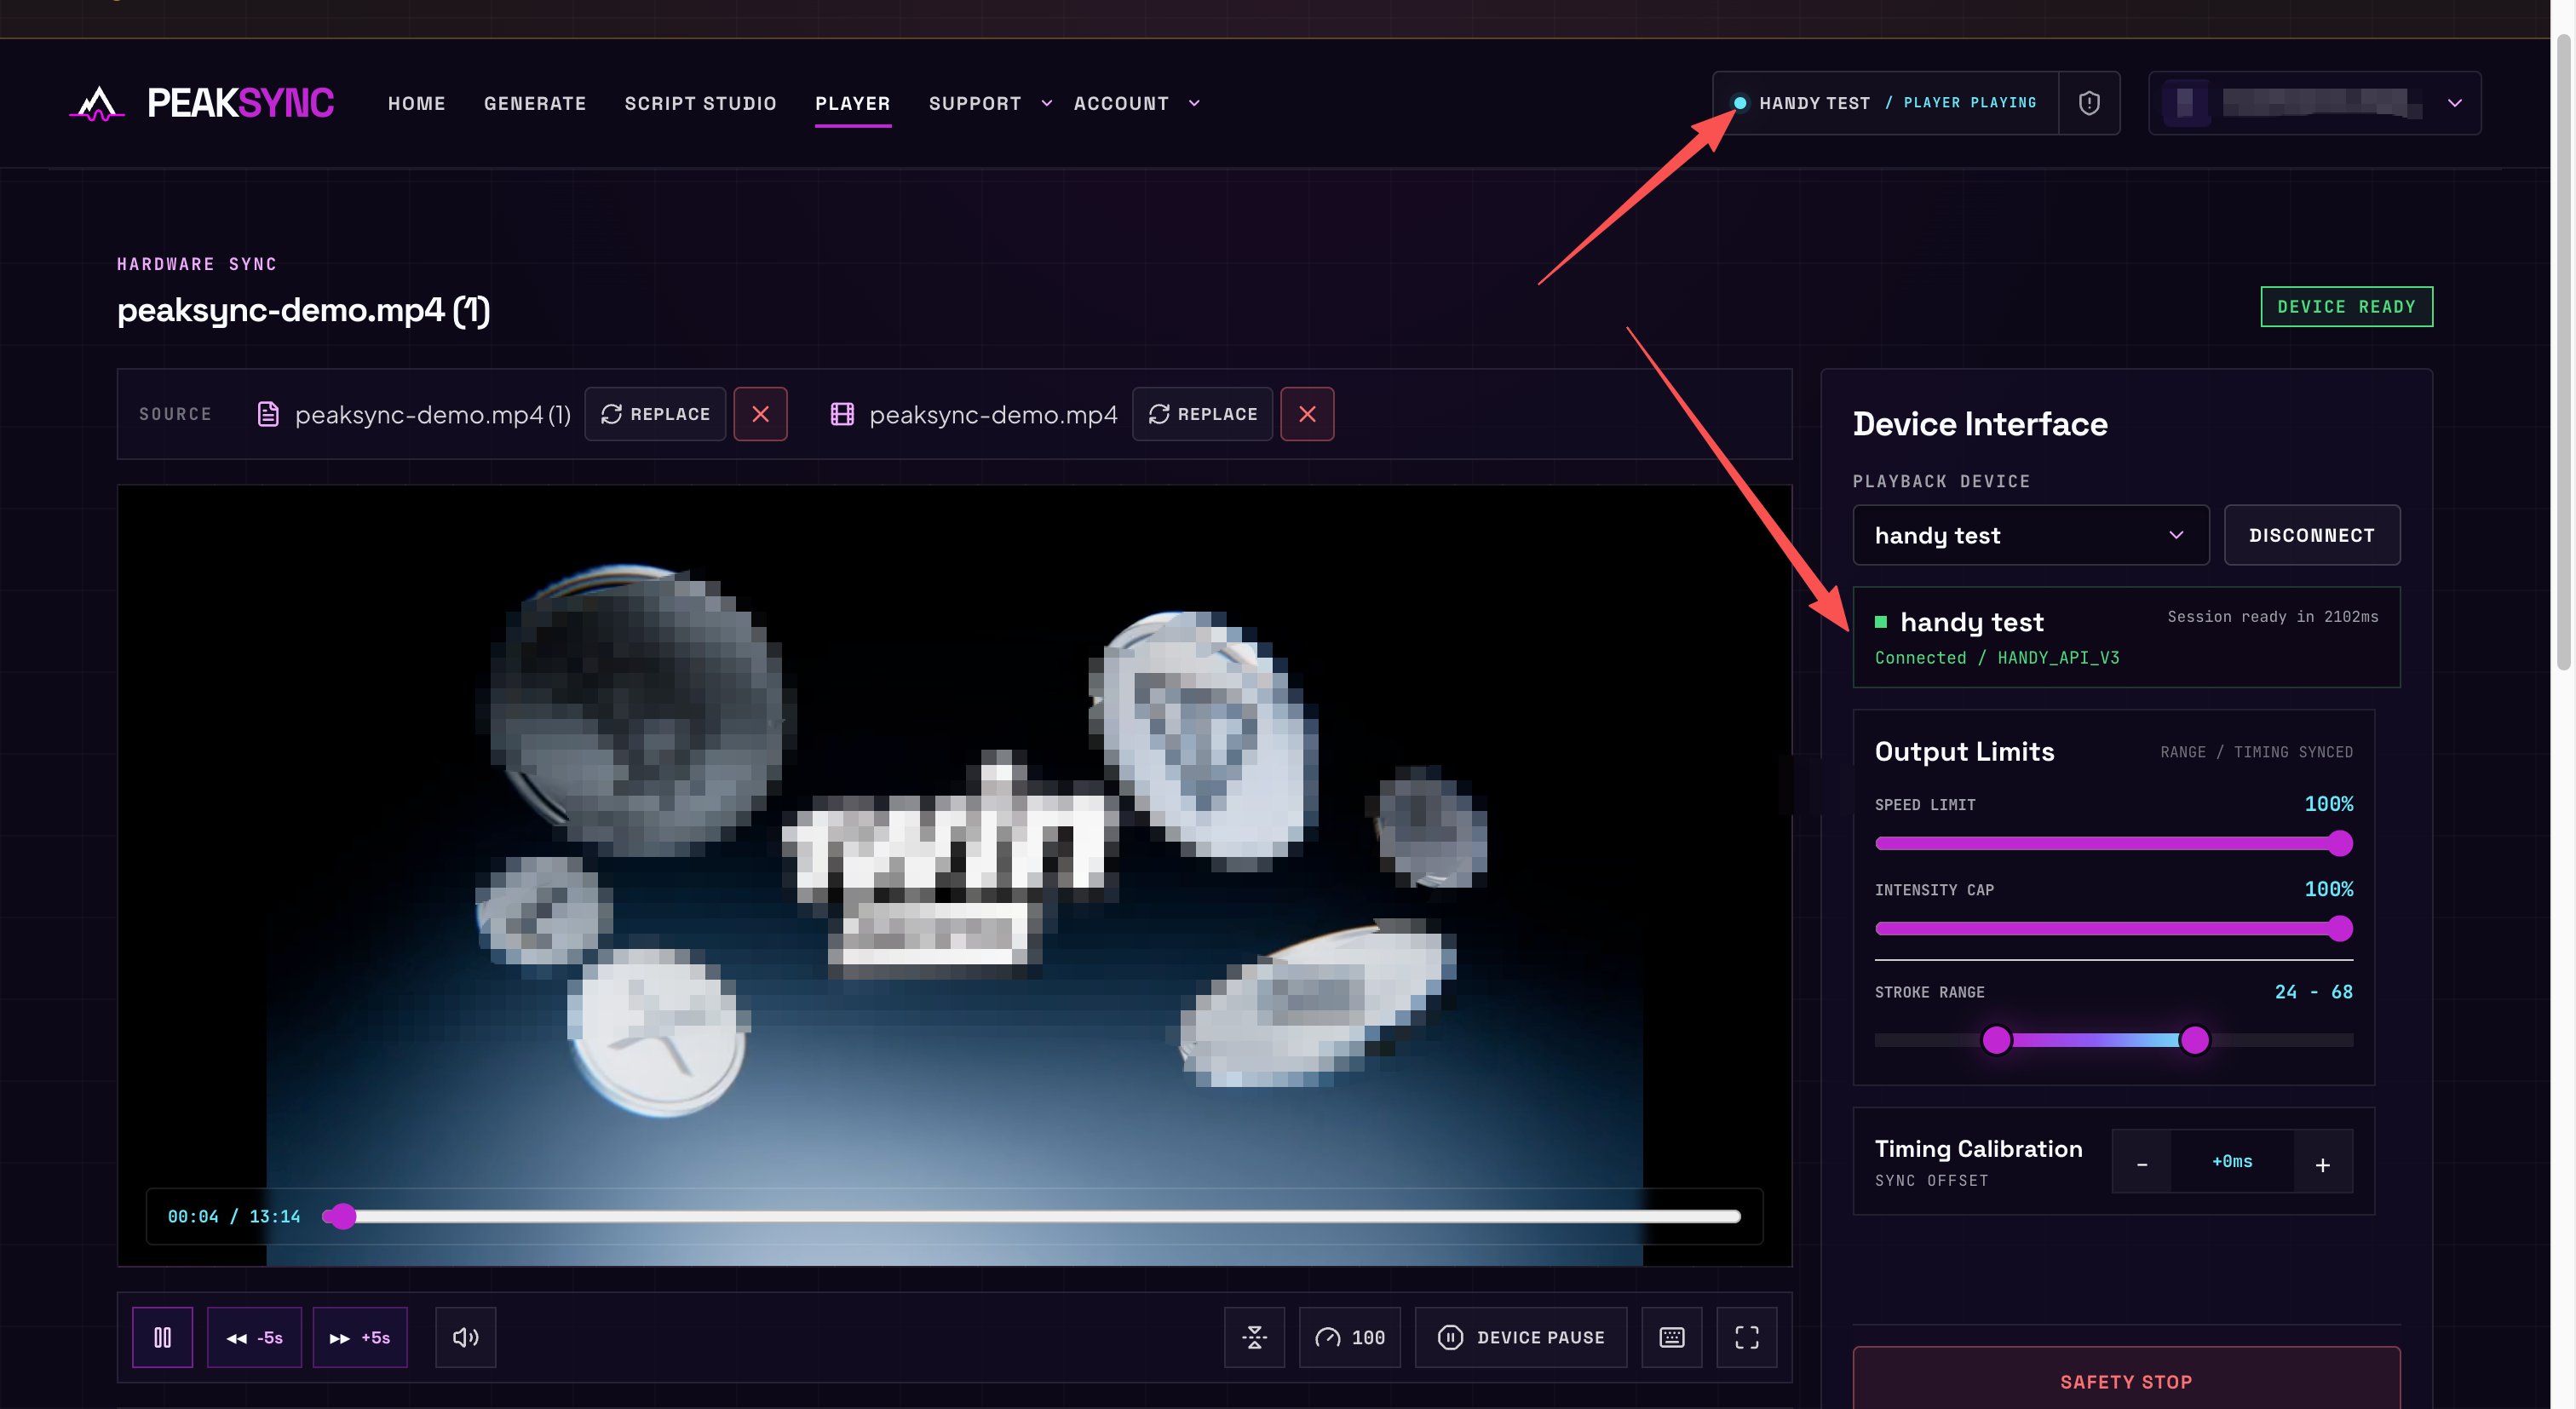
- Top device chip —
HANDY TEST / PLAYER PLAYING: the cyan dot andPLAYER PLAYINGmean Player currently controls the device and synchronized output is active. When playback pauses, the activity changes toPLAYER PAUSED. - Device Interface —
Connected / HANDY_API_V3: the green indicator confirms a live device connection; the text after the slash identifies the protocol used for this session. Session ready in 2102ms: this is how long the connection took to become ready. It is not the playback delay and is not the value adjusted by Timing Calibration.DEVICE READY: Player can see a connected playback device. This label alone does not mean the device is moving — look forPLAYER PLAYINGin the top chip to confirm active output.
If the page shows DEVICE READY but not PLAYER PLAYING, playback may be paused, device output may
be paused, or a safety stop may be active. Resume only after checking the video position and Output
Limits. The shield beside the top device chip and the SAFETY STOP button stop device output
immediately.
If no picture ever appears and you only see the Sync Scope, that is normal — see below.
3.3 Use local video or SCRIPT-ONLY playback
The server deletes your source video after generation. Your browser keeps a private local copy so the Player and Studio can still show it, which is why it usually just works.
But that copy is local. Clear your site data, or open the script on another computer, and there is no
video — only the script. The Player says NO VIDEO · SCRIPT-ONLY and plays anyway:
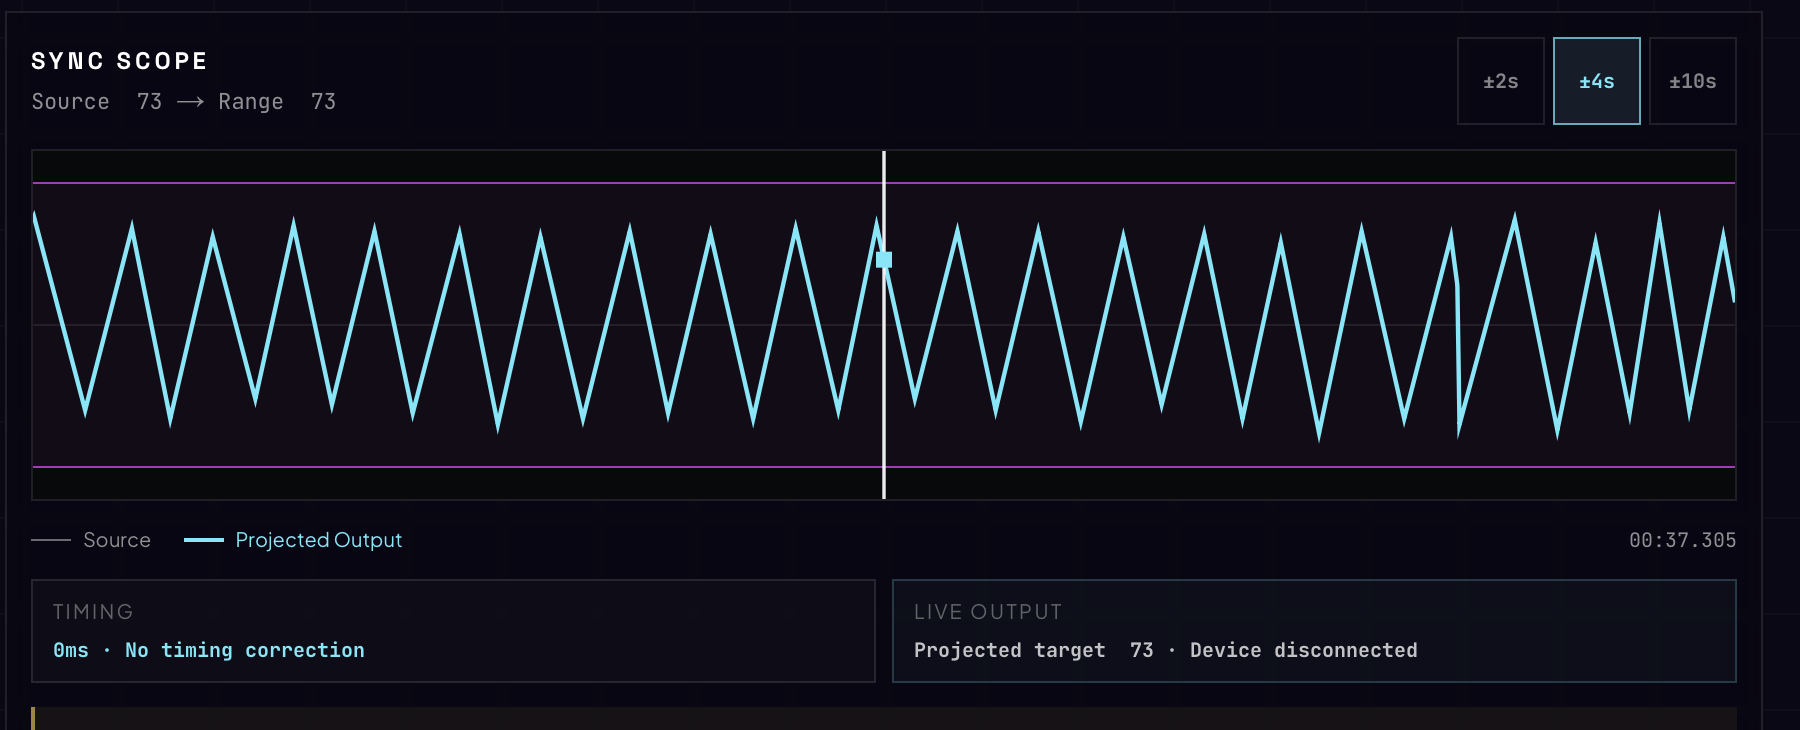
Everything still works — transport, seeking, Sync Scope, and full device output. You just have nothing to watch. Nothing is broken, and nothing is recoverable from PeakSync, because PeakSync never kept it.
4. Set up devices in ACCOUNT and use them in PLAYER
Everything so far works with no hardware at all. This chapter adds a device.
Anything that shows a device actually connected — from 4.3 onwards — was recorded on a different computer, one with real hardware attached, so the account and the saved profiles in those shots differ from the ones above. The steps are identical either way.
4.1 Distinguish an OFFLINE profile from a live connection
This is the single thing people get wrong most often, so it is worth reading carefully.
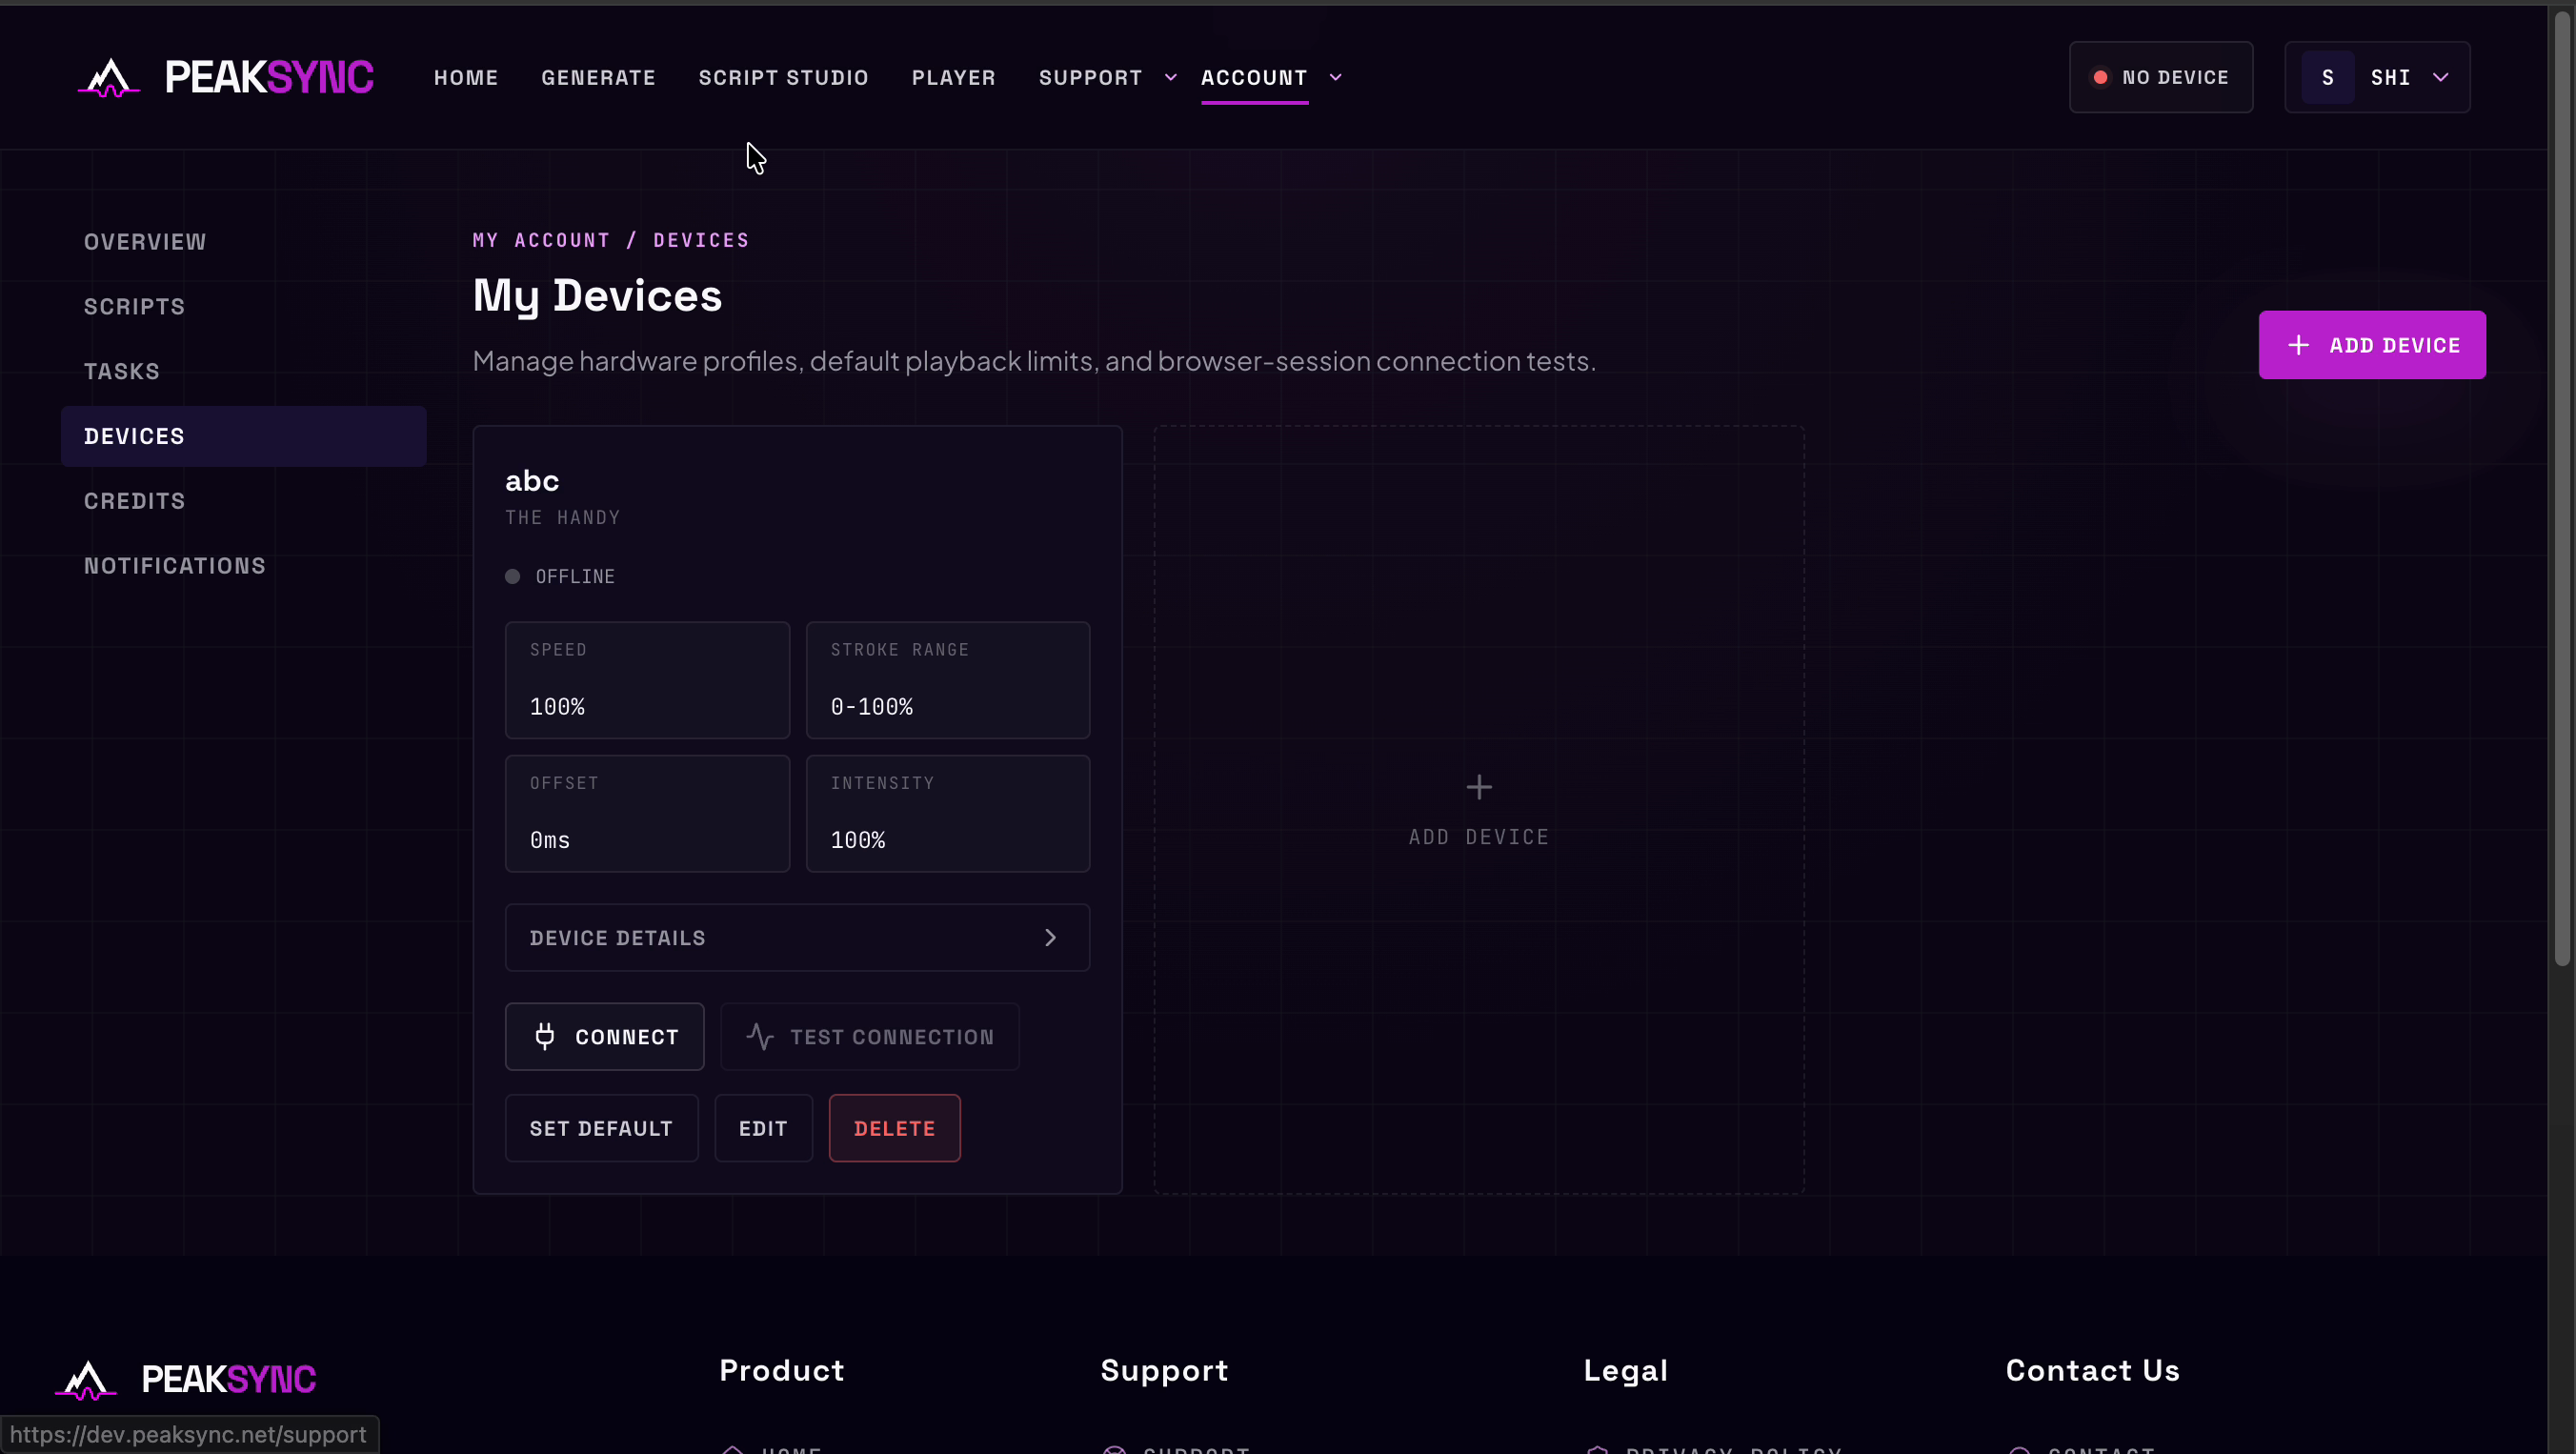
A device is saved here. It reads OFFLINE, and the header says NO DEVICE.
A profile is a name and a set of default limits, stored in your account. It cannot make anything move. A connection is live, belongs to one browser tab, and ends when that tab does.
So a saved profile reads OFFLINE on every computer, in every session, until you connect it there.
That is not a fault. It is the design.
4.2 Add a device profile in My Devices
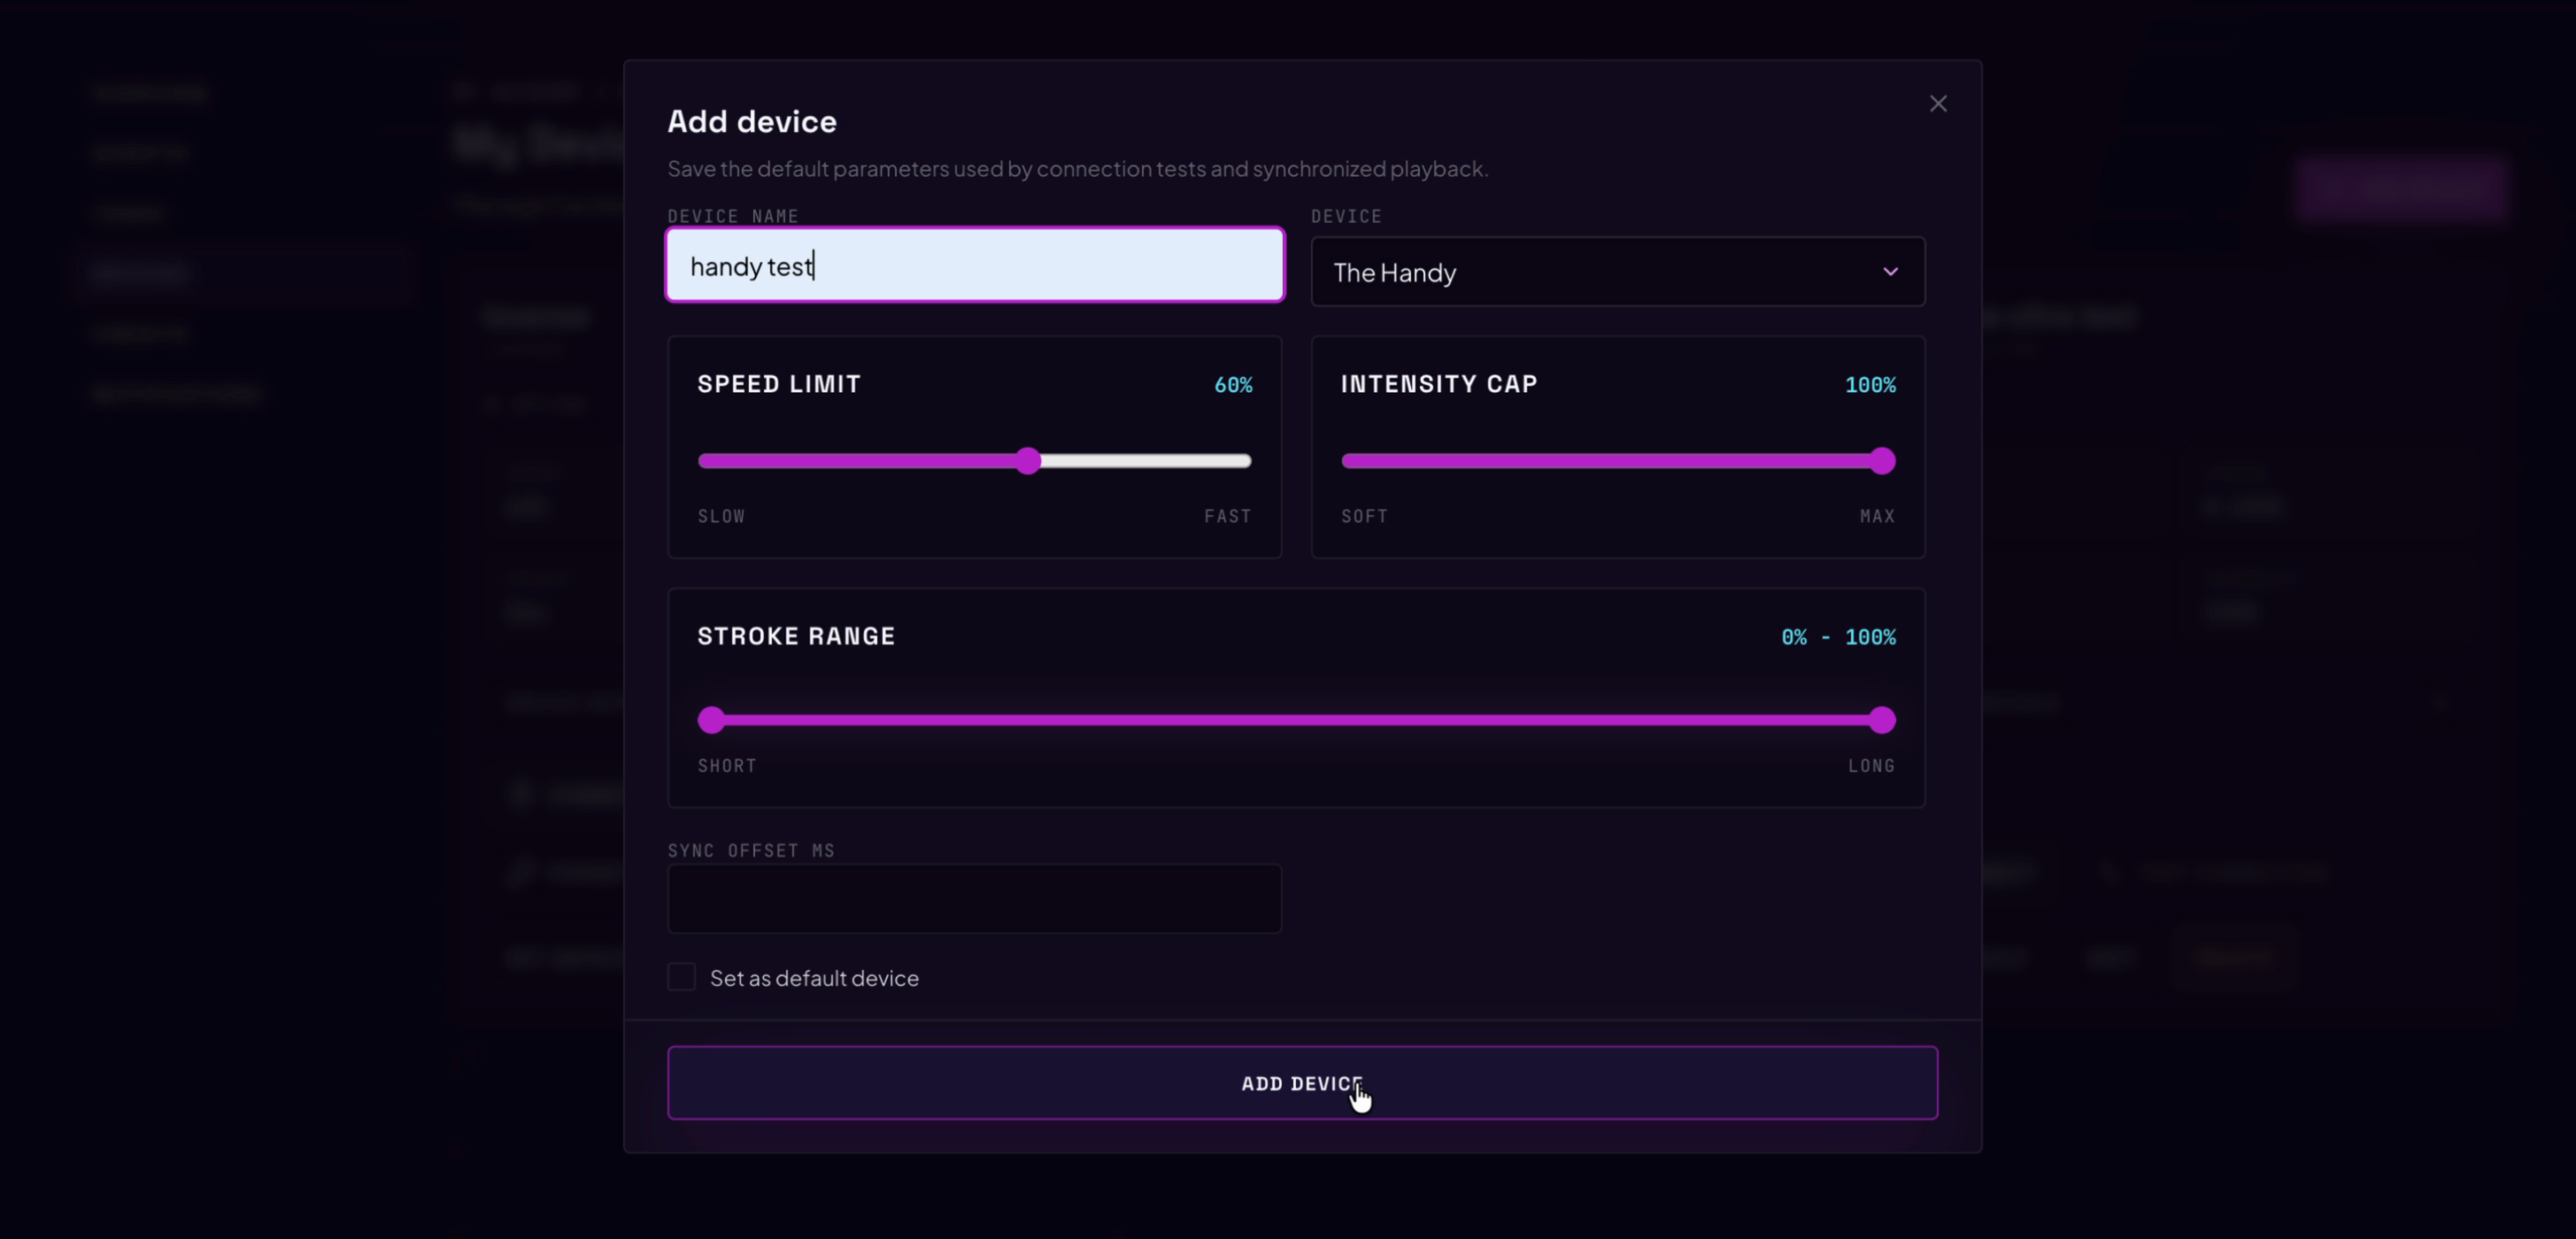
ACCOUNT → DEVICES → ADD DEVICE.
| Field | What it's for |
|---|---|
DEVICE NAME | Any name you choose. It labels the device everywhere afterwards |
DEVICE | The family — The Handy · Autoblow Ultra · VacuGlide 2 · Lovense · Buttplug / Intiface |
SPEED LIMIT | SLOW ←→ FAST, as a percentage |
INTENSITY CAP | SOFT ←→ MAX |
STROKE RANGE | SHORT ←→ LONG, a two-handled range |
SYNC OFFSET MS | A timing correction, if you already know yours |
Set as default device | Pre-selects it in the Player |
These are defaults, not locks. The Player can tighten them for a session without changing what you saved here.
Start somewhere middling and adjust. SPEED LIMIT 60% is a comfortable first setting to feel out
a new device — the profile above uses exactly that. Move it wherever you like from there.
4.3 Connect a saved device in My Devices
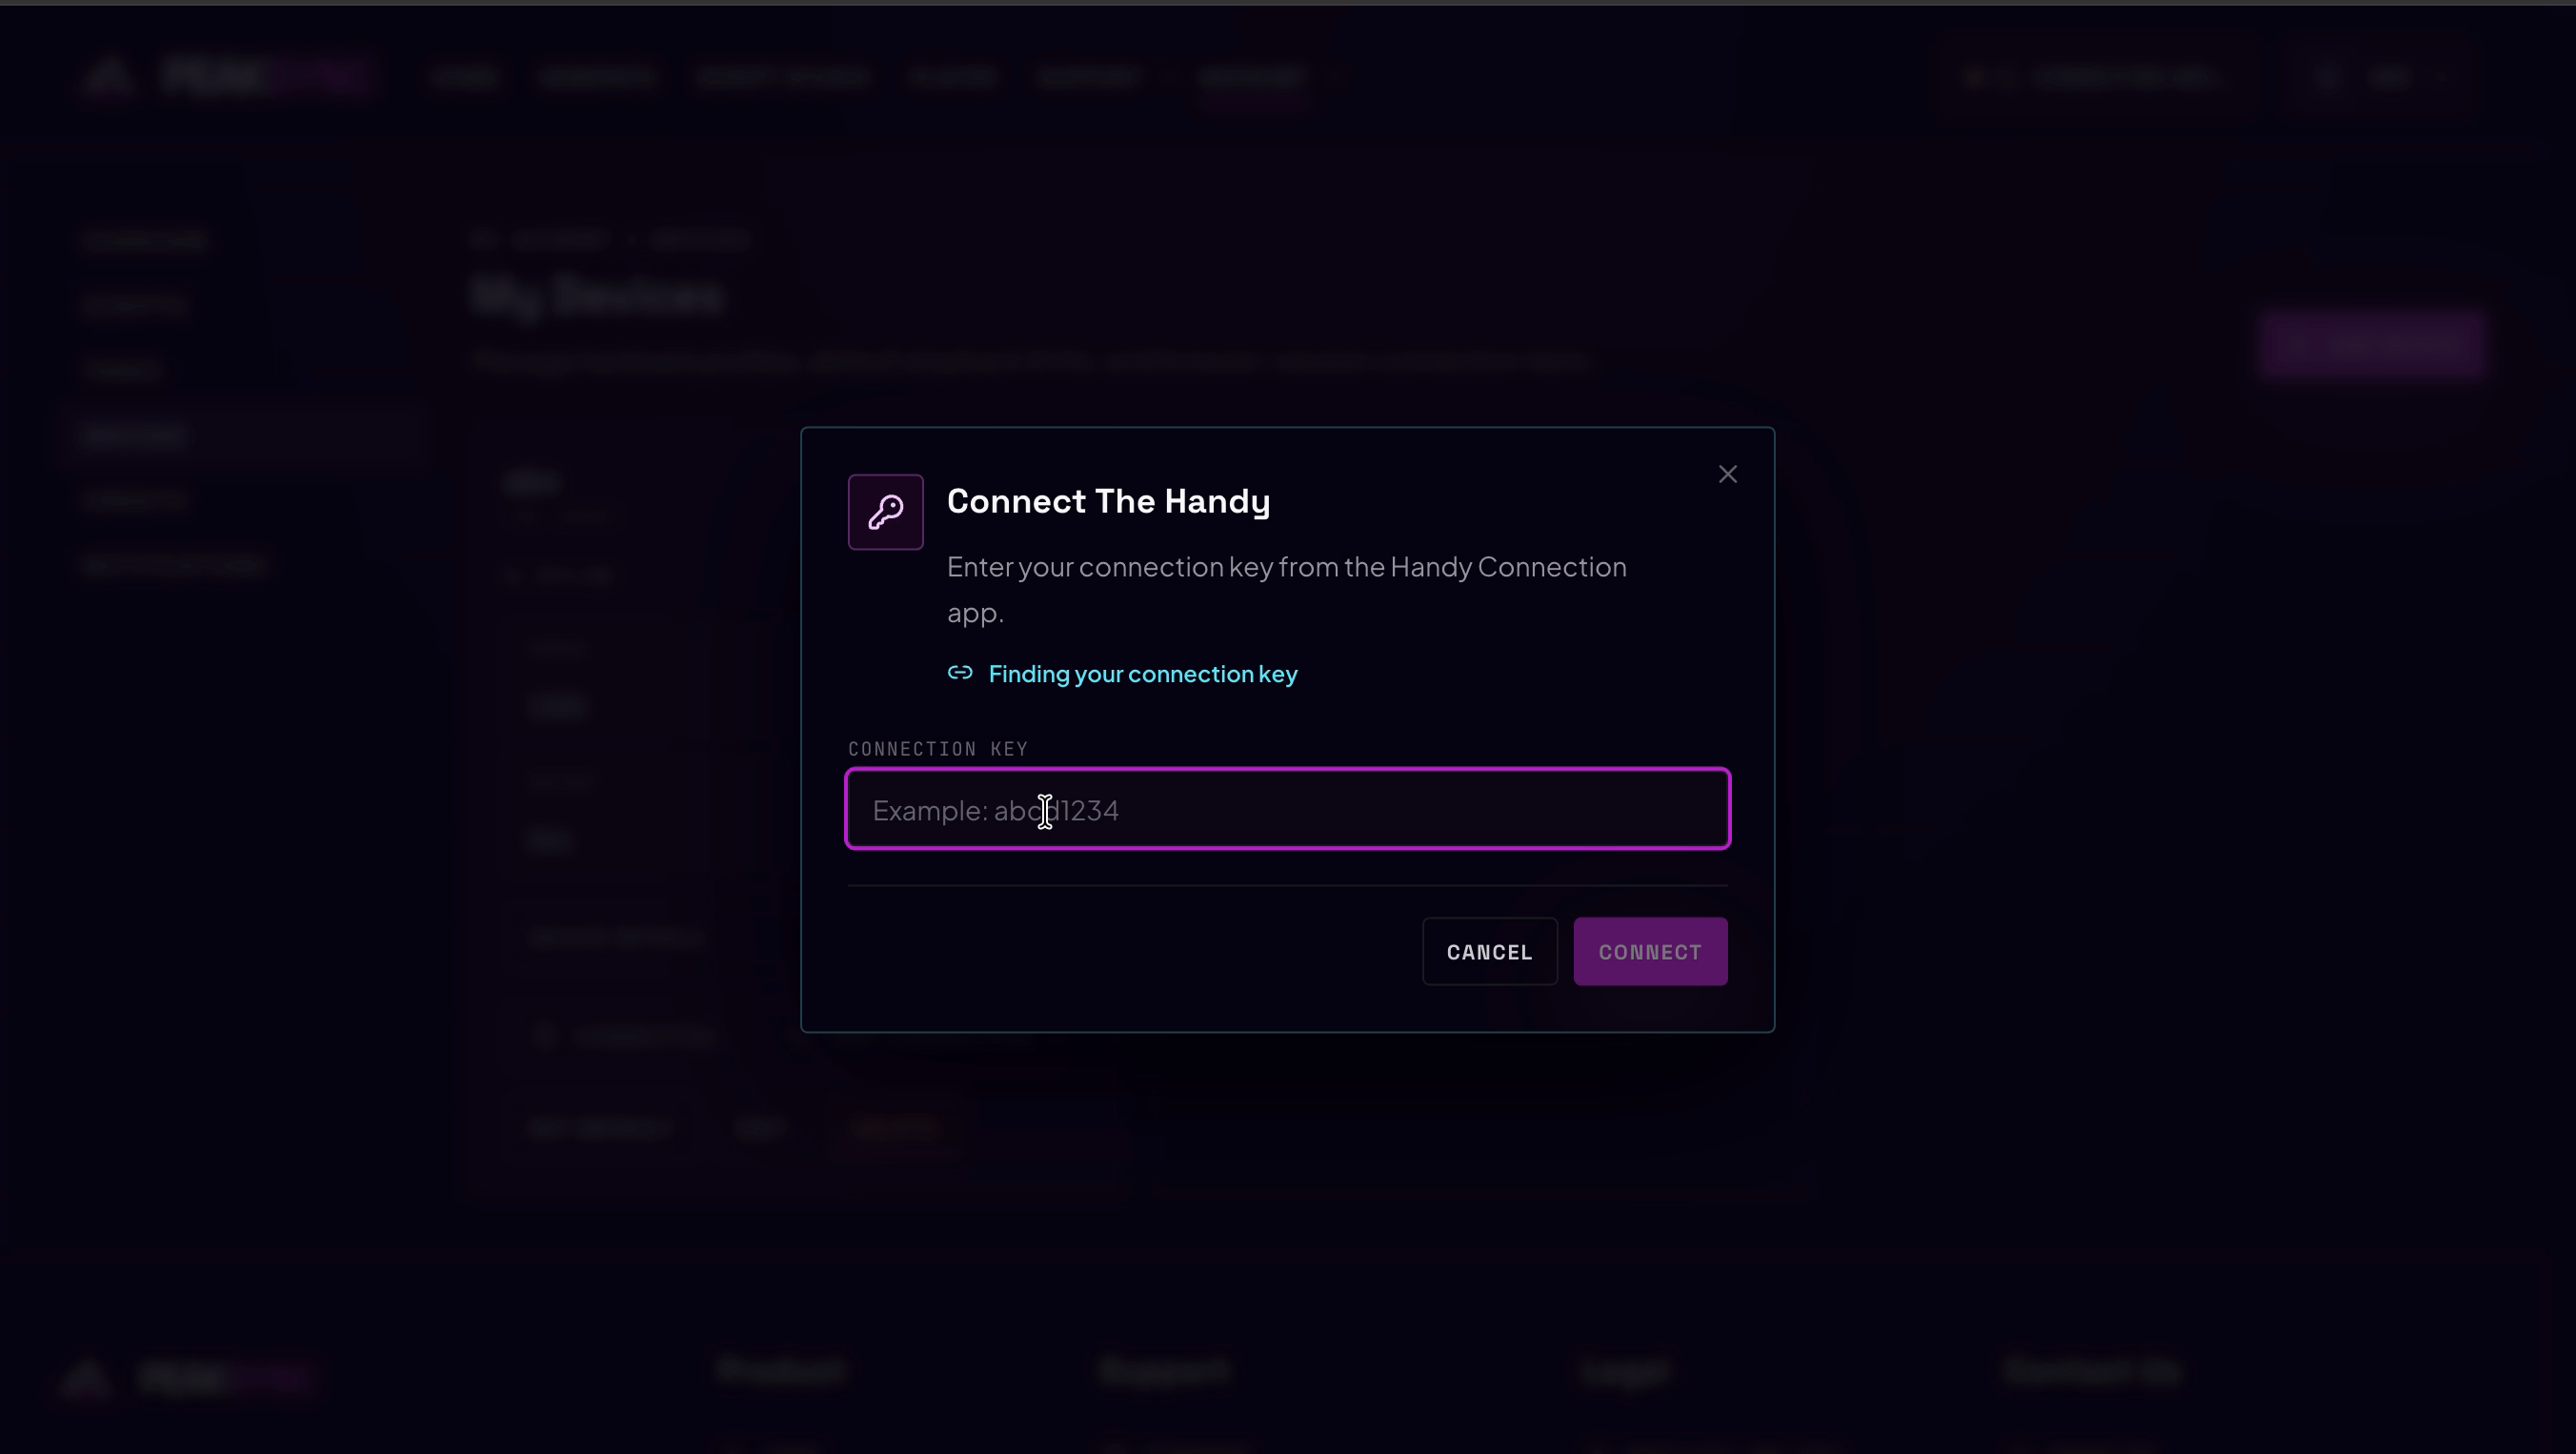
Press CONNECT on the card. You will be asked for one credential. For The Handy, that is the
connection key from the Handy app. If you don't know where to find it, the dialog links to
Finding your connection key.
The key is handled entirely on your side. It never reaches PeakSync's servers — where your browser supports it, PeakSync stores it encrypted on your own machine so a later connection can reuse it instead of asking again. It is only ever used to talk to your device, directly from your tab.
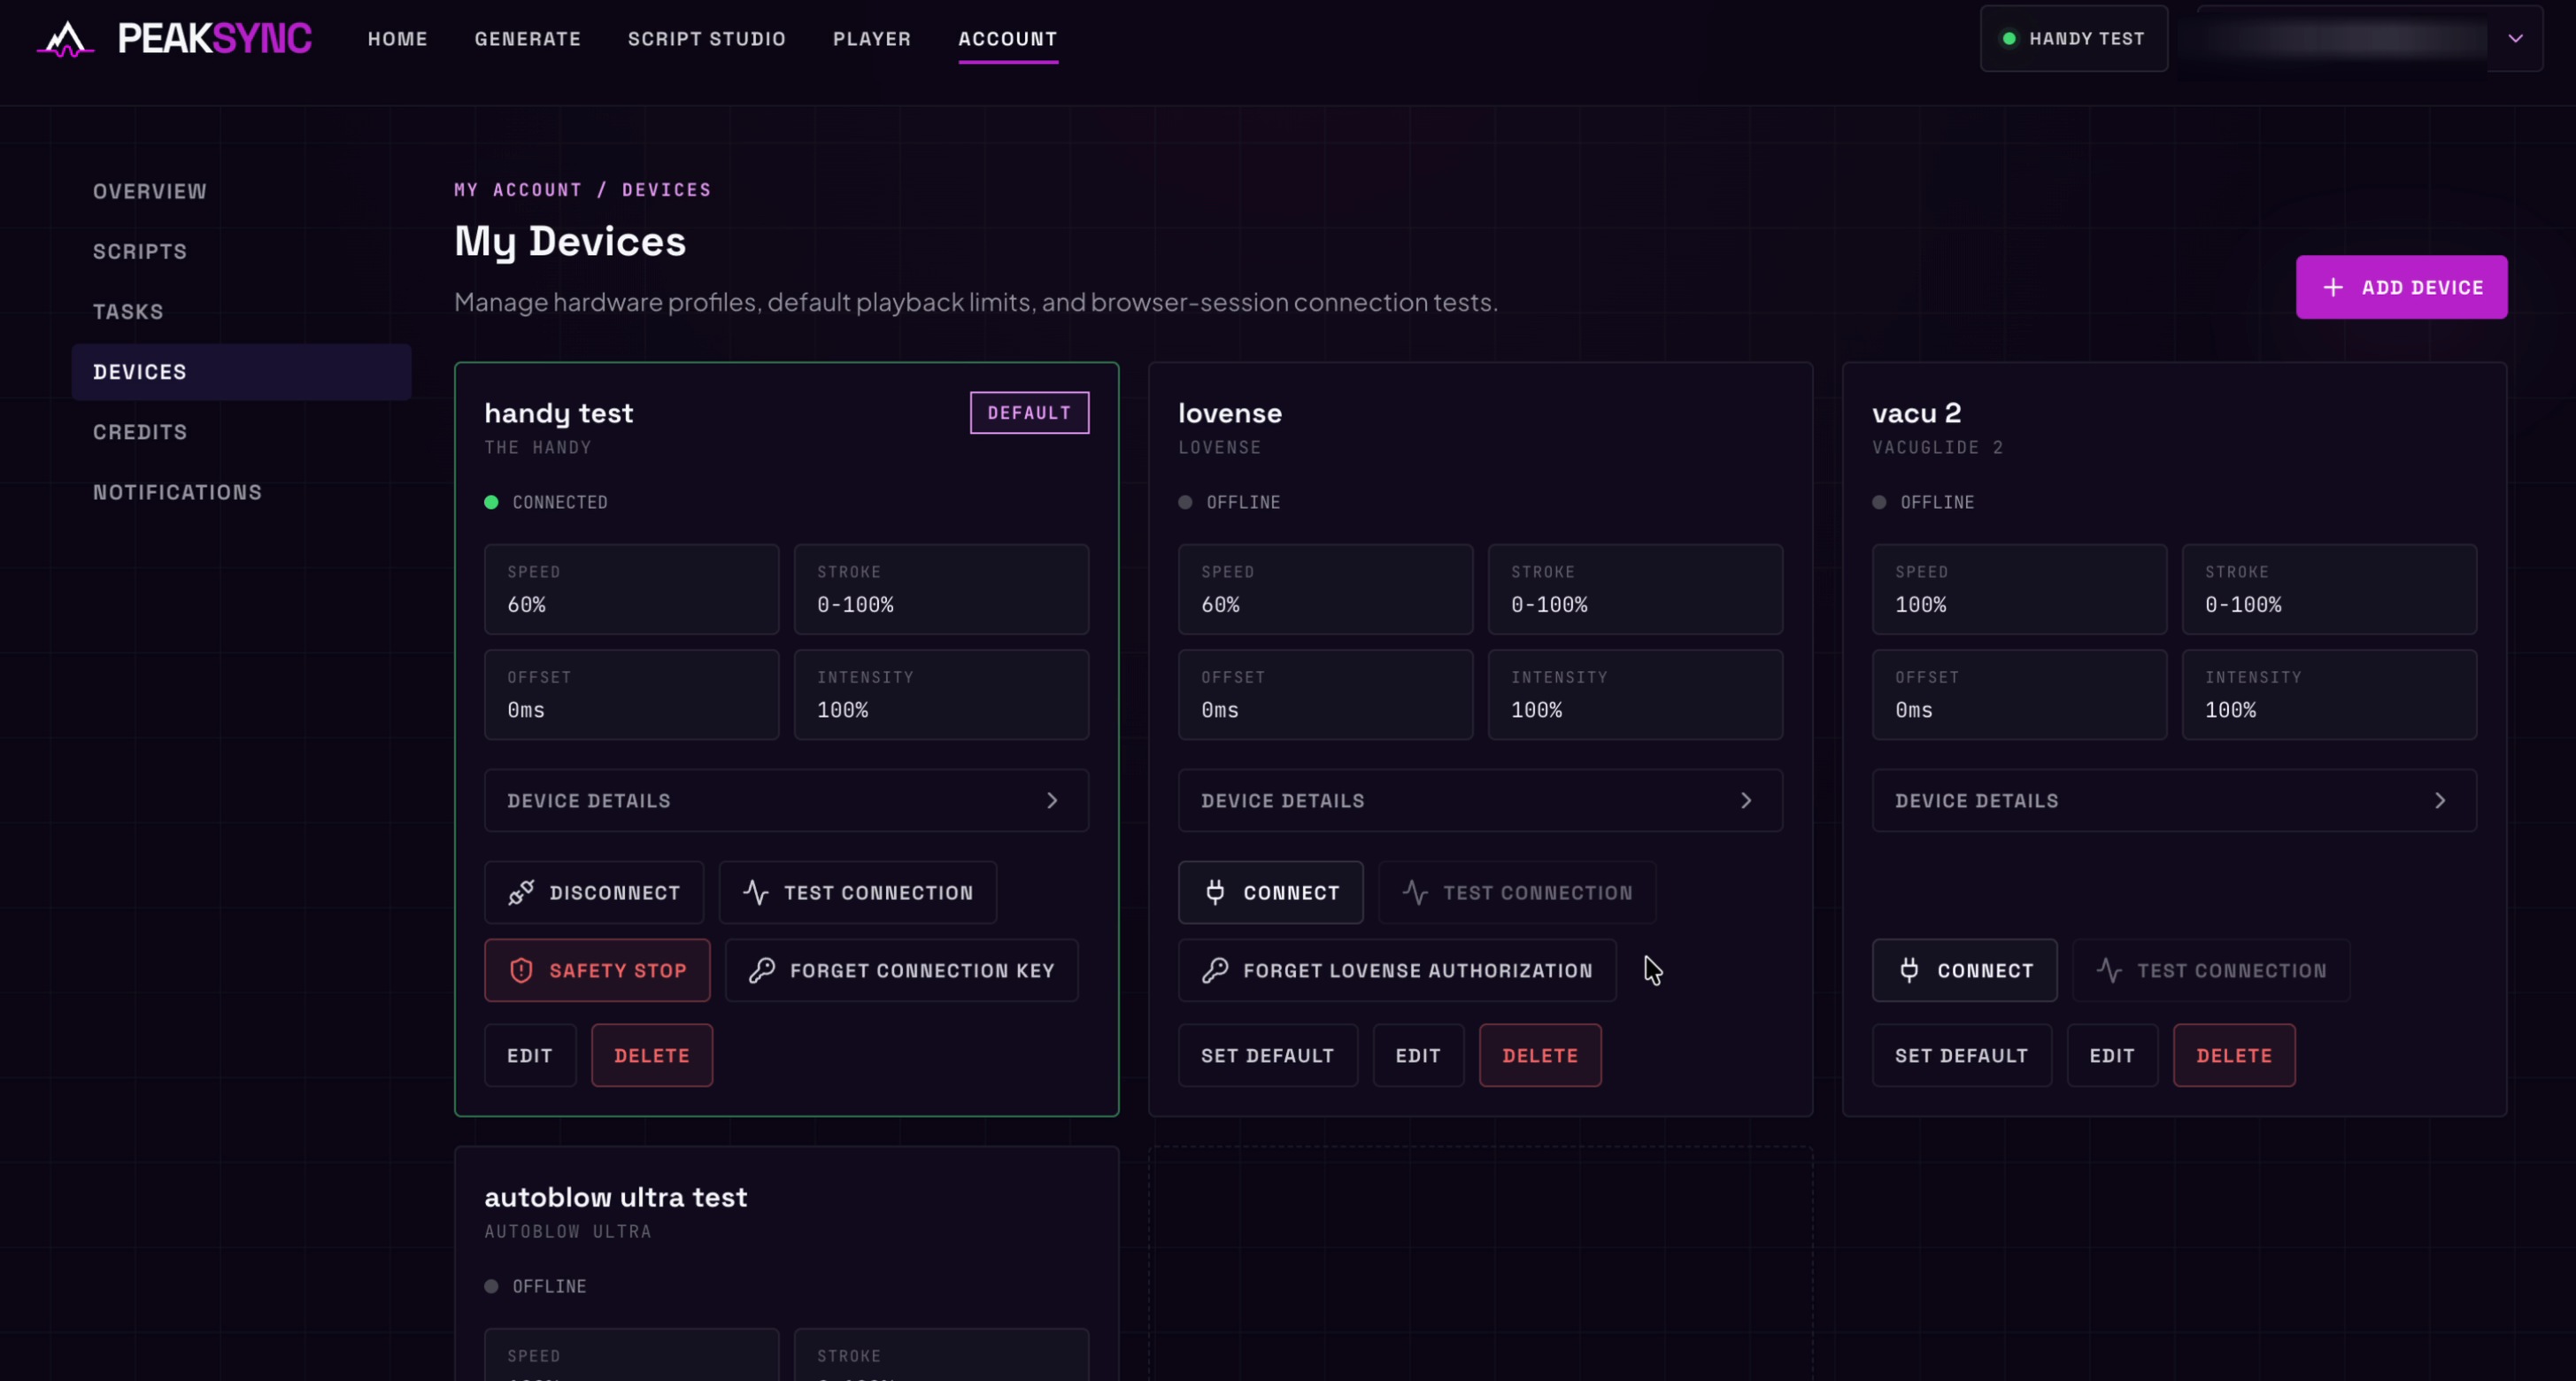
The card changes: CONNECTED, a green SUPPORTED badge, LAST CONNECTED with a timestamp,
and the actions become DISCONNECT, SAFETY STOP and FORGET CONNECTION KEY. The header pill
follows — NO DEVICE becomes the device's name.
FORGET CONNECTION KEY discards the stored key straight away, whenever you want it gone.
4.4 Test hardware with TEST CONNECTION
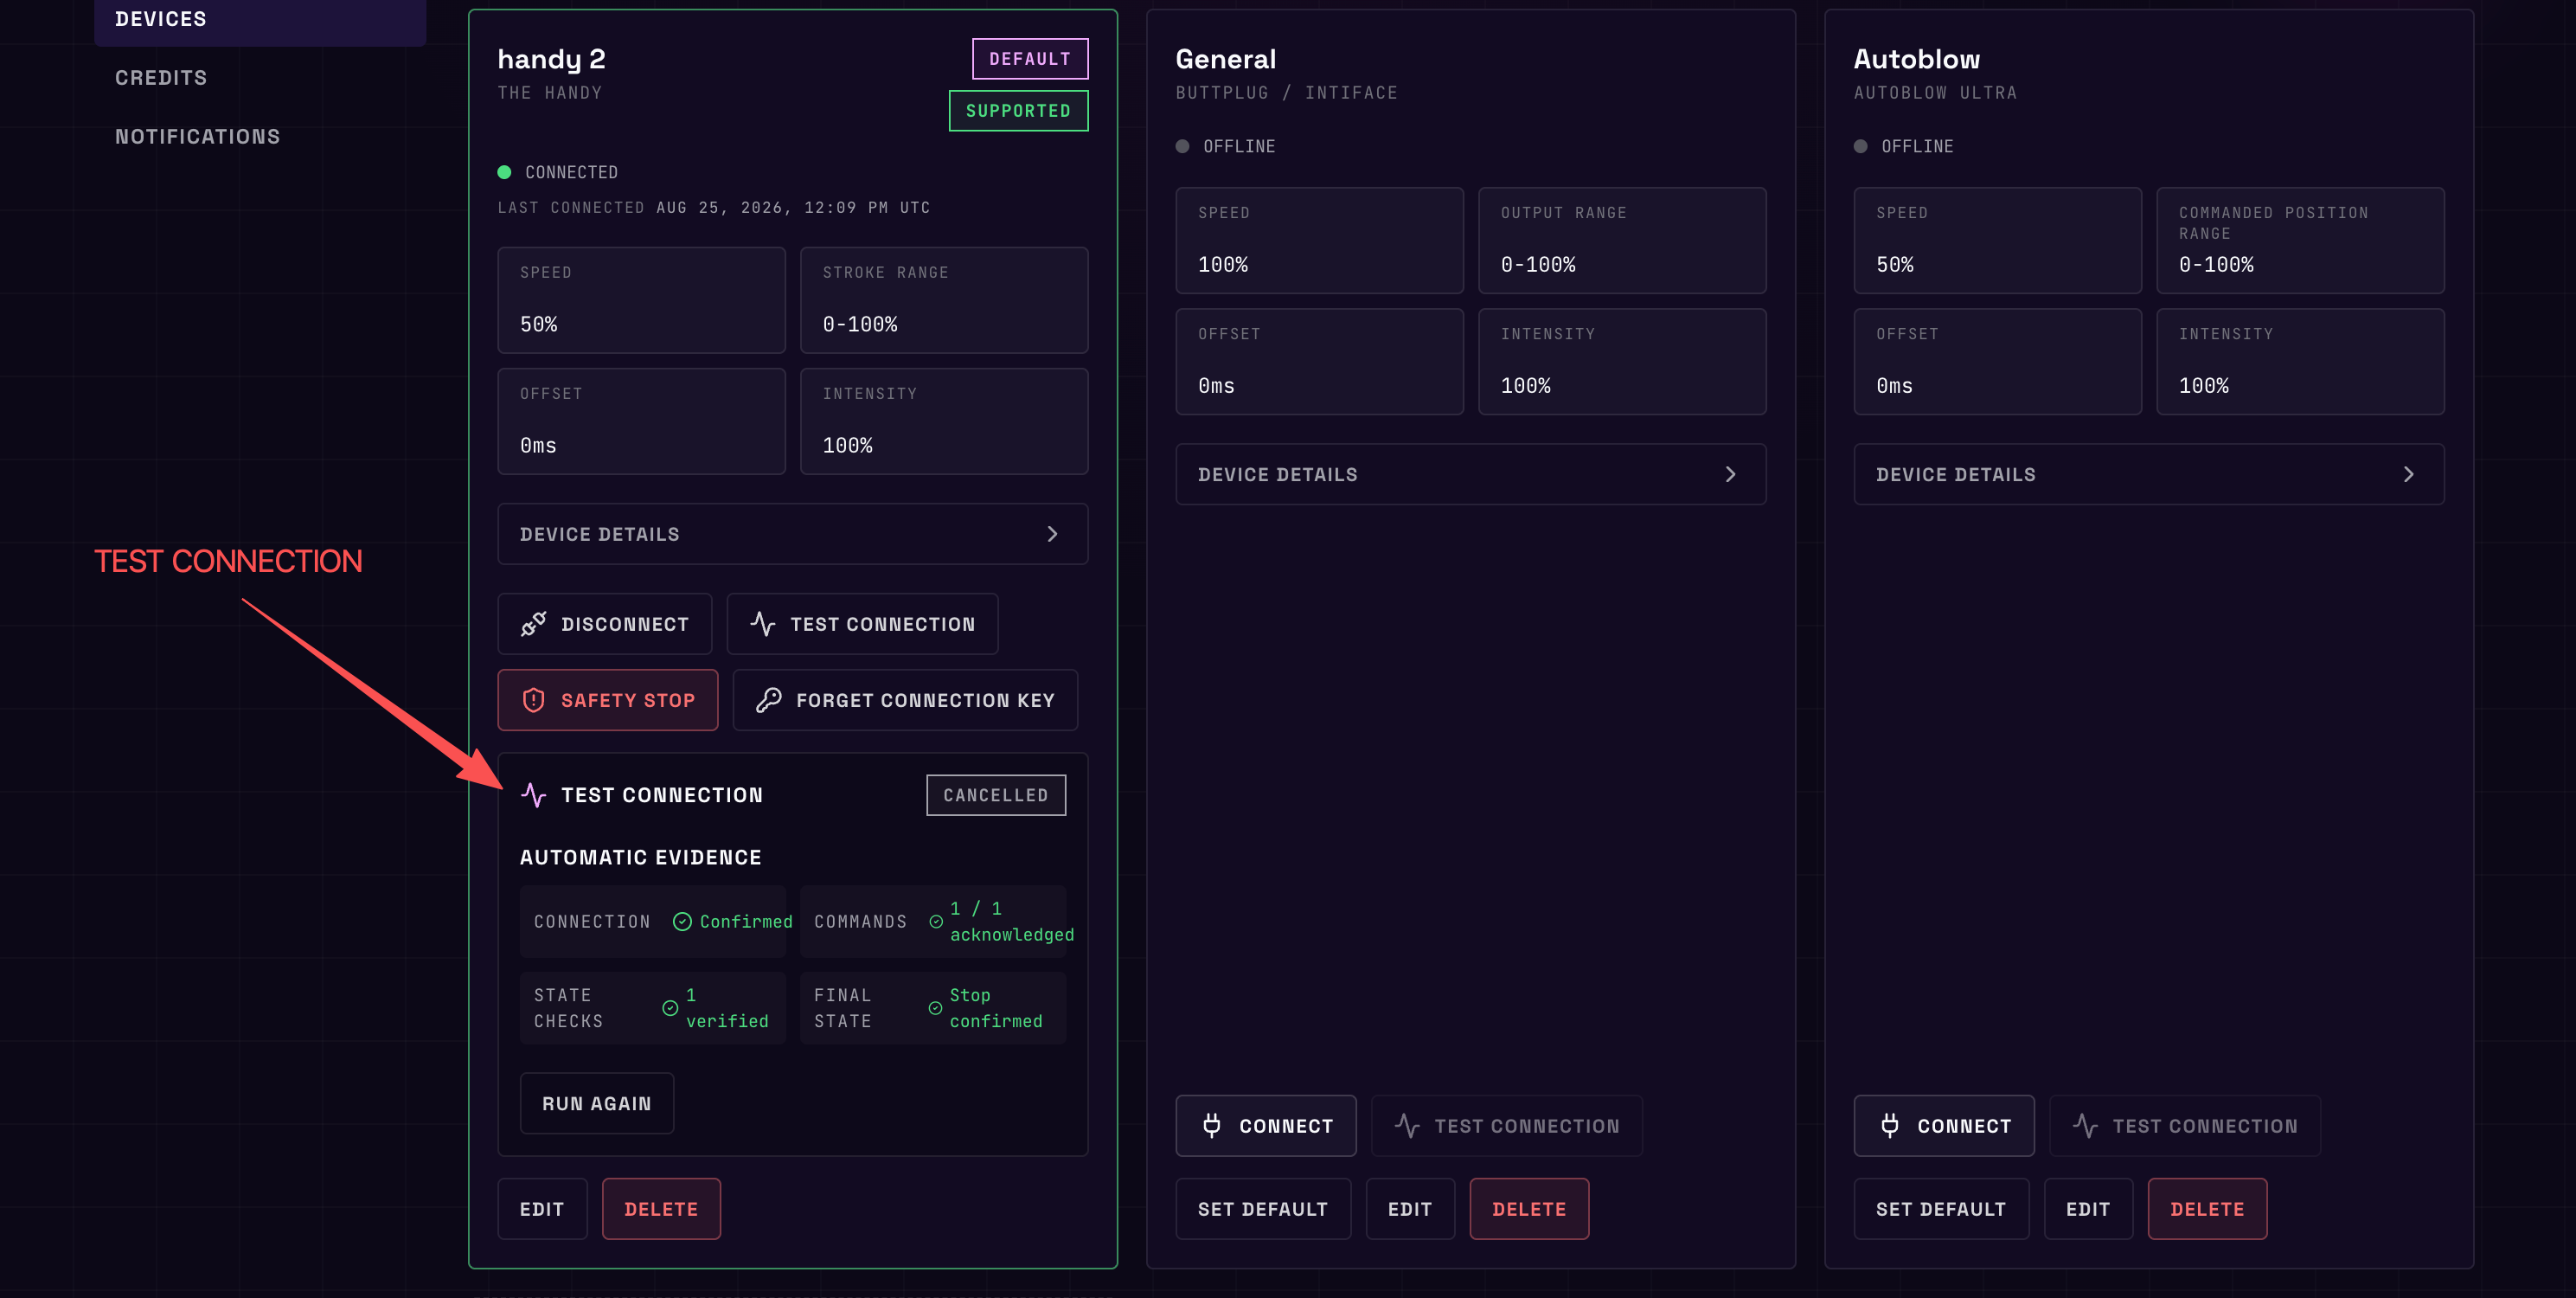
TEST CONNECTION runs a short, controlled stroke motion of about six seconds, so you can feel
that the connection works before you start a whole script.
It reports what it's doing as it goes:
Handy continuous-motion session acknowledged. Handy 60% velocity command acknowledged and HAMP moving state verified; maintaining motion for six seconds.
Note the 60% — the test obeys the profile's limits, so it is also a check on your settings.
Expect it to say OFFLINE again afterwards. The test connects, tests, and disconnects. That is
not a failure.
4.5 Connect the device in PLAYER and start playback
Open a script in the Player and connect there.
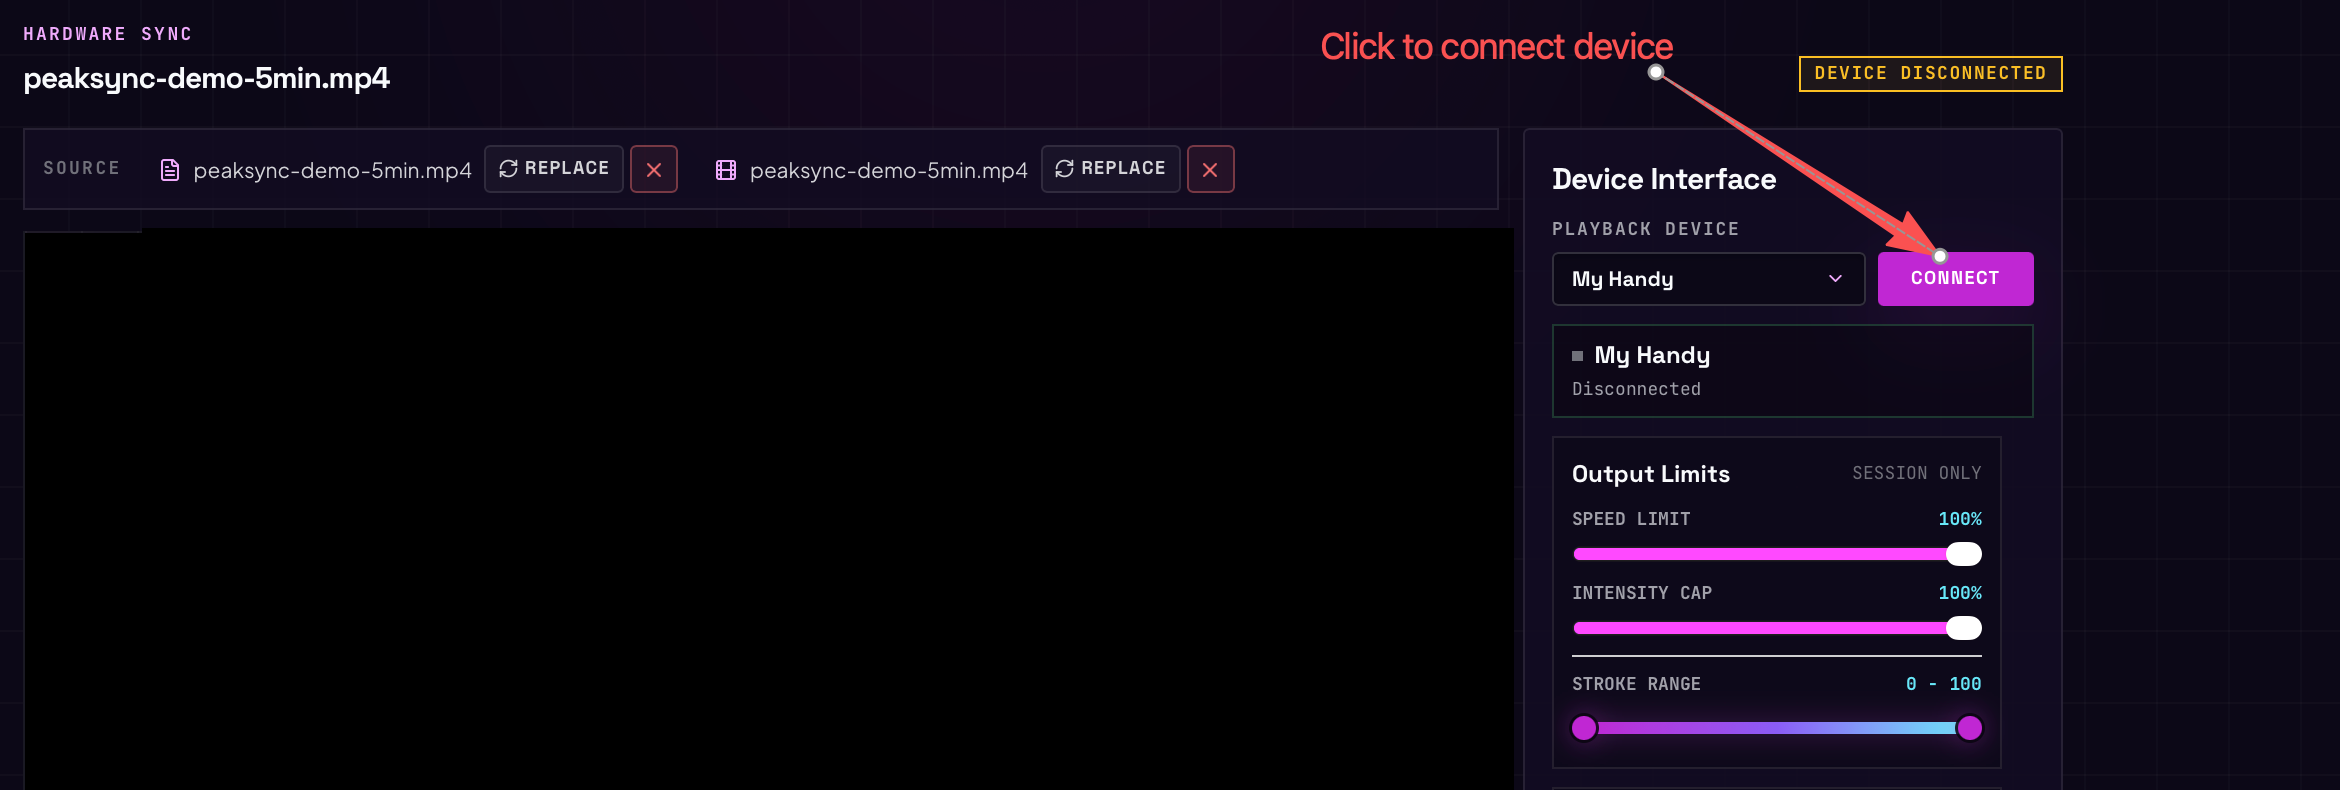
Your saved device is pre-selected by name — but selecting is not connecting. Nothing reaches your
hardware until you press CONNECT.
Below it are the same three limits, marked SESSION ONLY. Change them here and your saved
profile stays as it was. SAFETY STOP sits at the bottom, always within reach.
If you'd like it gentler or stronger than it comes, that's what these limits are for — and Limit script speed with Speed Guard does the same thing in the script itself.
Then press play:
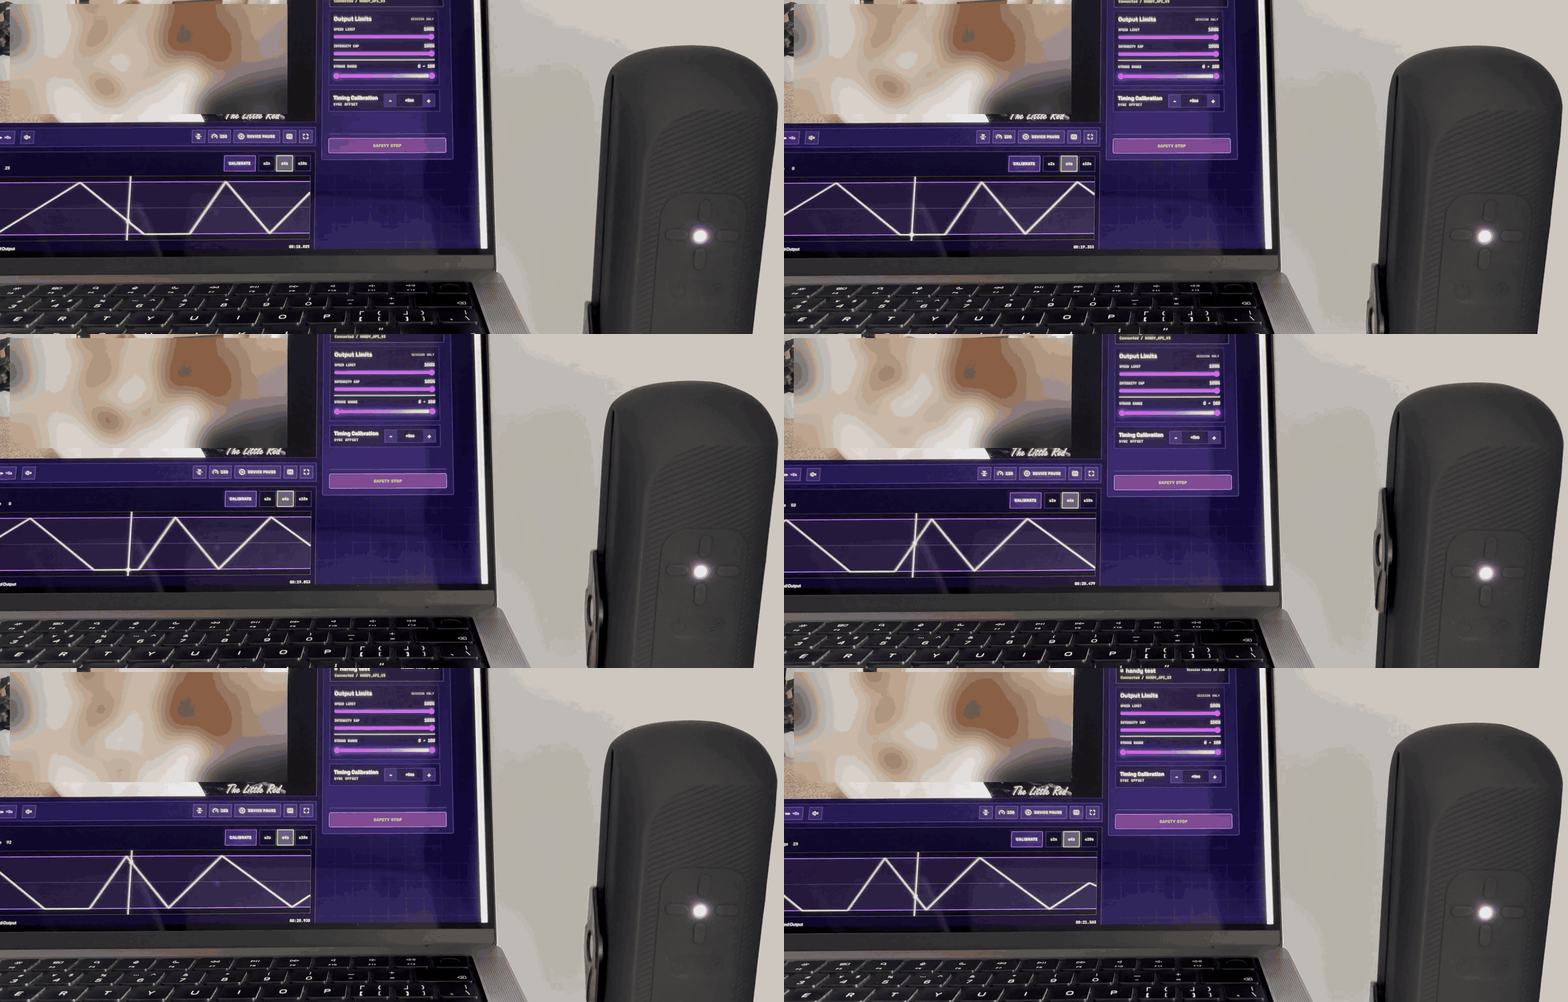
Real hardware, driven by the script on the screen beside it. The video pane is blurred; nothing else is touched.
That is the whole product in one picture: the trace advances, and the device follows it.
Read PROJECTED device output
Everything the Player reports about output is labeled Projected — Projected target 44.
PeakSync knows what it told the device to do. Most hardware never reports back what it actually did. The word is there for accuracy; it does not mean something is wrong. Judge by feel, not by the screen.
4.6 Calibrate device timing with CALIBRATE
If the motion runs slightly ahead of or behind the picture, fix it once instead of living with it.
CALIBRATE sits beside the Sync Scope and opens Calibration Mode: a short passage loops so you
can adjust while feeling the result. It appears once a video is loaded — on a script-only session the
Sync Scope says Add a video to calibrate timing. and you set the offset in the Device Interface
instead.
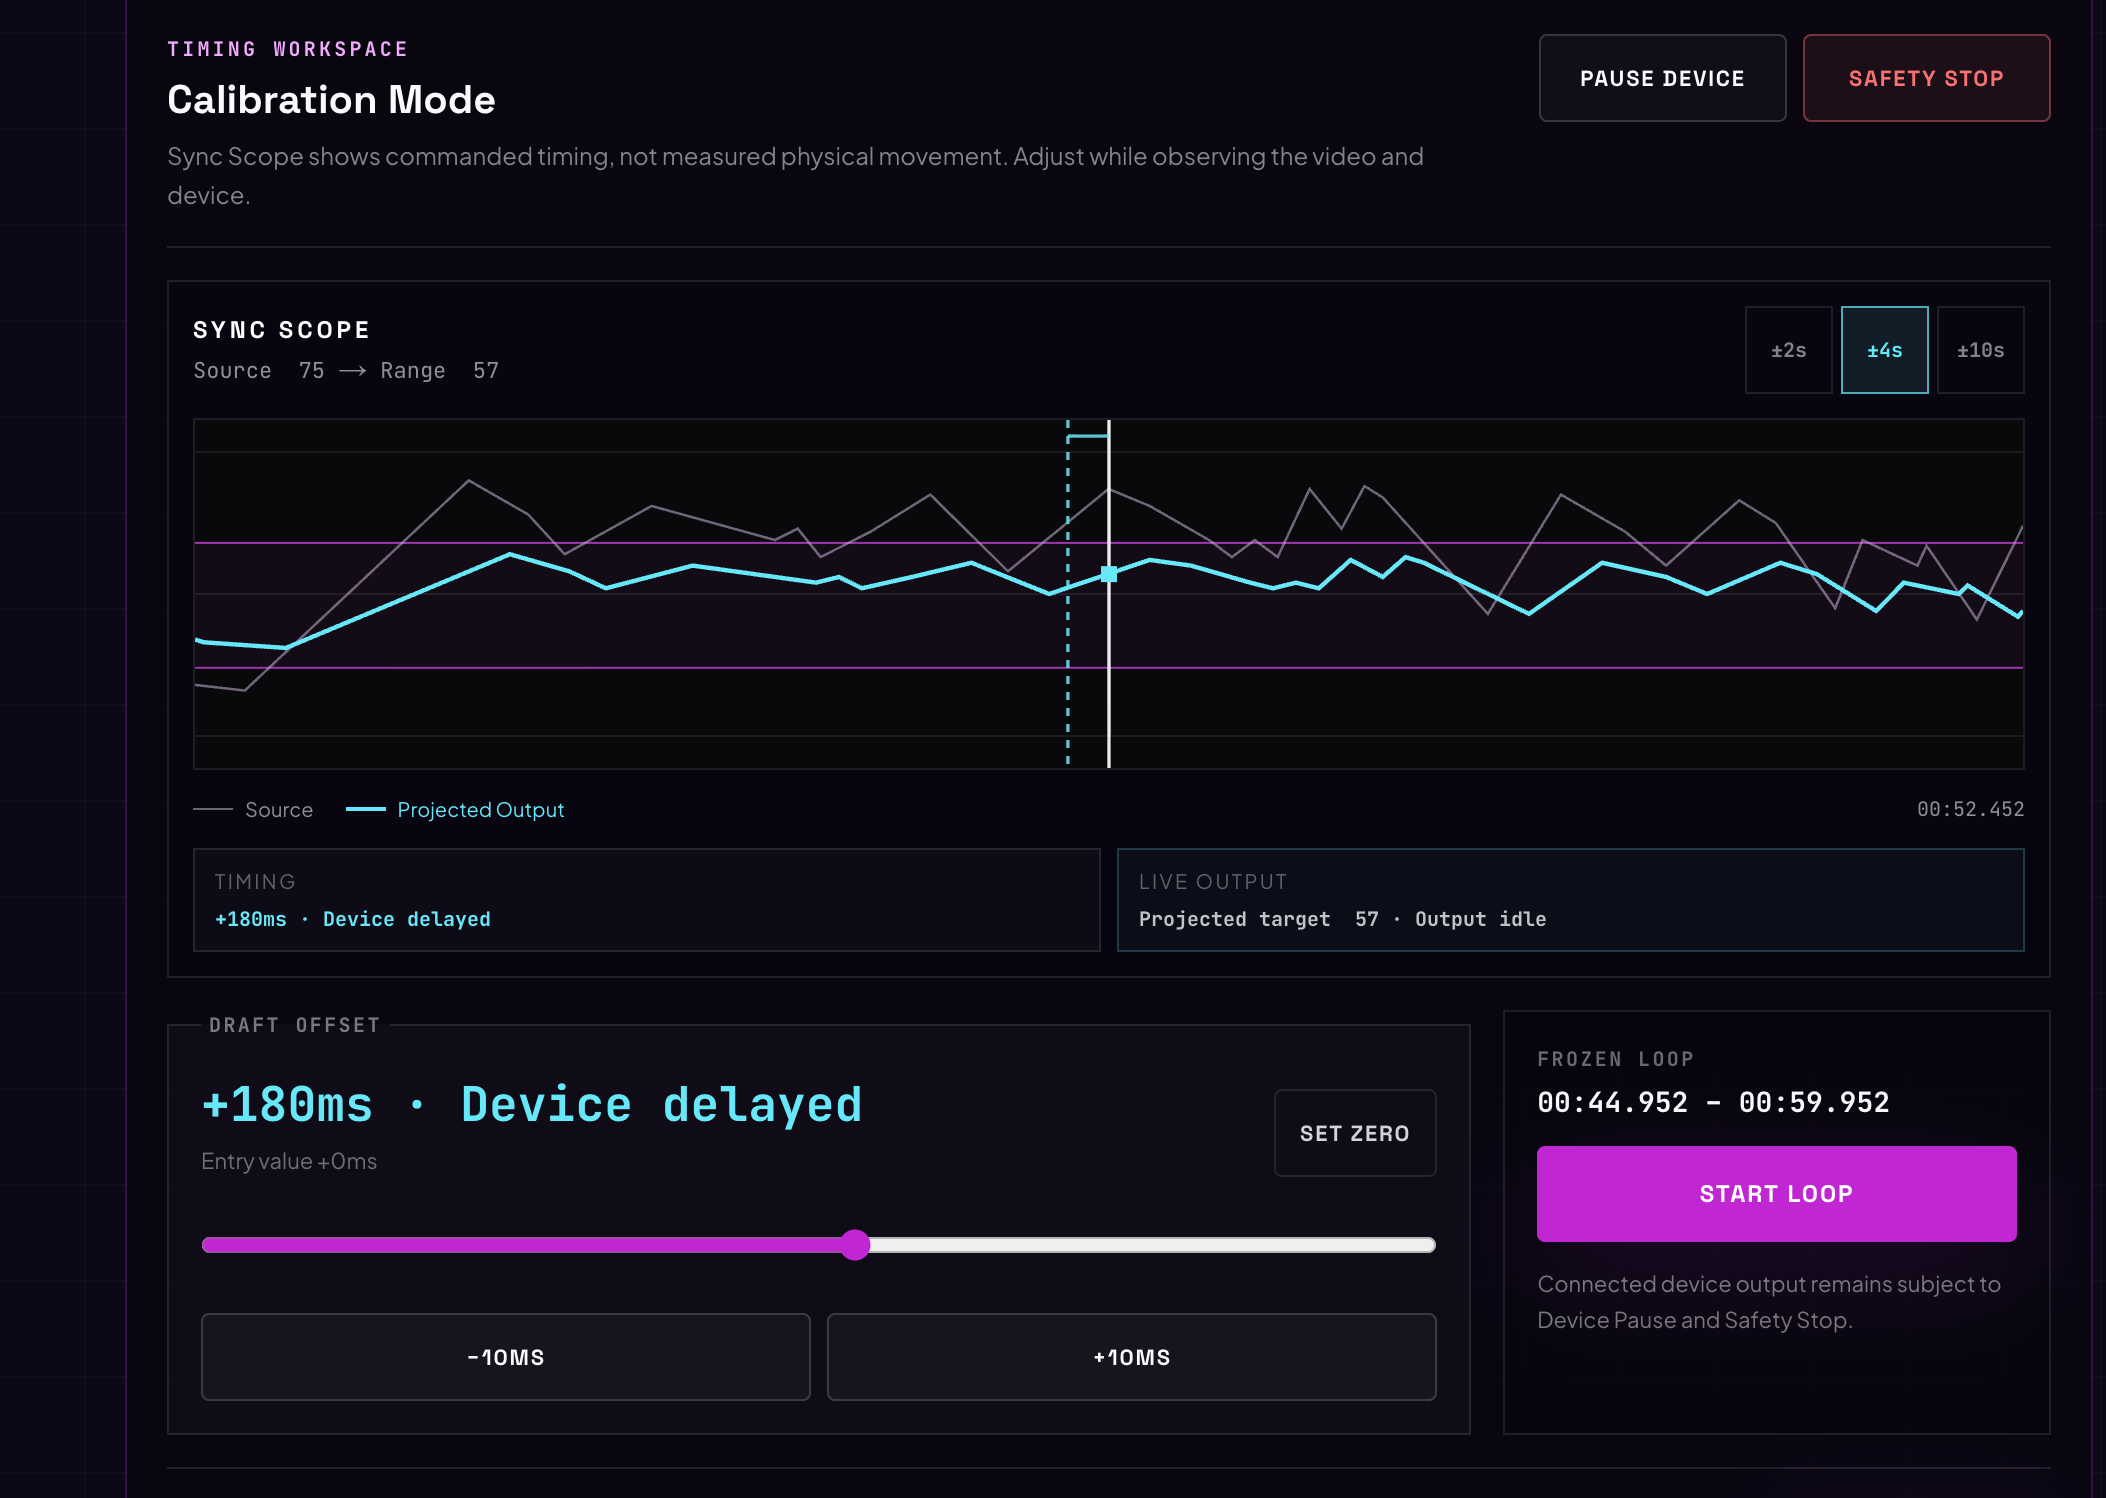
Calibration Mode keeps the Sync Scope, draft offset, frozen loop, Device Pause and Safety Stop in view while you compare the video with the connected device.
Use START LOOP to compare the same passage. When Calibration Mode opens, it freezes a
15-second passage around the current playhead (or the whole video when it is shorter). Select
START LOOP to safely seek to the beginning of that passage and play it repeatedly. At the end,
Player stops device output, returns to the frozen start time and resumes the video, Sync Scope and
connected device together. Repeating exactly the same motion makes small timing differences easier
to feel and compare.
START LOOP seeks to 00:44.952; after the playhead reaches 00:59.952, Player safely restarts the
same frozen passage. STOP LOOP ends the comparison and leaves the passage ready to run again.
While the loop is running, adjust the Draft Offset slider or use −10MS and +10MS; the Sync Scope
and device timing update with the draft value. PAUSE DEVICE and SAFETY STOP still override
physical output. Select STOP LOOP to pause playback and device output before choosing
APPLY TIMING or CANCEL. Without a connected device, the video and Sync Scope can still loop as a
visual preview, but there is no physical output to compare.
| Symptom | Fix |
|---|---|
| Device is late | Negative offset — advance it |
| Device is early | Positive offset — delay it |
The readout says it in words — +120ms · Device delayed — so you never have to remember which way
the sign goes. Adjust in 10 ms steps until you stop noticing the gap.
Drift is a different problem. An offset is a constant shift. If sync is right at the start and wrong five minutes later, that's a clock problem — check connection quality, and prefer wired over Wi-Fi. Recalibrating won't fix it.
4.7 Know when PLAYER stops device output
Worth knowing in advance, because most of it is deliberate:
PAUSE DEVICE · SAFETY STOP · pausing · seeking · hiding the tab · navigating away ·
refreshing · closing the tab · changing the source · a disconnect or error · the end of playback.
Hiding the tab is the one that surprises people. Browsers slow down tabs running in the background, and a slowed-down tab cannot keep millisecond timing. PeakSync stops instead of drifting out of sync. Keep the window visible — side by side or fullscreen both work.
Refreshing may restore the connection, because your saved key can be reused without asking you again. It never resumes output. You always press play again yourself.
If a device keeps moving after SAFETY STOP — rare, and serious — power it off at the device.
Then reconnect and retry.
5. Continue refining the script in SCRIPT STUDIO
Your script is playing, and it traces the video faithfully. What it feels like — the pace, the depth, how smooth it runs — is yours to set.
→ Edit your script — read the timeline, shape the motion to your taste, and set how strongly it plays. Editing costs nothing.
You generated a funscript from a video, watched it play in sync, and connected a device to it.